5.5K
 1.Get the finished measurement of the dress waist on the instruction page 2. For example, if you are making size 36, the waist finished measurement is 69 cm (27″). Divide it by 3,14 to obtain the diameter of your circle skirt pattern.

I love a full gathered skirt. It’s dramatic and so vintage looking as its emphasize the small of the waist and hides the hips, but sometimes, if your fabric is a little bit on the heavy side, you don’t feel like adding too much volume to your waist seam line.
So let’s see how your can draw a circle skirt for an amazing vintage look as well as a sleeker figure.
This pattern is to be cut twice on fold.
DRAW A CIRCLE SKIRT (PATTERN TO CUT TWICE ON FOLD)
 1.Get the finished measurement of the dress waist on the instruction page 2. For example, if you are making size 36, the waist finished measurement is 69 cm (27″). Divide it by 3,14 to obtain the diameter of your circle skirt pattern.
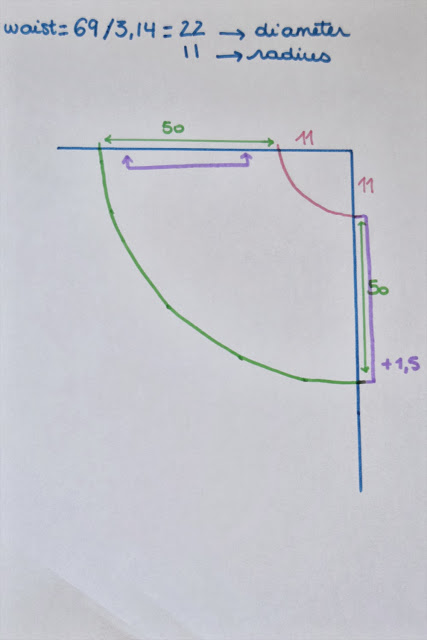
69 / 3,14 = 22 cm (approx.)
Then you need to divide it by 2 to have the radius.
22 / 2 = 11 cm
2.Start your pattern drawing a line the desired length of your skirt (for me 50 cm/20″ is a great length) and of your radius. For me, that would be a total of 61 cm (24″).
3.Draw a perpendicular line with the same length. Draw the waistline connecting the radius points in a nice and even curve. Do the same for the hem line.
4.Add the following seam allowances: 1,5 cm (5/8″) at 1 side seam and the waistline (not on the drawing, sorry) and the desired length at the hem. Draw a “cut on fold” bracket on the other side seam and you’re done.
ADD A LINING
1.This one is very easy! If your fabric is see-through or too light, you might want to line it. Take your skirt pattern and cut the 2 pieces in your lining fabric. Stitch the side seams together leaving the zipper opening unstitched and gather the waistline.
2.Attach the lining to your finished skirt before sewing it to the bodice. Treat the skirt and lining as one when attaching it to the bodice and setting the zipper in.
3.Hem the lining slightly higher than the skirt.

8 comments
Gracias por aclarar la fórmula de la cintura, para mi era una incógnita!!
La utilicé para hacer mi falda plisada y fui un poco a ciegas con las instrucciones de Burda, que ya te la dan hecha.
Aquí puedes verla: http://modaenlacostura.blogspot.com.es/2013/05/maxi-falda-de-plisado-soleil.html
Me encantan las falda con plisado soleil pero no me atrevo… La tuya super bonita!
Gracias Pauline, esta es la mía. Besos
¡Que guay Mary Carmen que haces una falda círculo! Tengo muchas ganas de ver tu vestido…
Pauline estoy sacando el patrón y secme presenta una duda: qué medidas debo de tener en cuenta, las que pones primero o las de la prenda acabada?. Entiendo que la segunda???
Hola Mary Carmen, tienes que tener en cuenta las medidas de la prenda acabada.
Otra pregunta: el esquema de falda que propones es una de 360 grados, me gustaría con menos vuelos, por ejemplo de 180 grados ¿qué te parece¿ crees que puede quedar bien?? O lo ves mejor con mas godets. Muchas gracias
He propuesto la versión con el círcul entero pero por supesto puedes elegir otra forma. Medio círculo (180º) me parece muy bien. Un besito.
Comments are closed.