Home Tags Posts tagged with "Fall/Winter"
Tag:

Fall/Winter

The Fall/Winter collection of Named Patterns came out … well last fall as it’s name indicate. And I remember liking every single pattern. But as I knew ordering more than one was stupid as I would never have time to make them, I just ordered my favourite: the Isla Trench coat. And I’m just about to show it now, 6 months later 😉

Isla-trench-coat-named-patterns-1

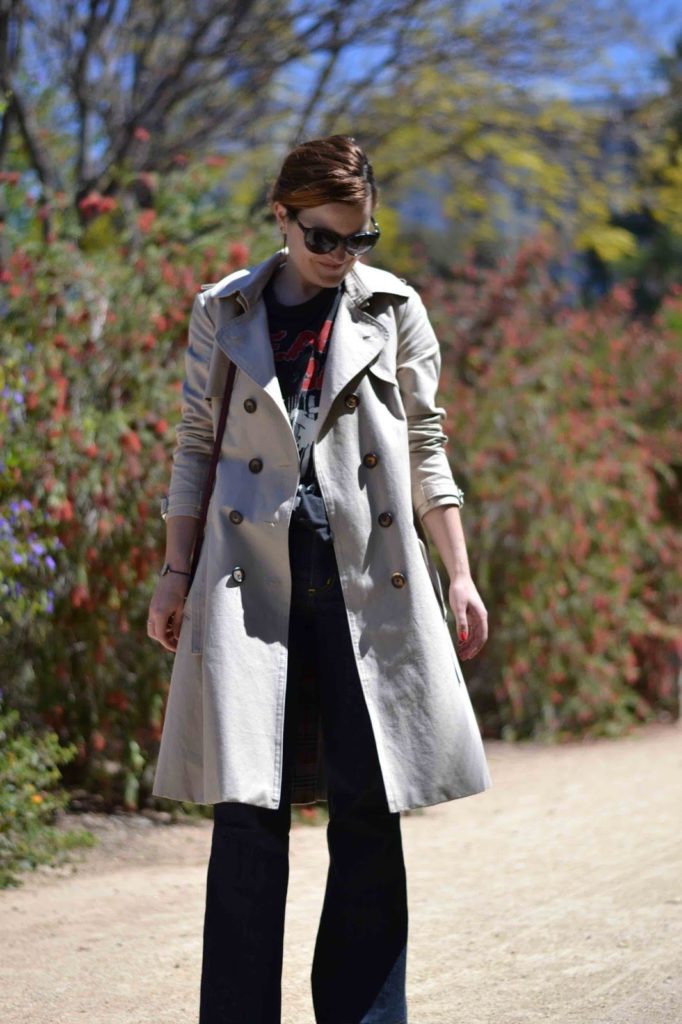
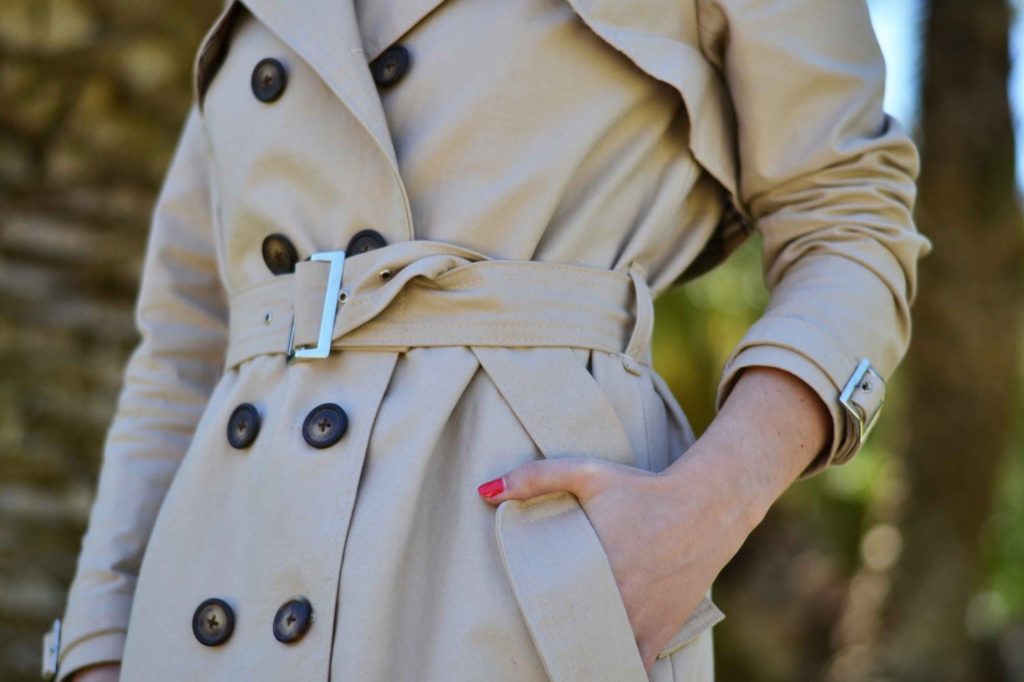
I wanted to make a very traditionnal trench coat (traditionnal in the sense of copying a Burberry one!) so I studied every Burberry trench coat pictures I could find on Pinterest (i even created a special board, check it for details). I went fabric shopping for some beige gabardine and tartan checked lining, which was more difficult than I thought first. In the end, my gabardine is slightly lighter in colour than desired but it’s ok. I found all the fabrics and material (buttons and belt loops) at my local fabric shop. I will admit that it was quite an expensive coat to make: the printed pattern was 22 € (+ 8€ shipping fees so 30 € in total), 3 meters of gabardine at 20€/m, 2 meters of 15€/m lining and about 15€ for the buttons/belt loops, I mean it’s almost a 100€ trench coat. But knowing a real Burberry one retails at least at 1500€, I feel better.

Isla-trench-coat-named-patterns-2

Isla-trench-coat-named-patterns-3

Isla-trench-coat-named-patterns-4

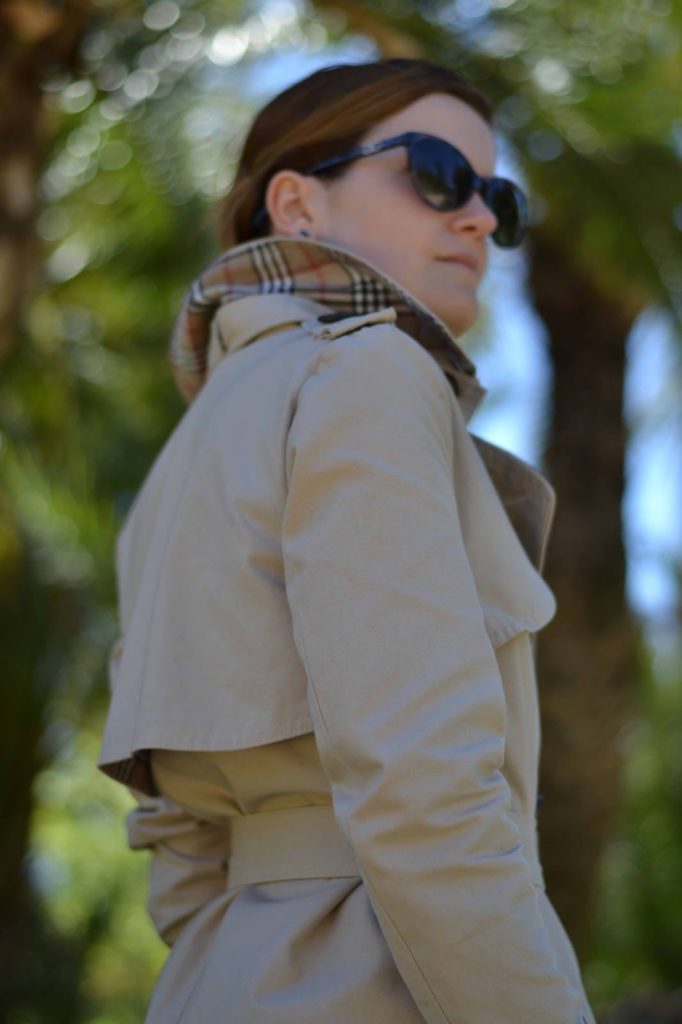
The gabardine is very nice, a bit on the heavy side so some areas were quite difficult to sew due to the various layers. I didn’t add any interfacing because of the gabardine’s weight. And the lining is a Burberry-like tartan in flannel, which makes it a perfect winter coat for the mild mediterranean weather of Valencia (sleeves are lined in rayon).

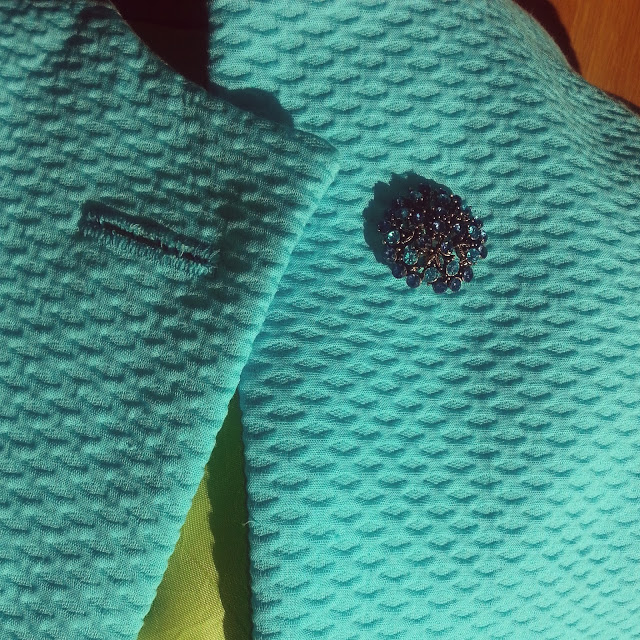
As for the supplies, I chose to change some of the features to get a more Burberry-lookalike coat. I’ve used some metal belt loops and eyelets for the sleeve straps and the belt. I wanted to do the same for the collar stand but instead just shortened it. I also added some epaulettes and made the under collar out of checked lining.

Isla-trench-coat-named-patterns-5For the pattern itself, I made some changes mostly due to my petite size: I had to shorten the body about 30 cm and the sleeves by about 10 cm (fyi I’m 1m55 tall , 5ft1). The instructions were very complete but I wouldn’t recommand this pattern for a beginner (which Named patterns doesn’t either, the pattern is marked 5/5 and challenging). There are a lot of pieces and the construction has to be very detailed and meticulous. But the results are very professional looking. The only complaint I have is just some personal preference: I like to cut my pattern directly in the paper but I could n’t do it as the numerous pieces are layered on top of each other so I had to trace them first.

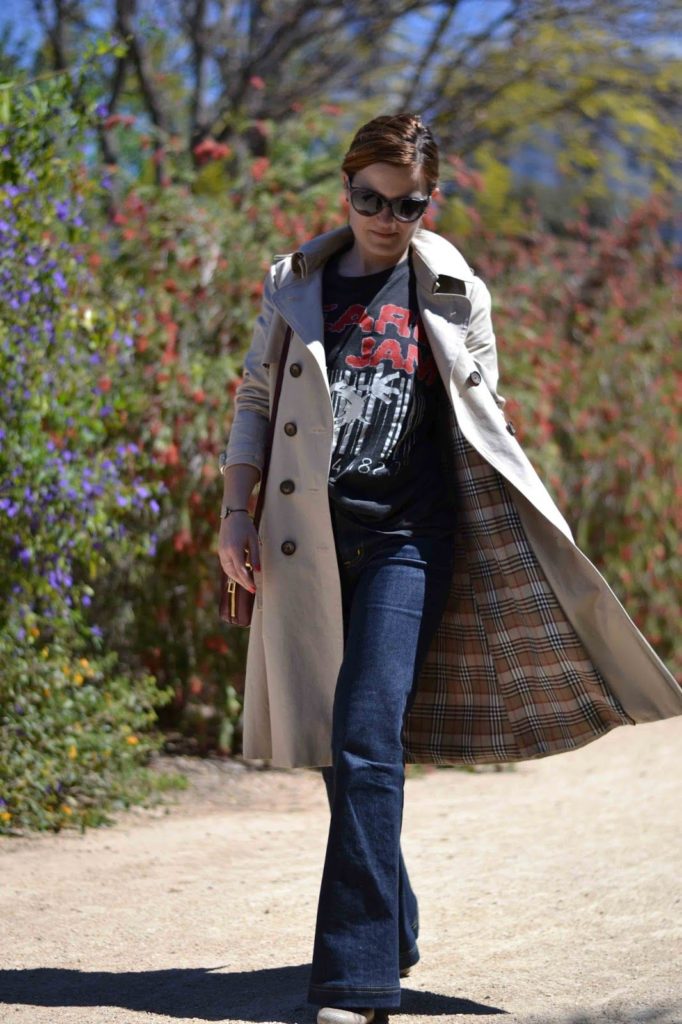
I’m still not sure I attached the lining at the back vent correctly but it looks ok. It was the fist time I had to line a back vent, I even left the trench unfinished for about 4 months before going back to finish the lining. I finally figured it out and that’s why I’m showing it only now (started in november and finished in march, that’s my longest project!)

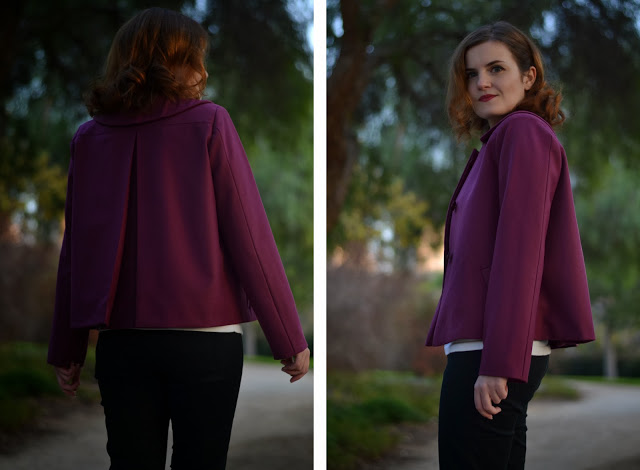
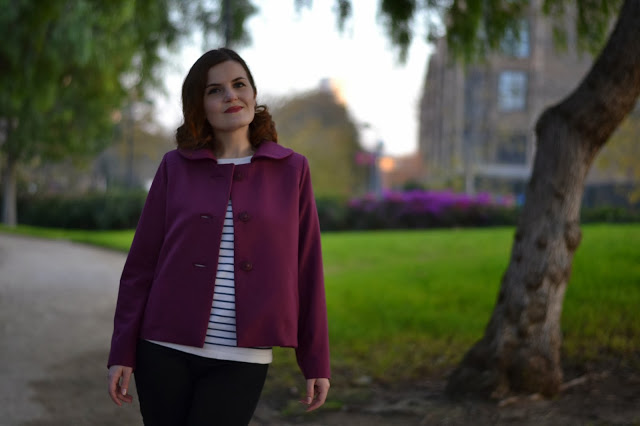
For the rest, everything fits together nicely, the construction order is great and the fit is good.

Isla-trench-coat-named-patterns-6

I’ve been wearing the Isla trench coat for about a month now and I really like it. My favourite thing about it? When the wind blows and the pretty tartan lining peeps out!

Isla-trench-coat-named-patterns-7

25 comments
6 FacebookTwitterPinterestEmail
Sewaholic patterns have been favourites of mine since I started sewing. Even if I didn’t have enough time to make some of the newest patterns, when the active wear collection came out, I knew I was going to order them. And from the 4 patterns I purchased (the leggings, the sweater, the bra/top and the cape), I knew instantly the cape was going to be on the sewing machine as soon as I received it.
So here you go, the Cypress cape by Sewaholic!

1a

The Vancouver collection is all about active wear, nylon and waterproof fabrics, but I saw this cape with a preppy style.
The fabric I used is a grey boiled wool, it has a nice drape and is not too heavy for the pattern. Of course it doesn’t drape as nicely as the nylon version used by Tasia to illustrate the pattern but the wool has enough drape and body to accentuate lightly the triangle shape of the cape.

3a4a

Here are the few changes I made to the original pattern because of my fabric choice: for the back piece, I eliminated the folds (I just folded them on the paper and redraw the back piece), I didn’t add piping and used toggle buttons instead of velcro closure (but kept the front zipper). I also added some faux-fur to the hood, inserting it in the seam allowances between the hood and its facing.
Other than that, I followed the instructions.

6a

The Cypress cape is very easy to make, no lining needed (and with the boiled wool not fraying, I didn’t even have to bind all of the seam allowances), it’s a stylish and easy to wear cape. Because I love capes but it’s difficult to find one that stays put and doesn’t prevent any quite of movement… I wore it all week-end for a trip and then for a bike ride and it’s great! The wide “sleeves” allow for a lot of movement, yet the cape stays close to the body for extra warmth.Now I have to go back to my computer (Christmas surprise for you!!!) and to my sewing machine (Christmas outfit for me and lots of handmade gifts!)…
Best,

signature1_editado-1

25 comments
3 FacebookTwitterPinterestEmail

Maxi Eliana

by Pauline Alice
maxi-eliana-sewing-pattern-1I wanted to show you this dress since I made it for the CSF fair in Paris last month. I teamed up with Henry Henriette, a pretty fabric and notions store in Nantes (they also sell online: here) as we shared our booth and we were all wearing Pauline Alice x Henry Henriette outfits.
maxi-eliana-sewing-pattern-2maxi-eliana-sewing-pattern-3
I made this Eliana dress in a soft rayon fabric, perfect for fall. The fabric drapes so nicely, I love walking in this dress as the skirt moves so beautifully.
To make this variation of the Eliana dress pattern, you just need to lengthen the skirt pieces. For mine, I added 50 cm to the skirt hem and widened the skirt to use the whole fabric width. In order to keep the fabric length recommended, I cut the skirt back piece in two instead of on the fold and planned quite ingeniously the layout. But I’m happy to report that I was able to make the maxi length version in the original yardage (ok, I’m quite short so it might have helped). Here is the layout I used:

maxi-eliana-sewing-pattern-4
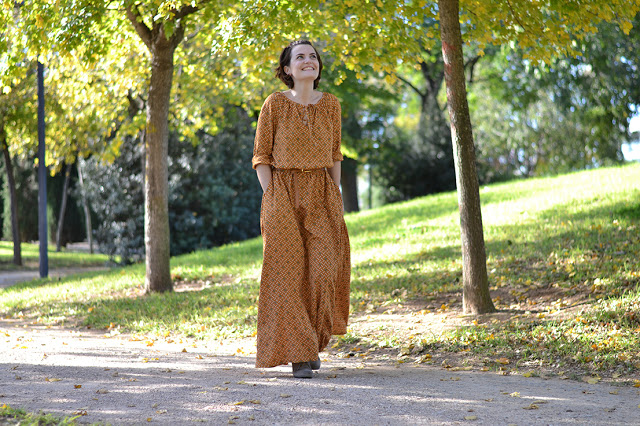
For the rest, I followed the instructions: bias binding for the neckline, elastic for the waist, pockets. I love the bohemian vibe of this maxi Eliana.

maxi-eliana-sewing-pattern-5Have a great week end,

pauline-sewing-pattern

19 comments
2 FacebookTwitterPinterestEmail
Today, I want to show you a new variation for the Quart coat pattern. I don’t know about you, but I like to use the same patterns multiple times. If you want to make a motocycle style jacket like this Iro number, here is the tutorial.
quart-coat-pattern-variation-transform-into-zipped-biker-jacket-1
What I’ve been dreaming of: Kristen jacket by Iro.

You’ll need a 50 cm (20″) separable metallic zipper, a ruler, a pencil and your Quart pattern pieces.Take your main pattern pieces: front, back and side. You’ll need to decide the length of the jacket, for mine I drew the cutting line about 10 cm (4″) below the waistline mark, seam allowances included. Do the same for the lining and the front facing. Draw new pocket marks, approx. centered around the waistline.

quart-coat-pattern-variation-transform-into-zipped-biker-jacket-2
Stitch the collar to the jacket and baste one side of the zipper to the front piece and collar, with the teeth at 1,7 cm (3/4″) from the edge. Follow the instructions and at step 37, sticth the whole facing to the jacket with right sides together, enclosing the zipper in the seam.
quart-coat-pattern-variation-transform-into-zipped-biker-jacket-3

The other ziper side is simply stitch directly on the front piece and collar. In order to know where to place it, overlap the front pieces matching the grainline and mark where the zipper should meet (in red in the illustration). Baste the zipper to the front and collar and stitch with a zipper foot.

quart-coat-pattern-variation-transform-into-zipped-biker-jacket-4quart-coat-pattern-variation-transform-into-zipped-biker-jacket-5
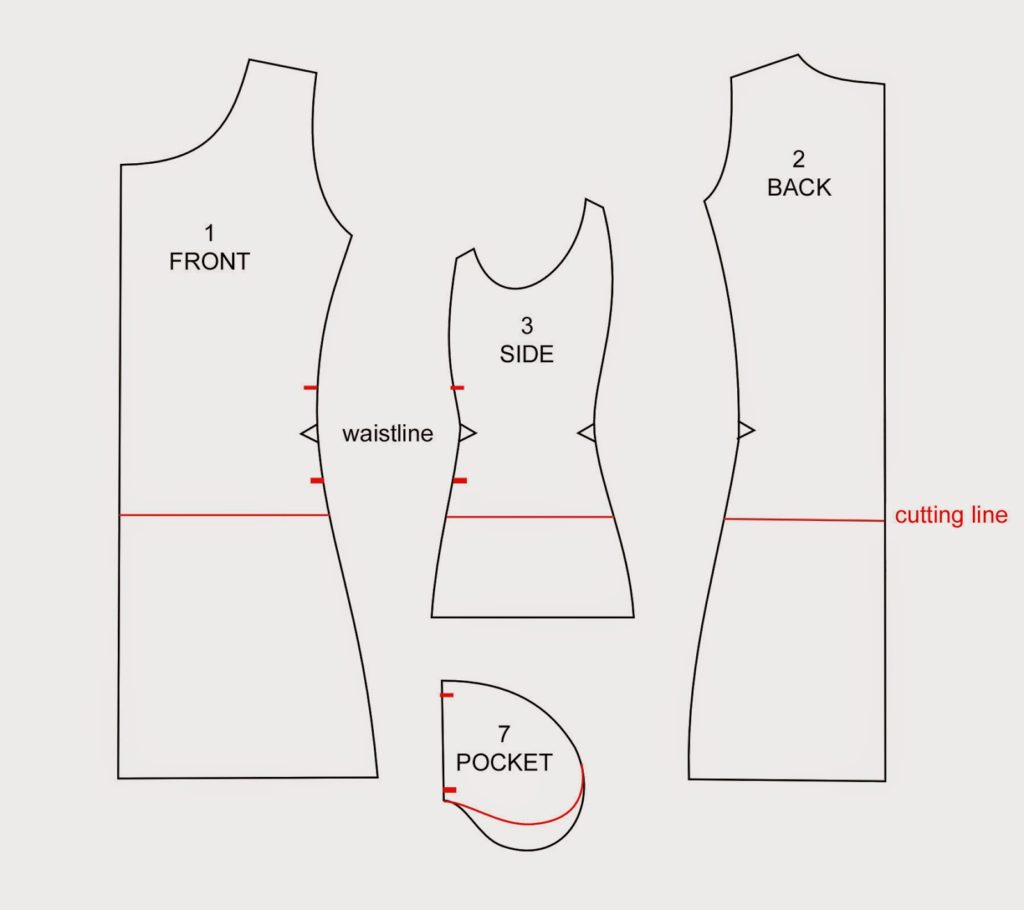
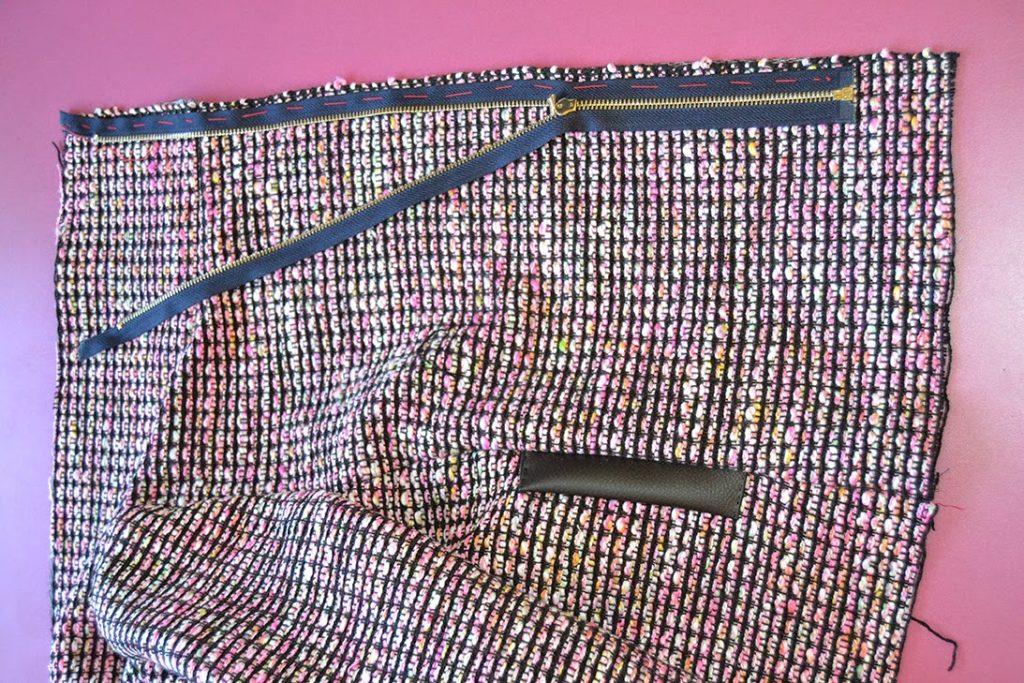
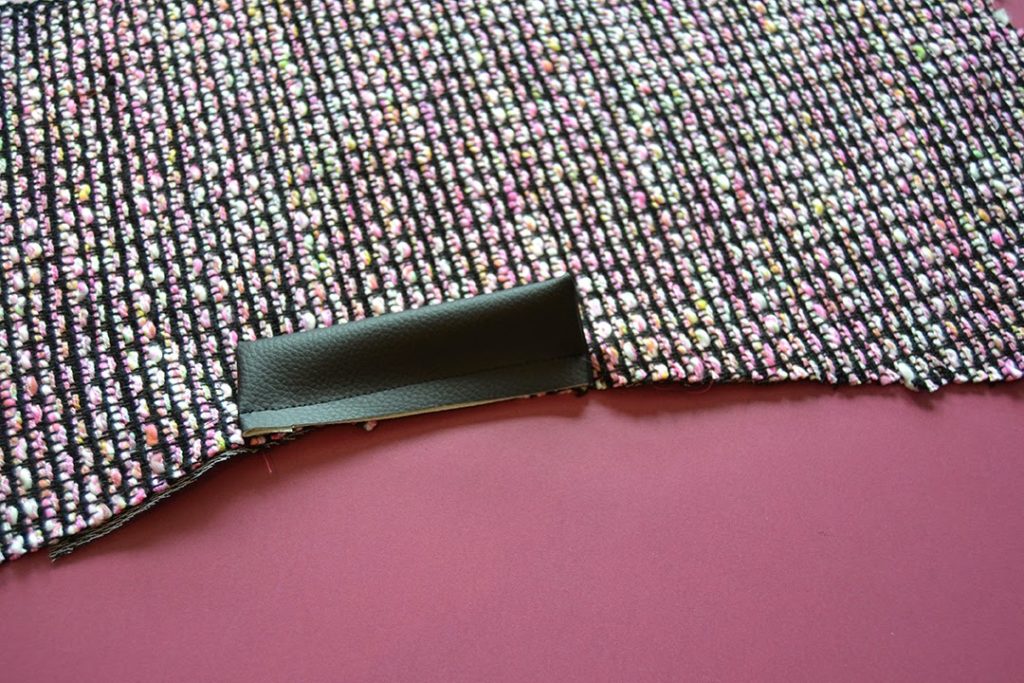
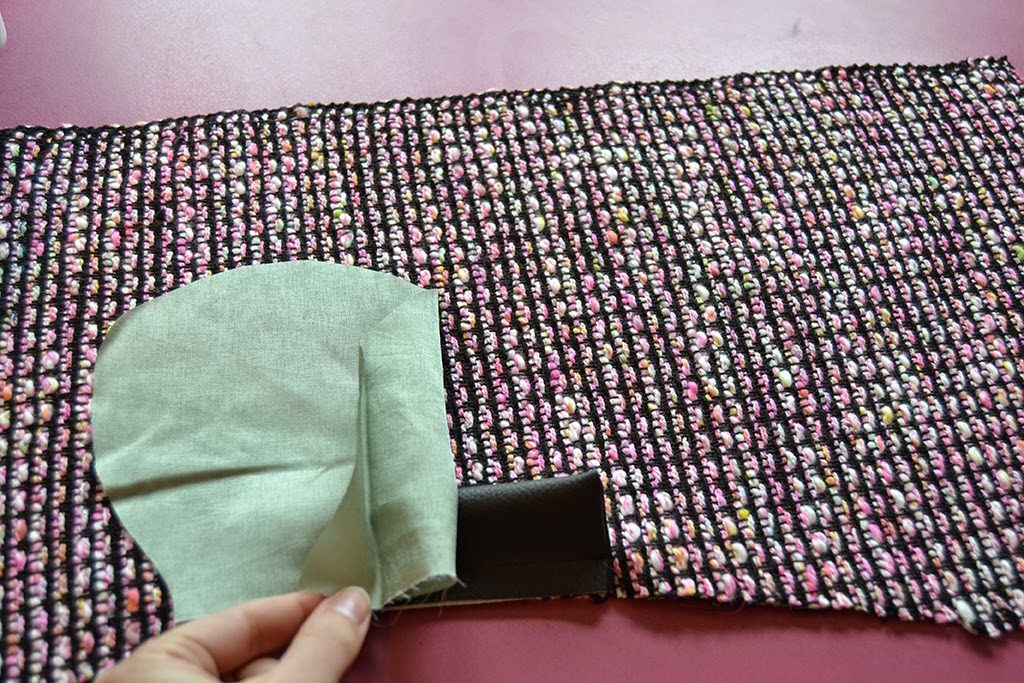
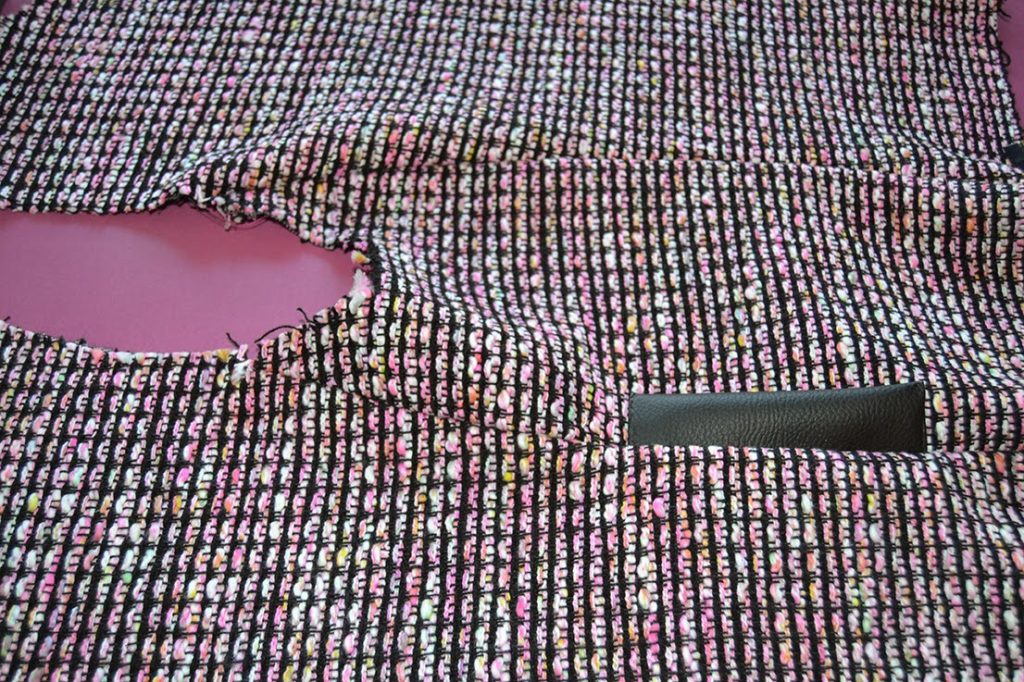
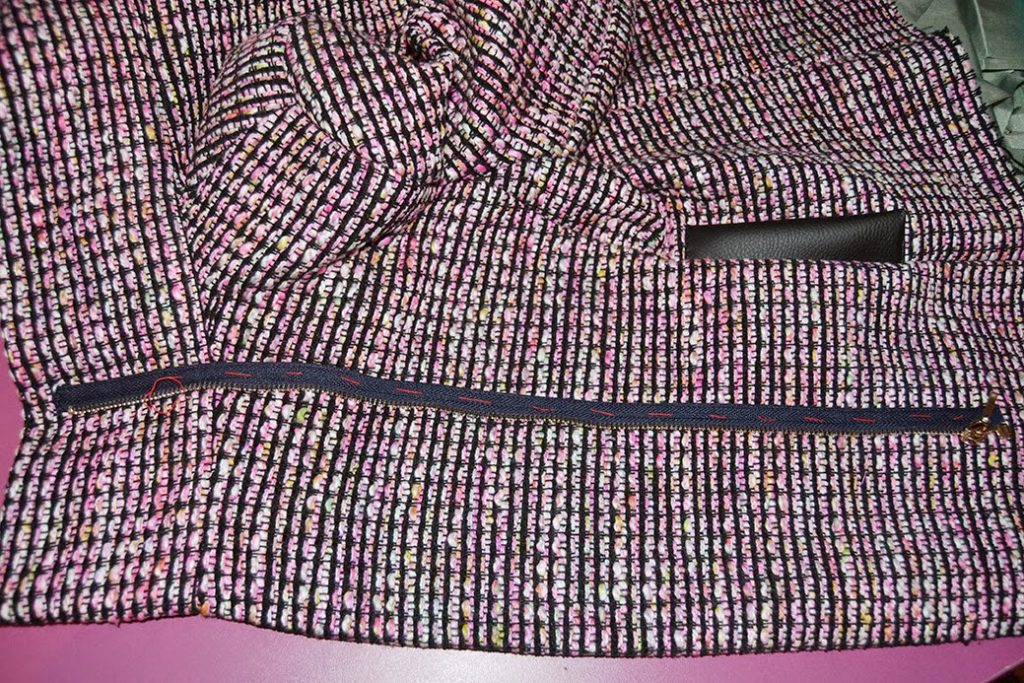
To add a leather welt to the pockets, cut 2 pieces of leather of 10 x 16 cm (4″ x 6 1/4″) and fold them vertically. Stitch the extremities together and turn inside out. Place the welt between the pocket marks on the front piece and stitch at 1 cm (3/8″) from the edge. Redraw a new pocket (see the illustration above) and place hem over the welt and the pocket marks on the side piece. Stitch the pockets according to the instructions. Stitch the welt side to the side piece.
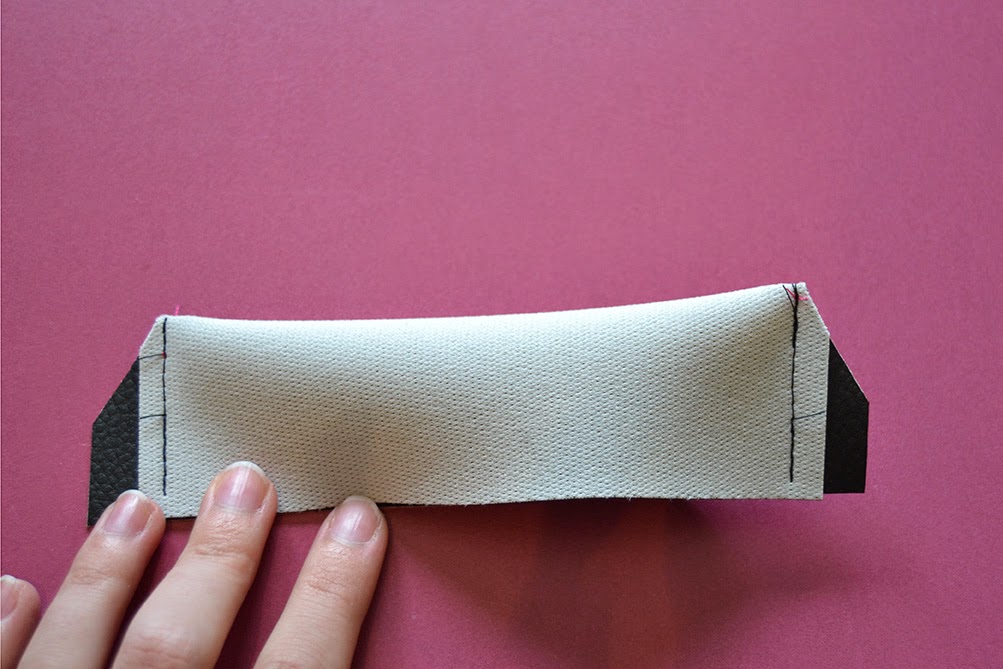
 

quart-coat-pattern-variation-transform-into-zipped-biker-jacket-6quart-coat-pattern-variation-transform-into-zipped-biker-jacket-7quart-coat-pattern-variation-transform-into-zipped-biker-jacket-8quart-coat-pattern-variation-transform-into-zipped-biker-jacket-9
I’ll show you the finished jacket very soon (I’ll take advantage of a trip to Paris for a fair to take the pictures). By the way, printed patterns orders made between February 14th and 19th will be shipped on Friday 20th, thanks for your understanding.

signature1_editado-1


20 comments
3 FacebookTwitterPinterestEmail
My first knitted garment ever! I’m so proud I want to make all sorts of knits now…


gilet-leon-my-first-knit-ewing-pattern-1This is the “gilet Léon” by Une Poule à petits pas, an oversize and loose cardigan. This is exactly the kind of garment I wanted: something easy to make but with just the right amount of new techniques (to me) so I can learn and progress.


gilet-leon-my-first-knit-ewing-pattern-2gilet-leon-my-first-knit-ewing-pattern-3
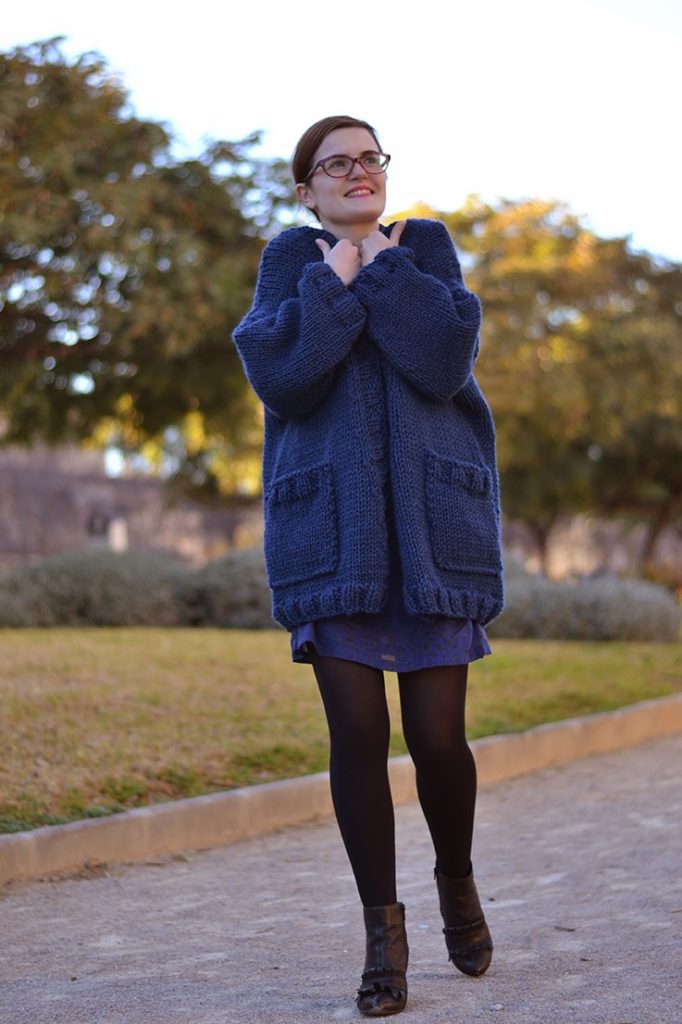
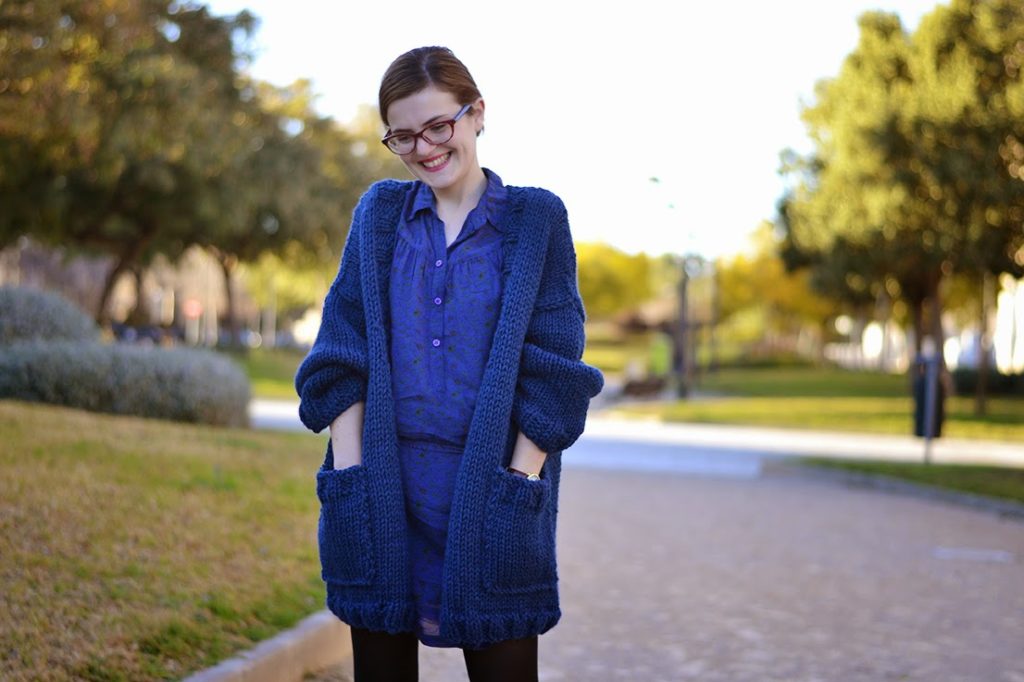
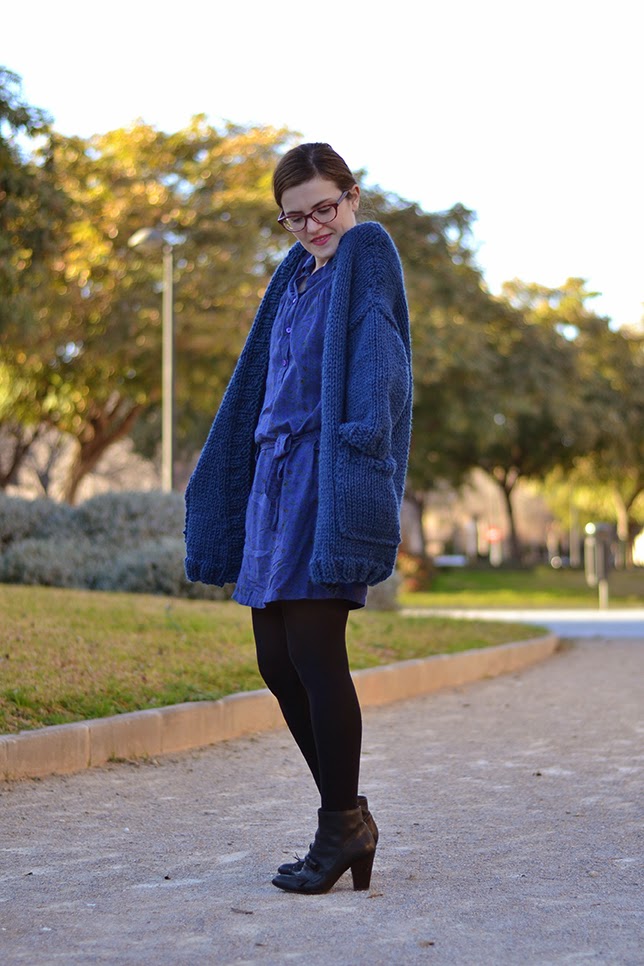
I made size S, it’s a little bit too big on me as I had to use two threads of 5 mm wool instead of the 8 mm recommended. As I didn’t have exactly the same test square, it’s wider than it should be. Next time, I’ll be sure to check the wool’s needle size more carefully when buying.
gilet-leon-my-first-knit-ewing-pattern-4
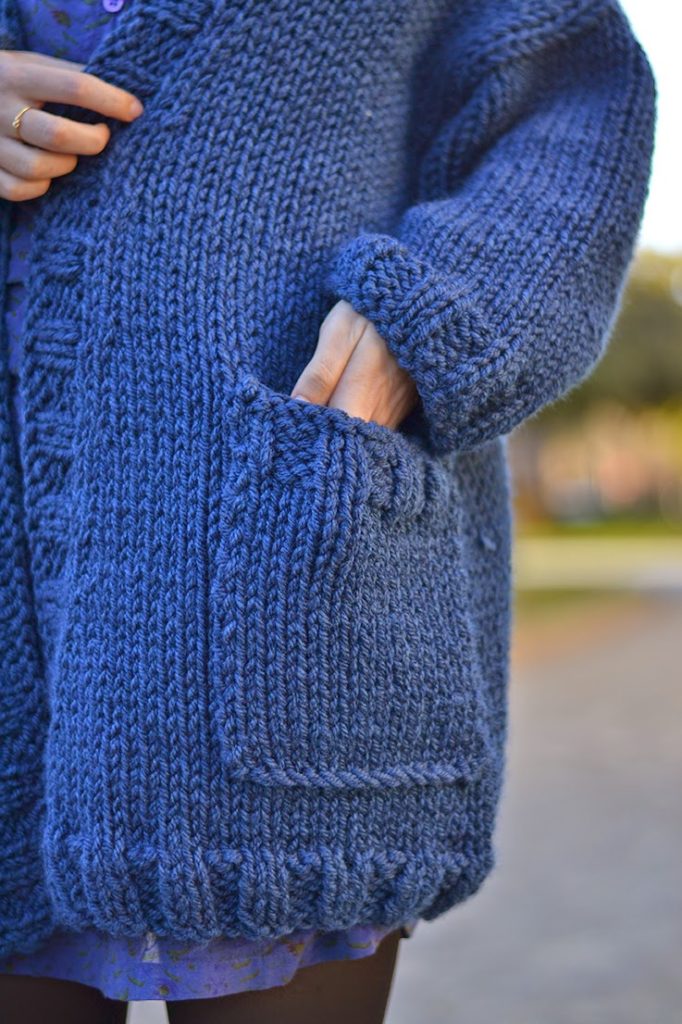
But it’s cozy, the colour is really beautiful and the knitting is very nice. I’m already planning my next project: Il Grande Favorito sweater!

signature1_editado-1

44 comments
1 FacebookTwitterPinterestEmail

Happy New Year 2015! I wish the best for this new year: happiness, health and lots of sewing of course!I’m finishing preparing the Quart coat tutorial which should be ready for next week, but in the meantime, let me show you my last make of 2014. This is what I wore on Christmas eve and it was so comfortable that I ended up wearing it again the following week end.

neoprene-two-piece-set-sewing-pattern-1neoprene-two-piece-set-sewing-pattern-2I made the Alameda skirt and the Aime comme moelleux top from Aime comme Marie in neoprene fabric! This fabric is amazing: I want to make so many neoprene things now.
This beautiful fabric comes from Supercut, an italian online fabric shop run by the sweet Marine. The plaid neoprene is fused with jersey which makes it soft and warm (oups, it’s out of stock now, but if you ask Marine, I’m sure she’ll let you know if she’ll receive more).
neoprene-two-piece-set-sewing-pattern-3
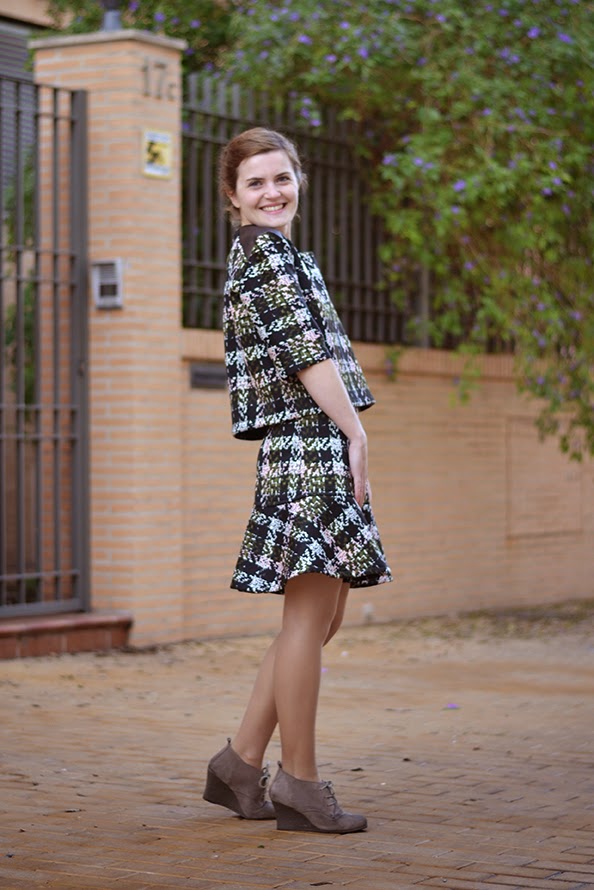
I wanted to make the
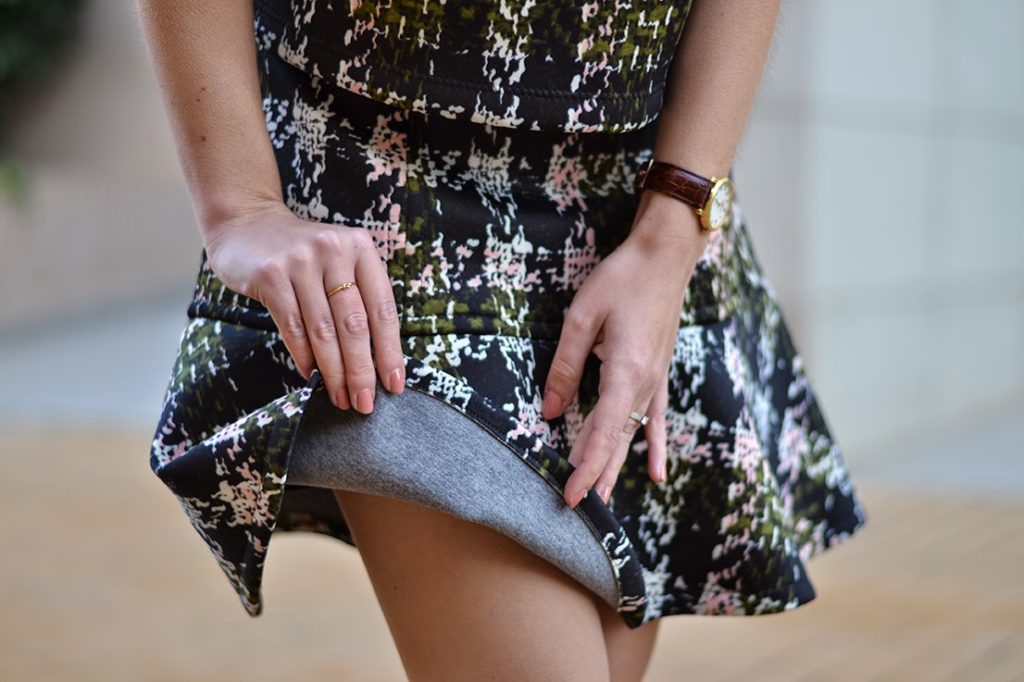
 Alameda skirt with this fabric as I knew the flounce would hold its shape and look very… well flouncy. And it does, every time I move, the skirt hem dances.
I made it a size smaller to allow for the fabric stretch and used a stretch needle.
My favourite thing about neoprene is that it’s perfect if you don’t have a serger and very little time to finish nicely your seam allowances. To keep mine from being too bulky, I just edgestitched them. For the skirt hem, I just turned it in and edgestitched. I’m in love with neoprene, it’s so easy to sew and cozy!
As for pressing, I wasn’t sure about the right side of fabric so I just pressed lightly on the jersey side (and because it doesn’t crease, it’s great for packing in your suitcase).
neoprene-two-piece-set-sewing-pattern-4I chose to make the Aime comme moelleux top with what I had left of the fabric. In total I had 2 m of fabric and was able to make these two pieces. The top is very easy to make, I shortened it considerably and didn’t make the cuffs. And as contrasting fabric for the shoulder yokes, I used leather.
I love the contrast between the short and boxy top and the fitted skirt with its flounce.
neoprene-two-piece-set-sewing-pattern-5
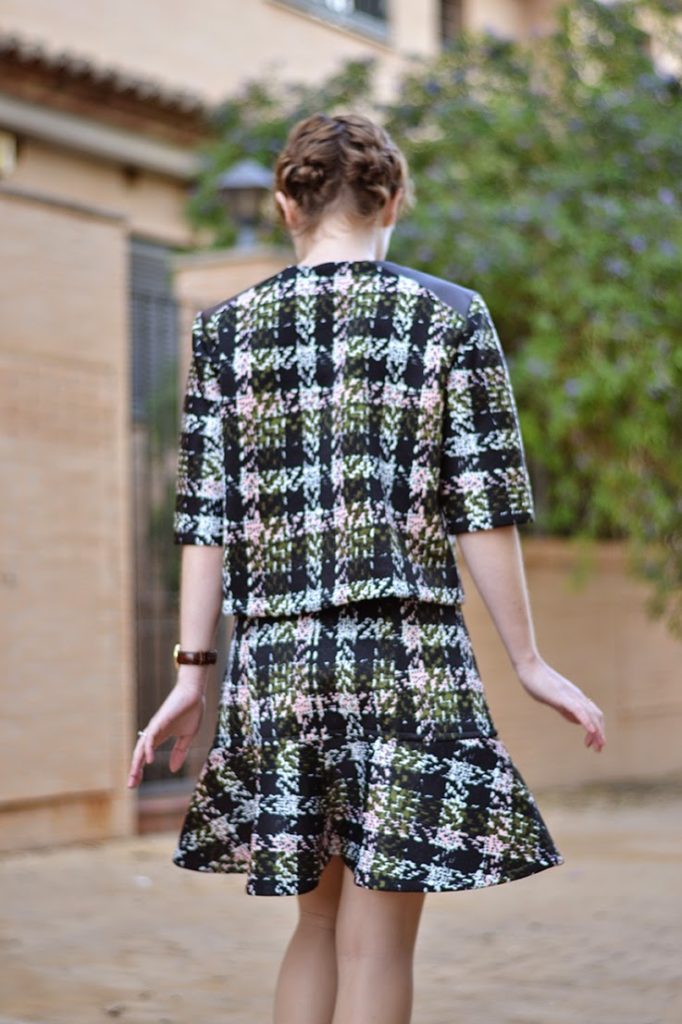
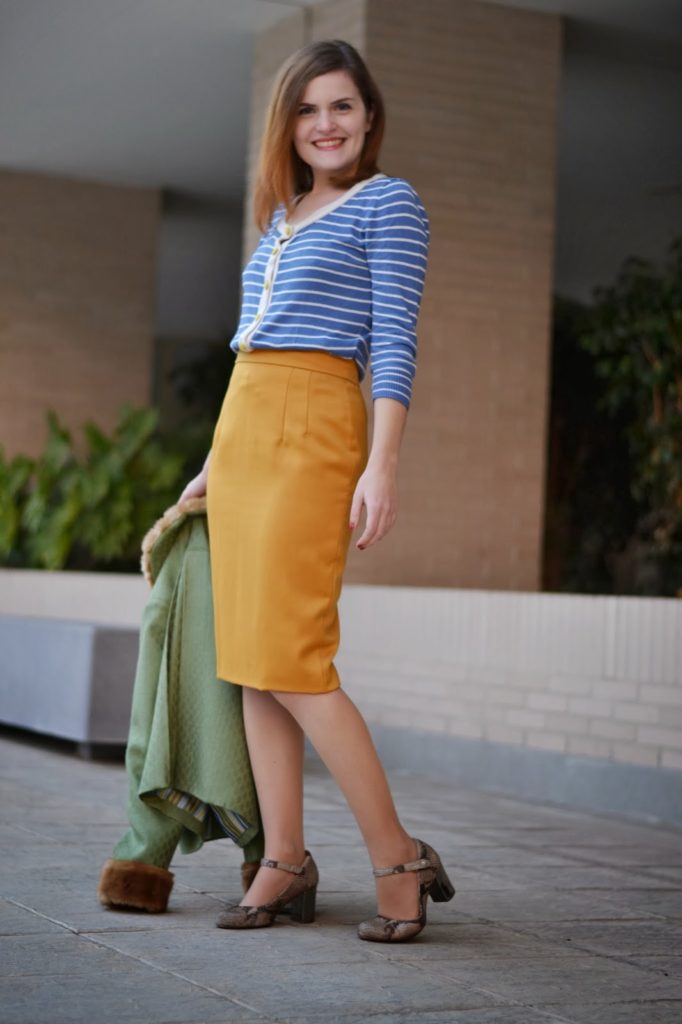
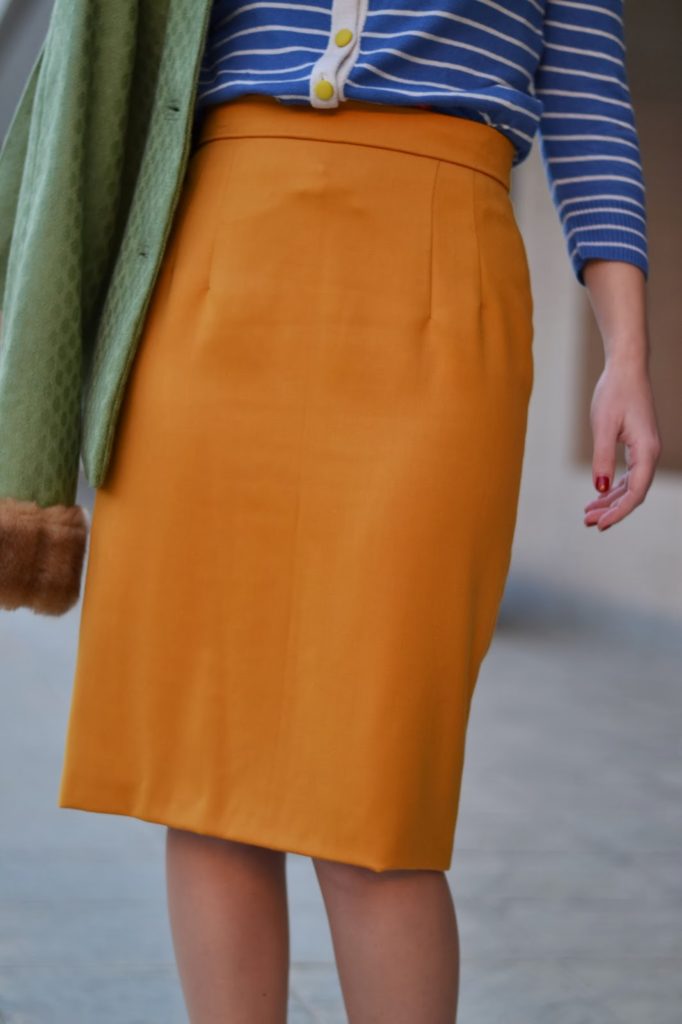
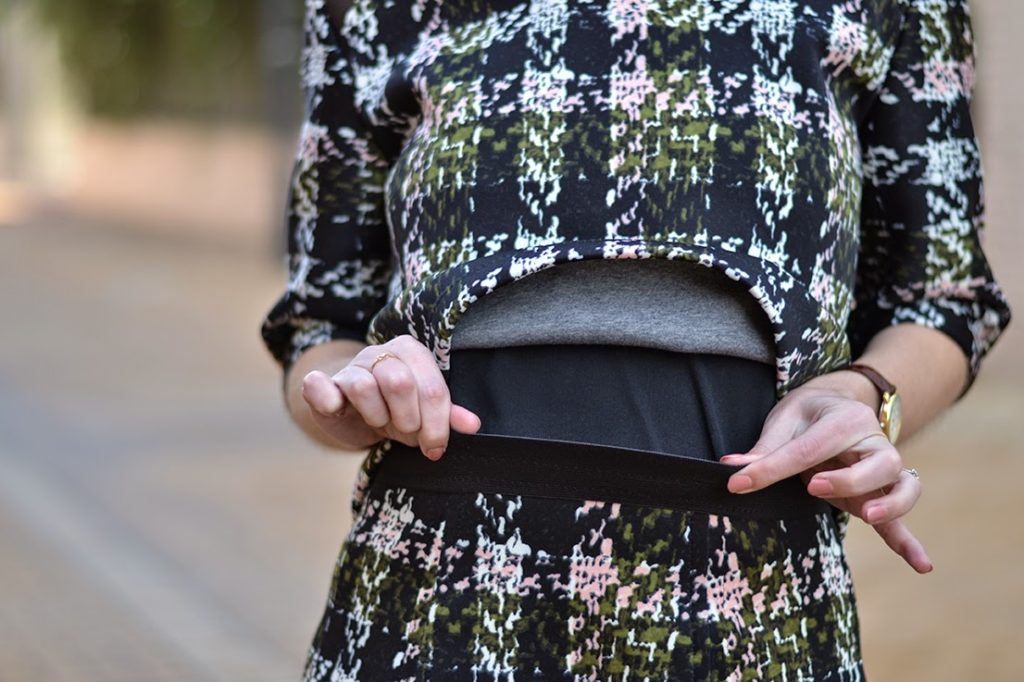
Best part: I made an elastic waistband for the skirt. As the fabric has a little bit of stretch, I didn’t add the back zipper and I’m able to pull it on without any problem. As the Christmas dinner was huge, I was thankful for my elastic waistband, so comfy!I love wearing the two pieces together, and I think they’ll also get useful for pairing with simple items (top and jeans or skirt and jersey).
What about you? Did you succomb to the two-pieces trend? Or the neoprene one?

signature1_editado-1

29 comments
0 FacebookTwitterPinterestEmail
Thanks do much for your lovely comments about the new pattern, the Quart coat! I can’t wait to see your versions…
But for today, let’s see the Quart coats of some amazing testers. Ladies and gentlemen, please welcome:
quart-coat-testers-version-sewing-pattern-1quart-coat-testers-version-sewing-pattern-2
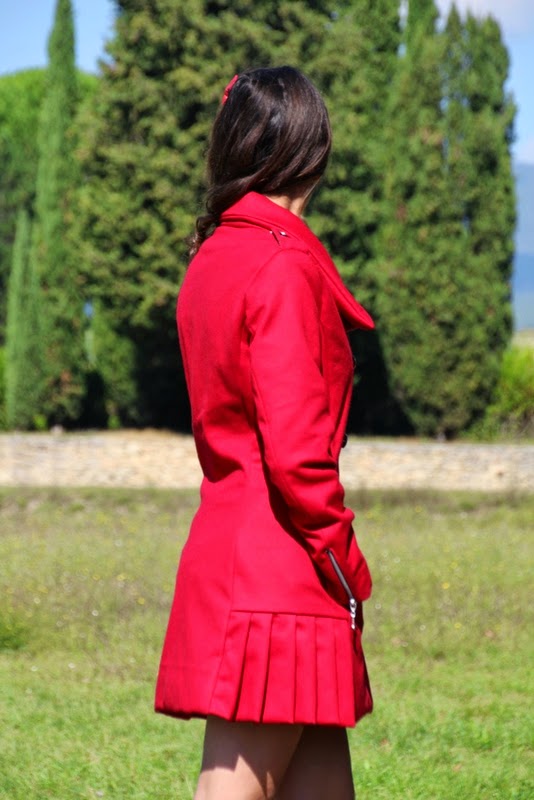
Sandra’s beautiful red Quart looks very festive! This is such a great way to brighten a grey Winter.
Read about it (in French) on her blog.
quart-coat-testers-version-sewing-pattern-3quart-coat-testers-version-sewing-pattern-4quart-coat-testers-version-sewing-pattern-5
I absolutely love Manju’s style and her sewing realisations are always so well executed. I am so happy to have her as a tester. Look at that beautiful tweed Quart coat and her bright lining! See more details at SewManju!


quart-coat-testers-version-sewing-pattern-6quart-coat-testers-version-sewing-pattern-7quart-coat-testers-version-sewing-pattern-8
Once again, Annie’s pictures are divine, I should definitely ask her to model the patterns for me ;-). Such an amazing classic style and gorgeous coat. Read about her Quart coat (again in French) at her blog.
Have a wonderful end of the week!


signature1_editado-1

19 comments
0 FacebookTwitterPinterestEmail
new-pattern-quart-coat-sewing-1
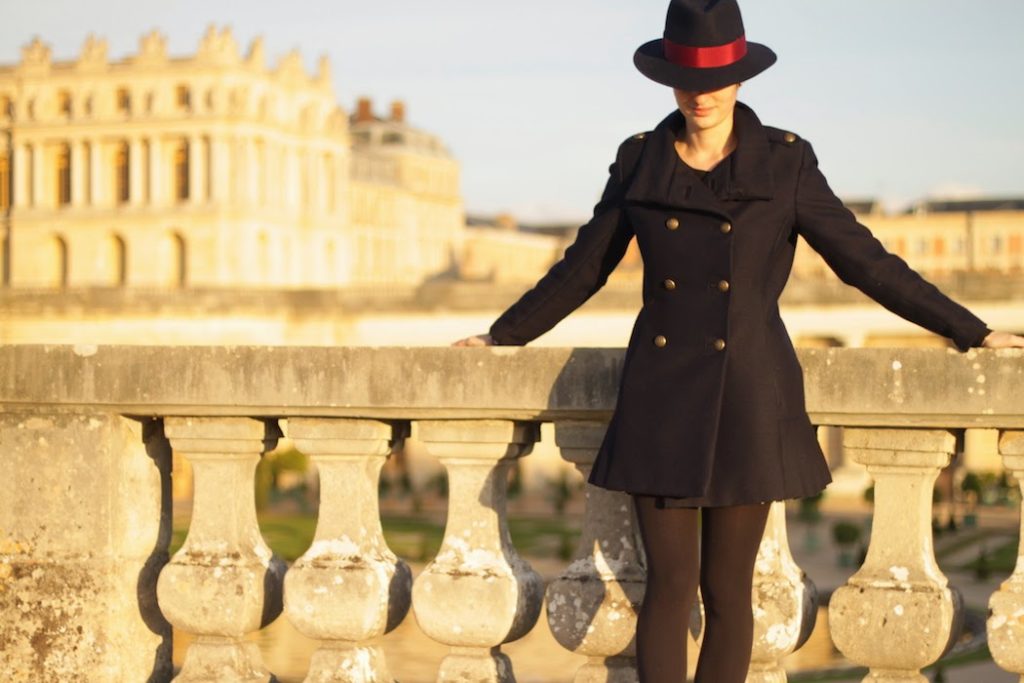
There’s nothing I like more to sew and wear than coats! And more than once I’ve cursed my sunny (and too warm) city because winter is too mild to wear heavy outerwear.
But it was time for me to take my pencils, my ruler and my fabrics to offer you the pattern of a nice coat full of possibilities: the Quart coat!
new-pattern-quart-coat-sewing-2new-pattern-quart-coat-sewing-3
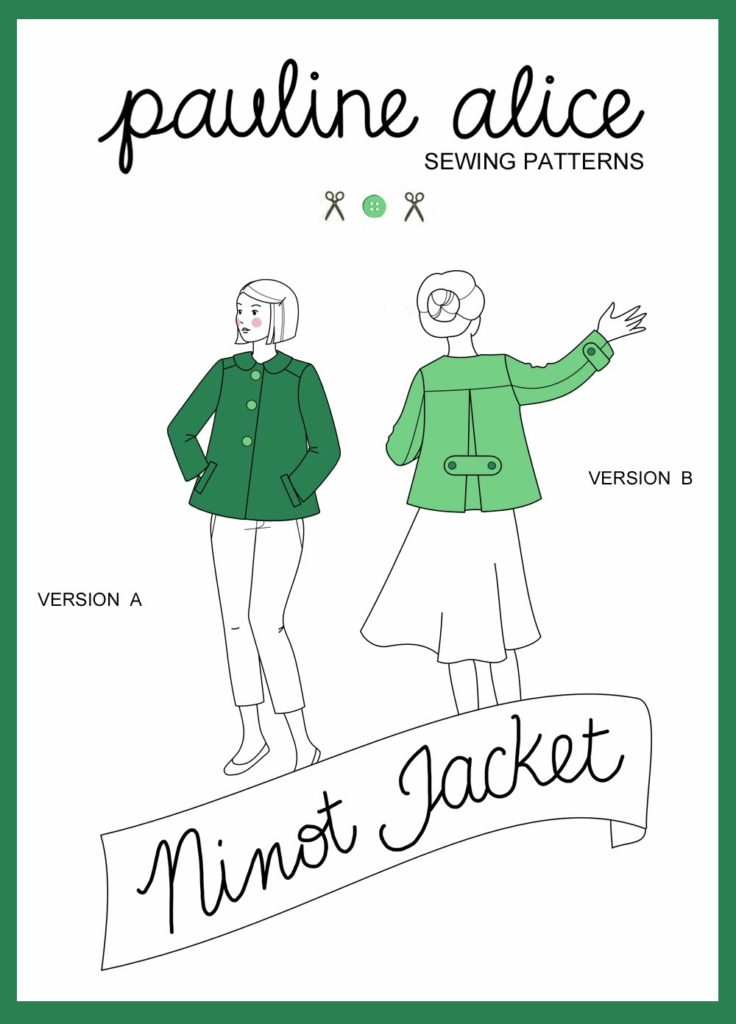
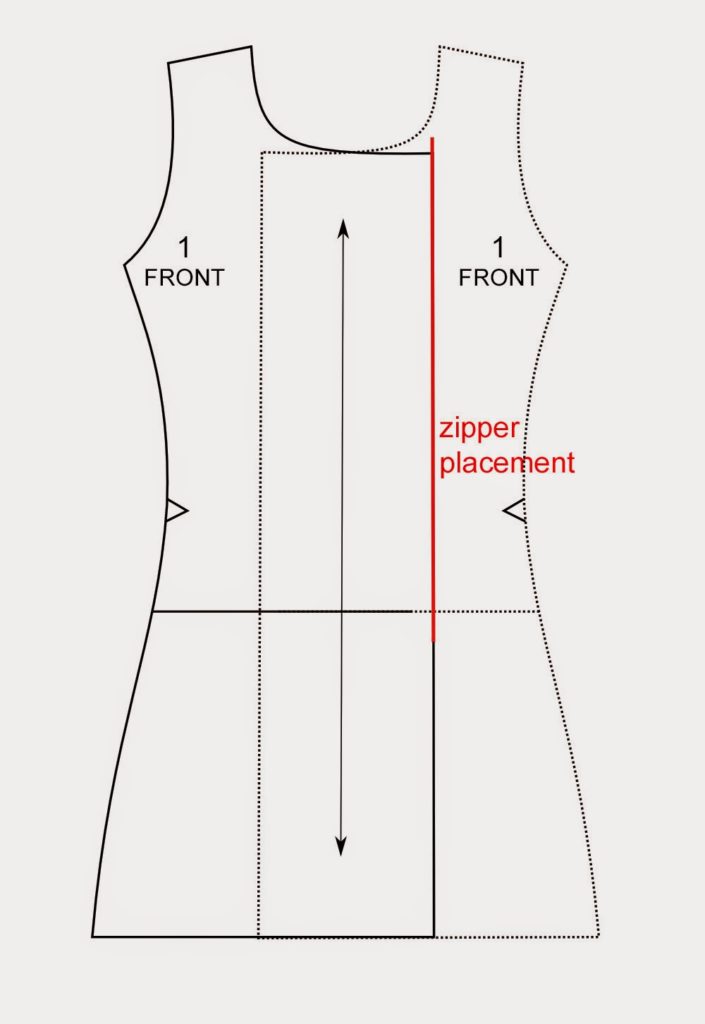
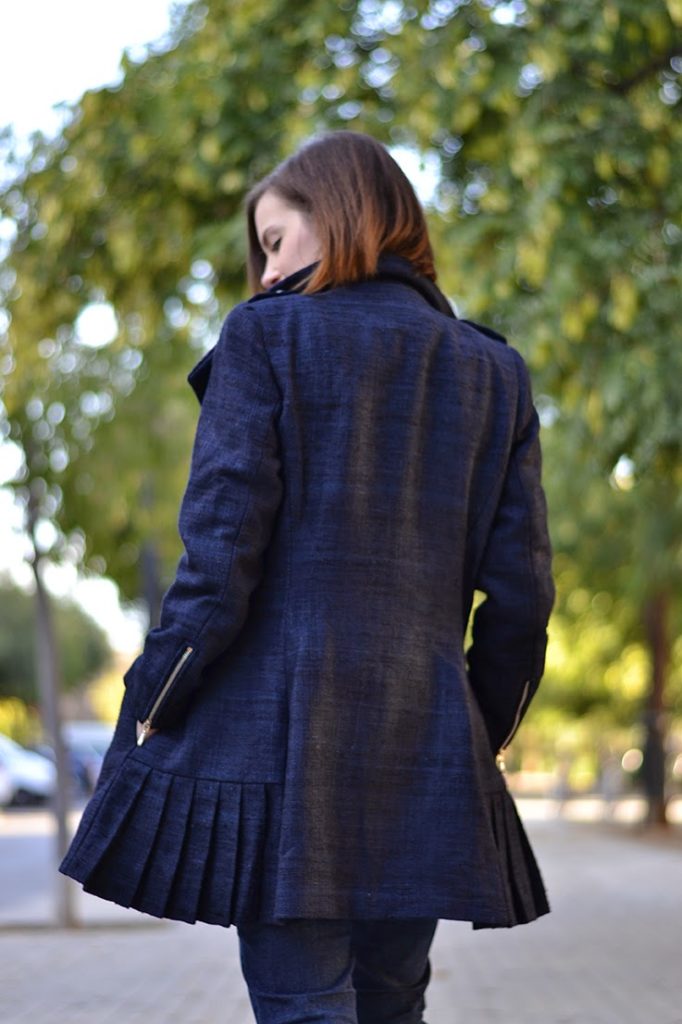
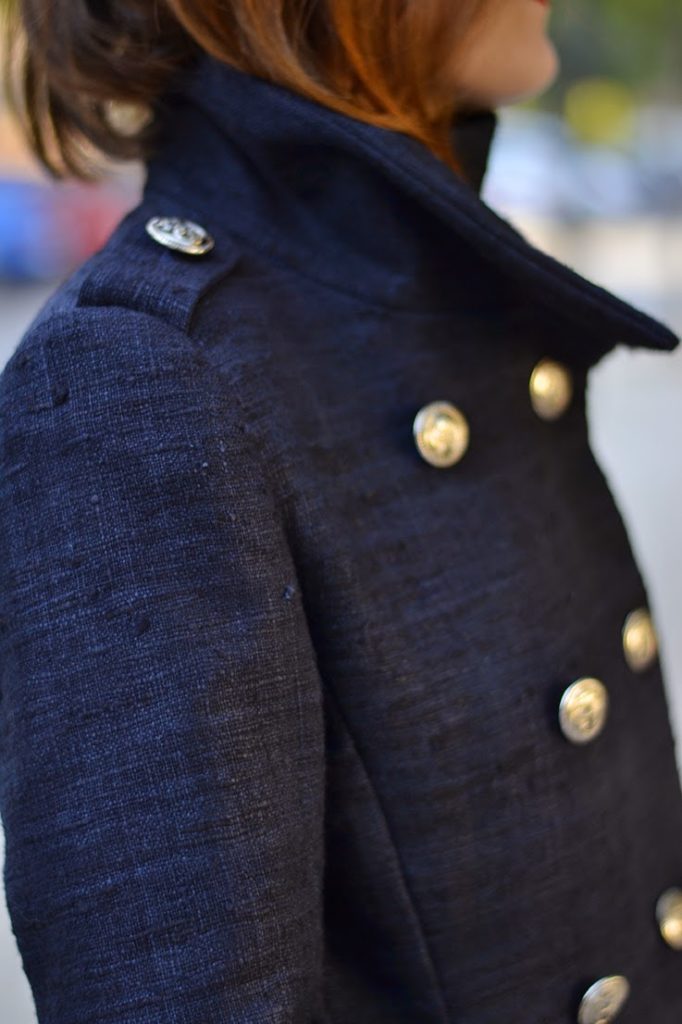
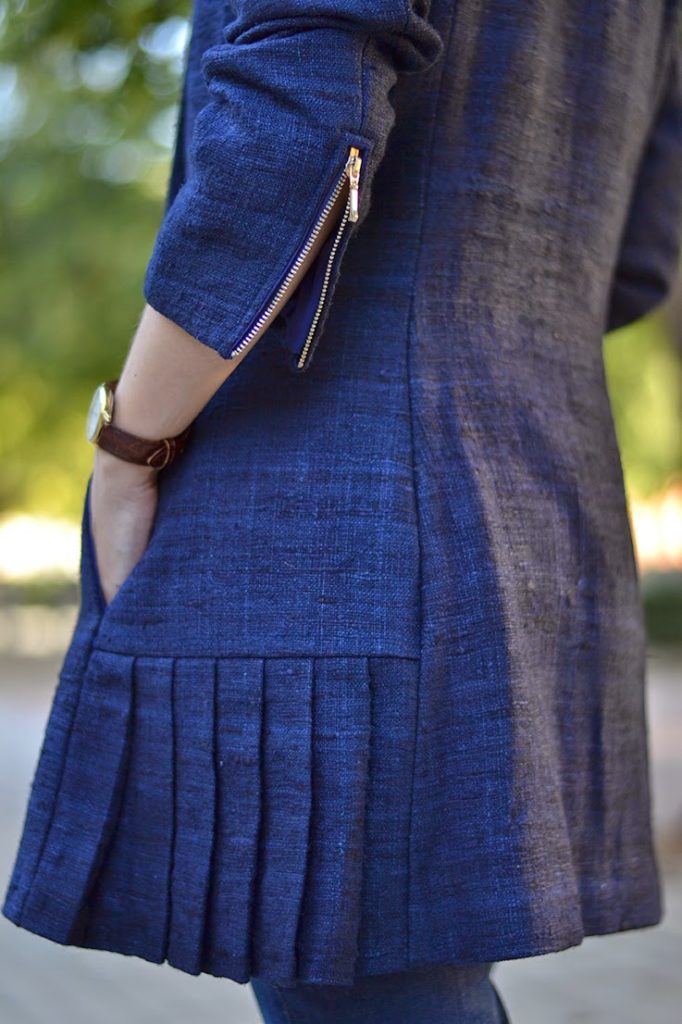
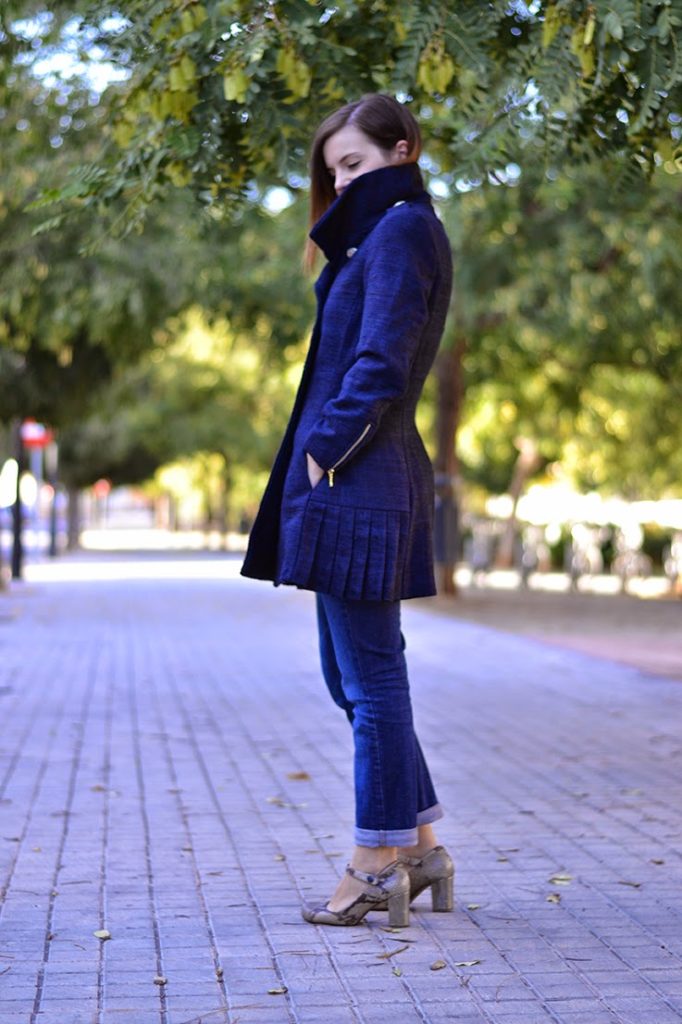
With its high collar, pockets and long zipped sleeves, the
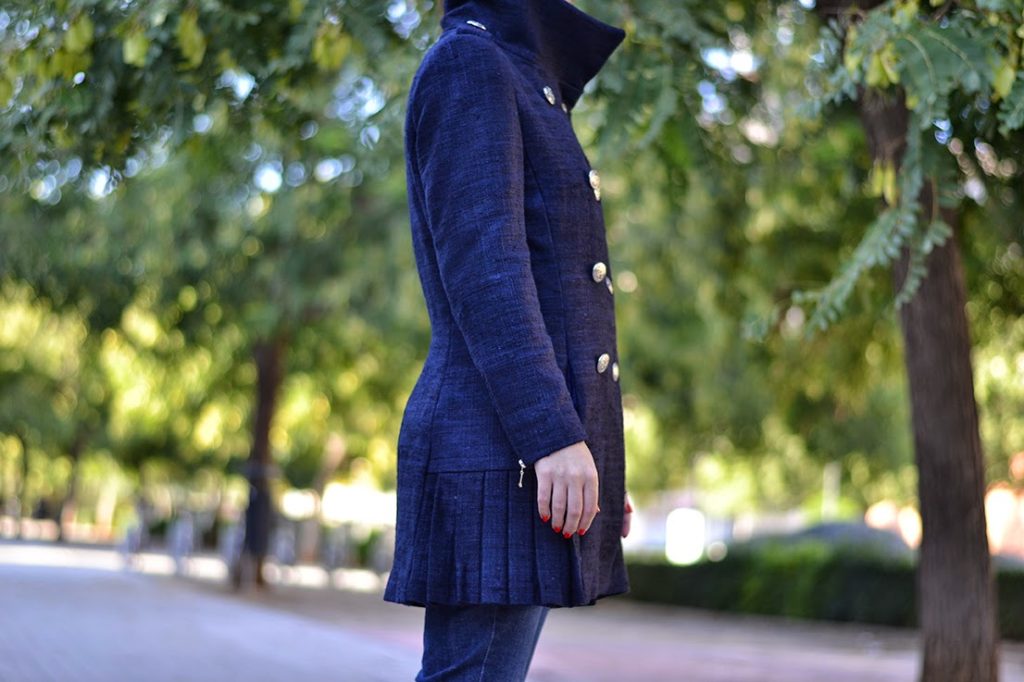
 Quart coat will protect you from the cold with style. The princess seams will highlight your figure nicely and the pleated side is the perfect girly detail.
new-pattern-quart-coat-sewing-4
Quart coat pattern made in navy blue raw silk.
I was inspired by Burberry’s military style: elegant and classic outerwear that will match easily with whatever you’re wearing and that you’ll love wearing year after year.
Besides, the Quart coat can be made in wool coating for winter as well as lighter fabrics (gabardine, twill…) for a trenchcoat version perfect for mid-season.
new-pattern-quart-coat-sewing-5new-pattern-quart-coat-sewing-6The Quart pattern, with its advanced level, has these small details that will make the intermediate seamstress progress and will please the expert ones (think handstitched interfacing, bound buttonholes, zipped cuffs, epaulettes…).

The glossary on the last page comes back on the terms and techniques essentials to make this pattern. And because it’s starting to be an habit now, I’m already preparing a photo tutorial to follow in depth the Quart coat construction.

new-pattern-quart-coat-sewing-7
Head to the shop and get the Quart coat pattern!
I can’t wait to see what you’ll come up with, your thoughts on the pattern and to show you the testers versions.
Have a great week!
new-pattern-quart-coat-sewing-8
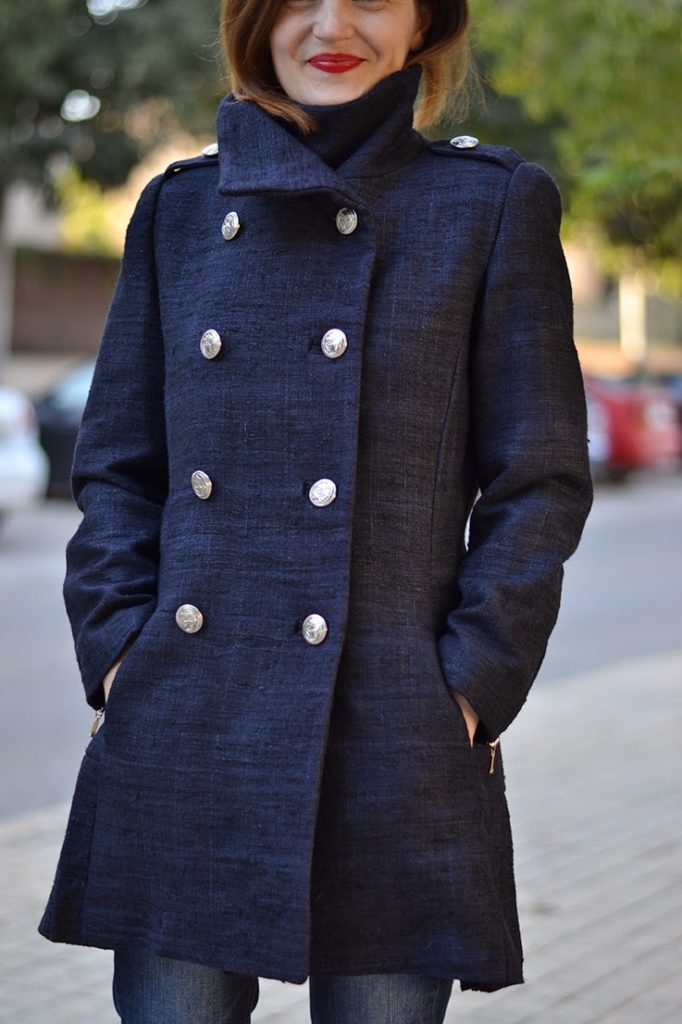
ps: I’d like to remind you that you can take advantage of your order of the printed pattern to receive the new folders for free! If you have pauline alice printed patterns still in their (thin) envelopes, add their names in the comment box when confirming your order and they’ll be sent without any additional cost.


signature1_editado-1

57 comments
0 FacebookTwitterPinterestEmail
I made this skirt about a month ago, before Christmas. It was my “pencil skirts month”, I was obsessed with them and wanted one in every colour. At the end, I made only 2: this one and one in burgundy (my other obsession this winter).

25

I used the same pattern, a self-drafted one. It’s a typical pencil skirt but I like the double darts, they shape nicely the curves of the body. The only problem is that the dart end is showing because of the fabric. It’s a light wool crepe which shows every stitch. No handstitching for them, I had to bag the lining. Speaking of lining:
3
Isn’t it cool? I love the contrast between the hot pink and the mustard/gold wool crepe.
This kind of garment is exactly what I need: classic line but very colourful. Perfect for the Wardrobe Architect project!
14


54 comments
0 FacebookTwitterPinterestEmail

like-arish-agoriup-sewing-pattern-1

From the very beginning, I’ve imagined the Ninot jacket as part of a suit. So when I bought the fabric for the jacket, I took enough for a pencil skirt as well.
I just love the contrast of the fitted skirt and the boxy swing jacket.


like-arish-agoriup-sewing-pattern-2

The post is called “Like Arish Agoriuq” because she is one my favorite character right now. She’s the main character of “El Tiempo Entre Costuras” a TV serie set in the 40’s in Spain. Arish is her spy name while living in Madrid as a very stylish seamstress.
I love the show for the fashion: the 40’s were so elegant! In the serie, Arish is wearing a lot of two pieces suits with pencil skirts, blazer jackets and big fur collars. You can see more pictures here.

like-arish-agoriup-sewing-pattern-3


The skirt is the typical pencil skirt with a kick pleat at the back. I made the pattern. The wool crepe is so soft, it’s the perfect fabric for such a suit. I’m wearing it with a light pink detachable faux-fur collar from H&M. I think this will be my Christmas outfit…
I wish you a Merry Christmas! I’m going home to France in my family but the shop is going to stay open during the holidays (last minute gift?). After the holidays I’ll be back with a serie of tutorials on the Ninot jacket, stay tuned!
pauline-sewing-pattern
35 comments
1 FacebookTwitterPinterestEmail
variation-ninot-coat-sewing-pattern-1 I wanted to experiment with the new Ninot Jacket Pattern while designing it and as a swing coat was on my Fall/Winter sewing plan, I made a coat out of the jacket pattern!
It was super easy: just lengthen the jacket side seams to the desired length!

variation-ninot-coat-sewing-pattern-2

J’ai réalisé le manteau dans un piqué de coton bleu vif et je l’ai doublé avec une doublure vert pomme. Les boutons sont super jolis, on dirait des bijoux!
Maintenant vous savez que la veste peut se transformer sans problème en un joli manteau, ce message est dirigé aux frileuses 😉
variation-ninot-coat-sewing-pattern-3
The jewel button, handmade buttonhole and a detail of the textured piqué fabric.

pauline-sewing-pattern

44 comments
1 FacebookTwitterPinterestEmail
ninot-jacket-pattern-1


It’s a jacket! You were a few to have guessed in the right direction, the buttonholes might have helped.

ninot-jacket-pattern-2ninot-jacket-pattern-3

The Ninot Jacket is a short swing jacket, with a deep inverted pleat in the back. This style was very fashionable during the 40’s and 50’s (and you know how much I love these years…). As much as I love a fitted jacket, I think the small volume given by the back pleat makes it ideal for an everyday jacket, with enough structure to look sophisticated for the evening in the right fabric (think tweed with some lurex or brocade, amazing no?).
And for the “Couture” touch, bound buttonholes and welt pockets.

ninot-jacket-pattern-4ninot-jacket-pattern-5

There are 2 versions of the jacket:

Version A is fully lined and has a Peter Pan collar. It’s perfect for making in wool crepe (like the burgundy one above), wool, flannel, tweed, brocade… Winter time fabrics! And why not add a little faux-fur to the collar and cuffs like the green version above? It feels so luxurious…
Version B is unlined (seam allowances are finished with bias binding for a clean and fun finish). It’s collarless and has button back and sleeve tabs. It would be a cute jacket for spring made in gabardine, linen or cotton twill for example (with contrasting bias binding).
There are minimum tailoring techniques (the bound buttonholes can be replaced by machine-made buttonholes), the sewing level required is intermediate (a tutorial serie is already planned).
ninot-jacket-pattern-6


ninot-jacket-pattern-7

I hope you like the Ninot Jacket. Feel like making it? Buy the pattern here!
pauline-sewing-pattern
45 comments
0 FacebookTwitterPinterestEmail
  • 1
  • 2