Home Tags Posts tagged with "project"
Tag:

project

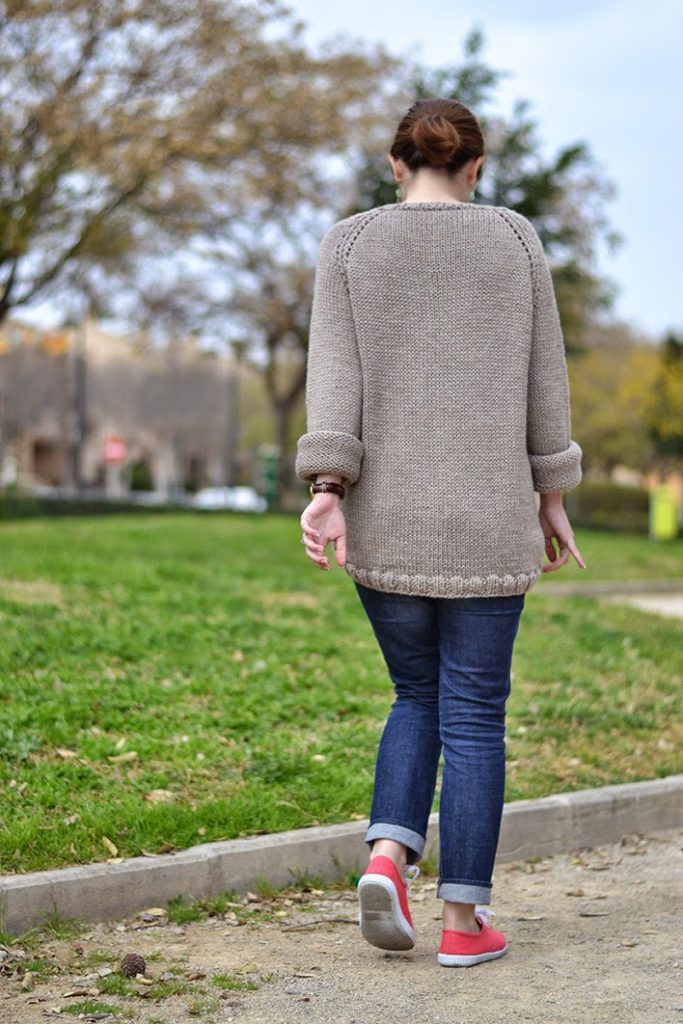
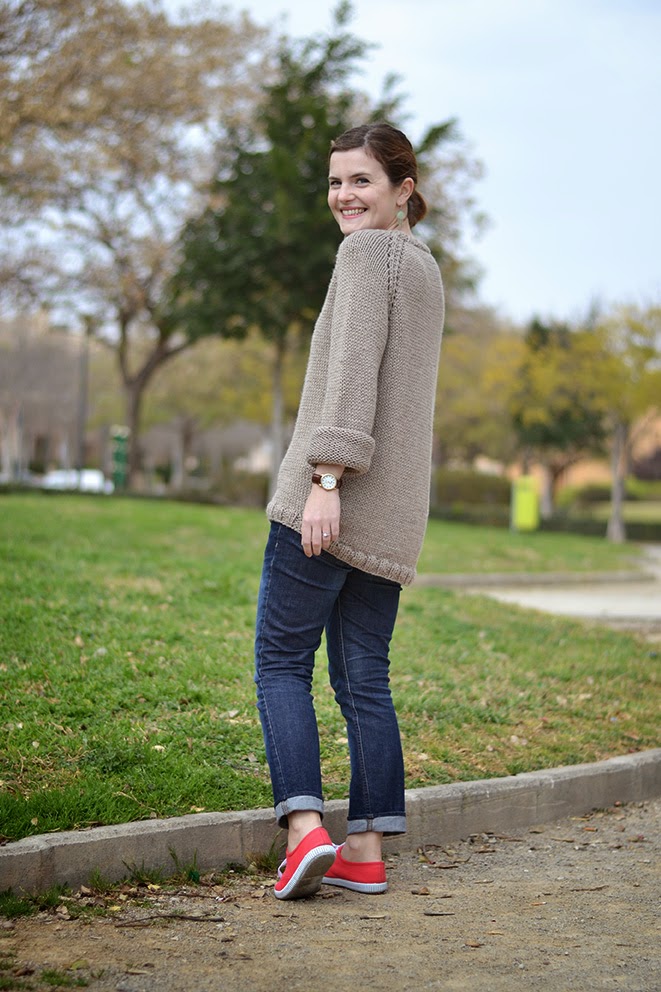
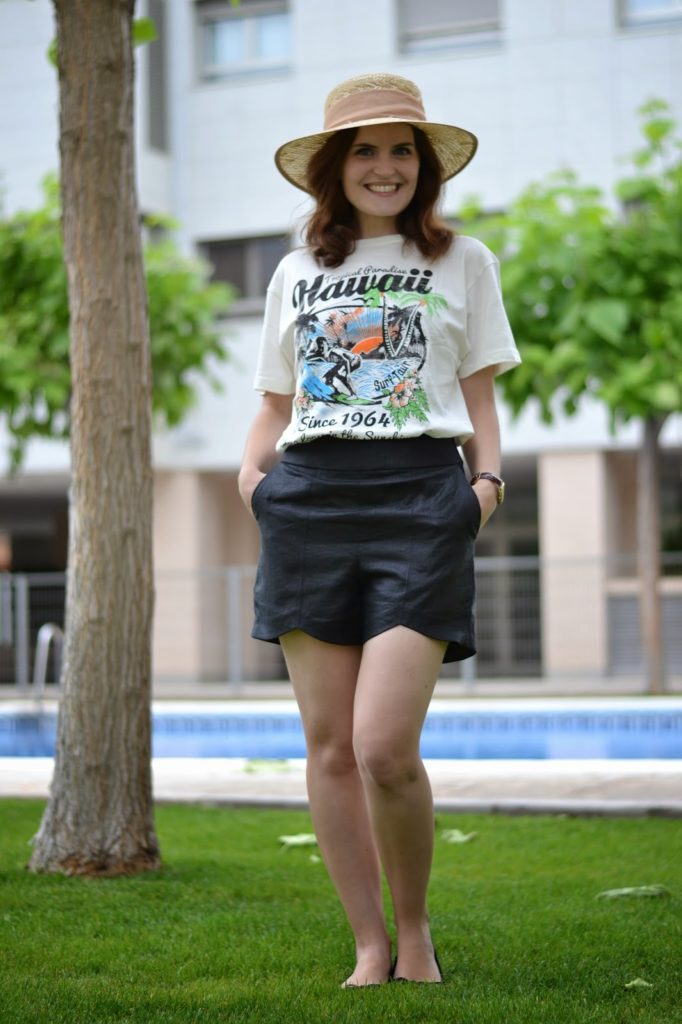
Here is my new favourite sweater: Il Grande Favorito! It’s my first sweater but already my favourite!

sweater-grande-favorito-my-favorite-sewing-pattern-1

After learning a little bit about knitting this winter with a loose cardigan, I wanted to make this sweater as a lot of people recommended it for its simplicity and yet nice details (the low back, raglan sleeves and seamless shaped (worked from the top down with circular needles).

sweater-grande-favorito-my-favorite-sewing-pattern-2sweater-grande-favorito-my-favorite-sewing-pattern-3

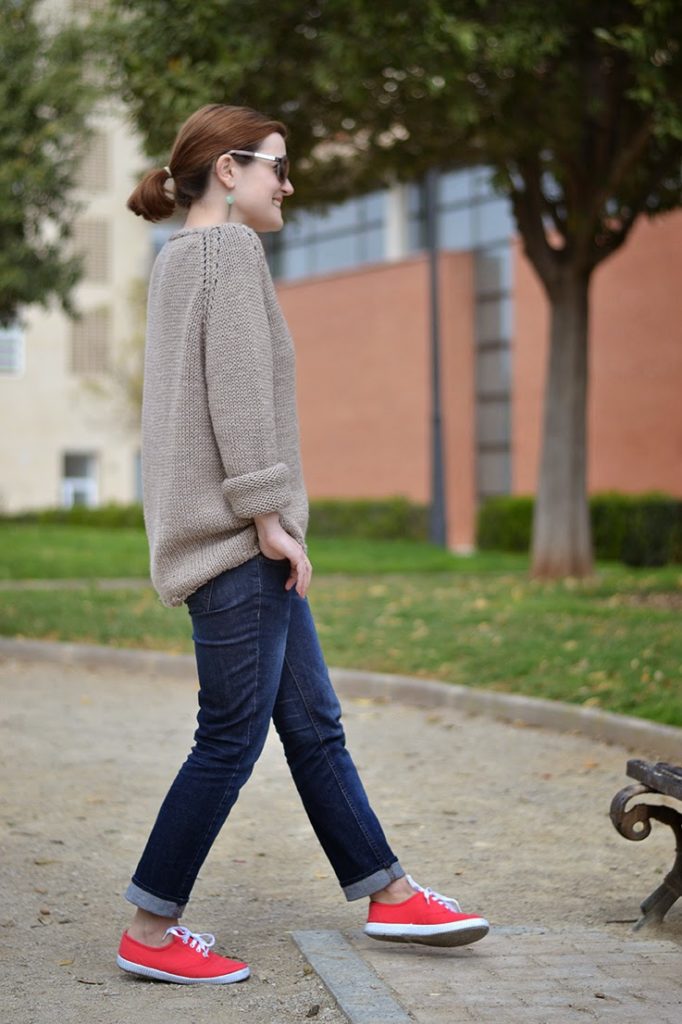
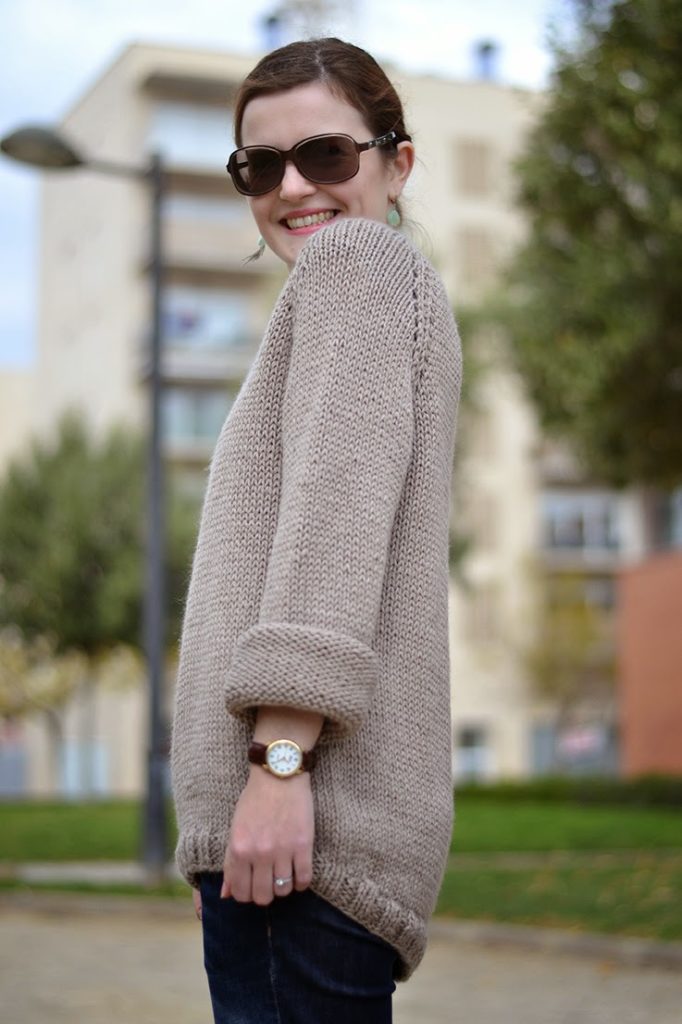
I thought it would be too difficult but no, it was just the perfect project for me: easy enough to make it without loosing hair over it and challenging enough so I can learn something new.I wore it all this week end and I love the comfy and oversized look, as well as the nice neutral colour I picked.

sweater-grande-favorito-my-favorite-sewing-pattern-4

sweater-grande-favorito-my-favorite-sewing-pattern-5

The details: wool by Lanas Stop extra merinos, bought in a small shop, and Il Grande Favorito pattern by Isabell Kramer, bought on Ravelry (available in French and German as well, I bought it in French and the translation is great!).

signature1_editado-1

16 comments
1 FacebookTwitterPinterestEmail
Summer is here and I am in need of cute yet confortable clothes! I think that I can live an entire summer out of dresses but sometimes I feel more like wearing pants, shorts or even overalls… but still feel dressed up and cute.
And here comes the Scalloped Hem Shorts pattern by Pattern Runway, perfect for these summer days when you need to look smart but cool at the same time. I love the hem (of course!), the classic look of the slash and welt pockets, the front seam… Very sassy! It could easily go from a day at the beach to a meeting in the city and finish to a party or drinks on the evening.
13
Of course, in order to wear them all day long, you might want to stay away from linen! What can I say? I had this waxed linen for about a year and I love its leathery look, I think it adds a nice touch to the pattern but it wrinkles like crazy. I was seated for 15 minutes before taking the pictures and the front looks aweful (I saw that only after taking the pictures ;).
5
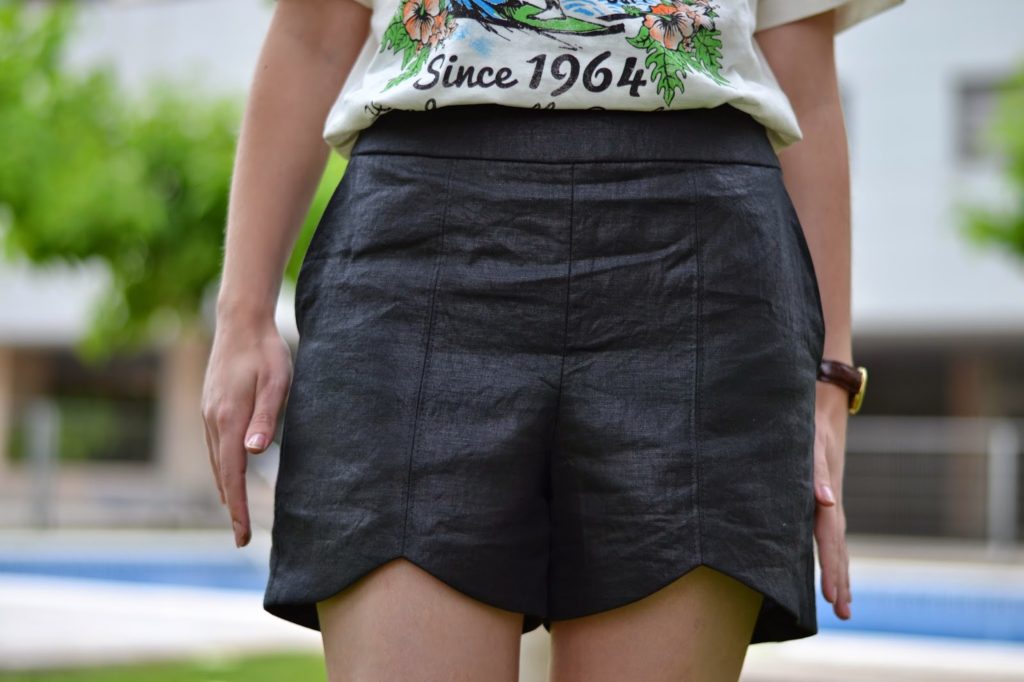
The sizing of the pattern is good but I found it a little big. According to the measurements, I cut a size XS (and didn’t make a muslin, silly me) but when I tried it on, it was large both at the hips and at the waist (it’s supposed to sit at the natural waist). I remember reading reviews saying the same. I stitched 1,5 cm seam allowances all over instead of the 1 cm included in the pattern. But I think I’ll just cut the XXS size next time as it’s still a little big (it’s the first time I’ve entered into such a small size haha). I would also make them a little bit shorter, but that’s a personal preference. But these are such easy changes that I can only say the best about this pattern (and it’s really my fault as I could have avoided that by making a muslin).
4The instructions are clear (the welt pocket lining could be easier, if you have never made one, take your time and check their online tutorial). I made false welt pockets as I didn’t want to add bulk to the back and I knew I wouldn’t use these pockets anyway.
What about you, do you have a favourite shorts pattern?
8


11 comments
1 FacebookTwitterPinterestEmail
Piping! That’s such a great detail to add to any design and so easy to make as well.
I’ve been playing with piping lately and eventhough you can find quite a lot of colours at the store, wouldn’t it be great to make piping in your favourite fabric?
Let’s see how to do it!
12
1. This is some store-bought piping. You can see how it’s made: a cord is sandwiched between a bias strip of fabric and there is a stitching line very close to that cord. The strip of fabric beeing cut on the bias allows for a lot of flexibility in the piping, making it great to outline any curve seam line.
3 
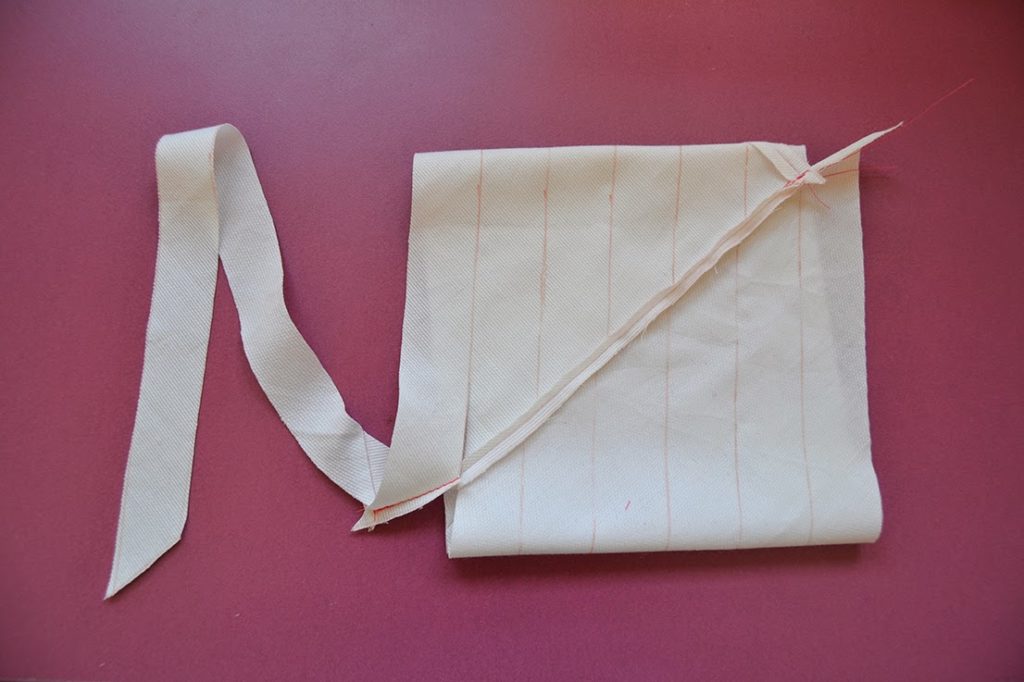
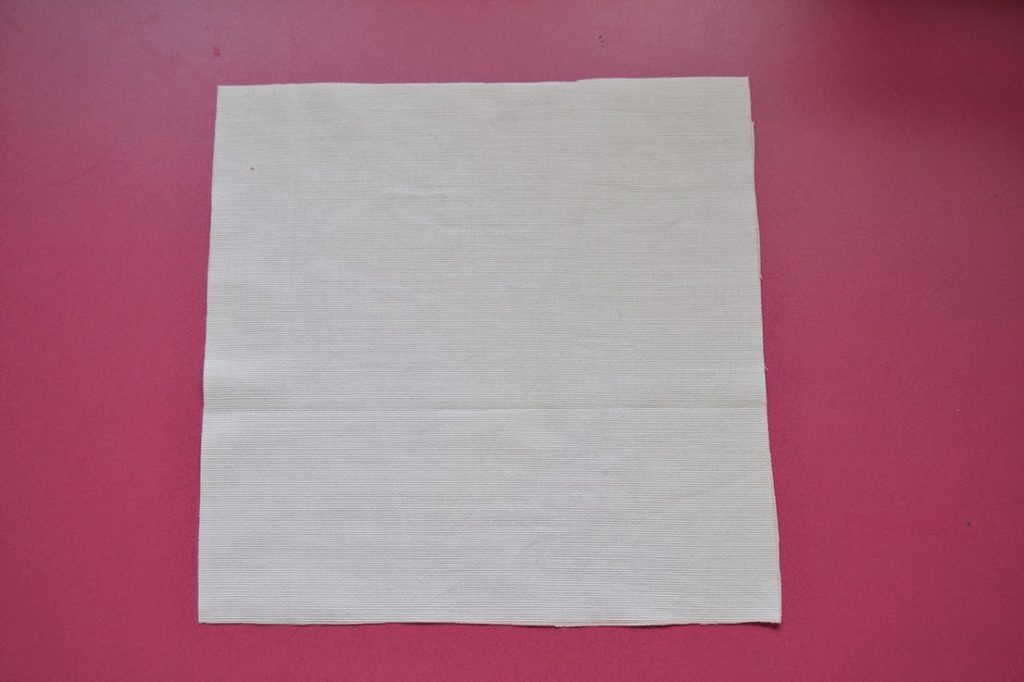
2. Cut a square piece of fabric. I made mine 25 cm x 25 cm (10″ x 10″) but you can make it as big or small as you want. With this size, I was able to make a 2,4 m strip of bias (2 1/4 yards).
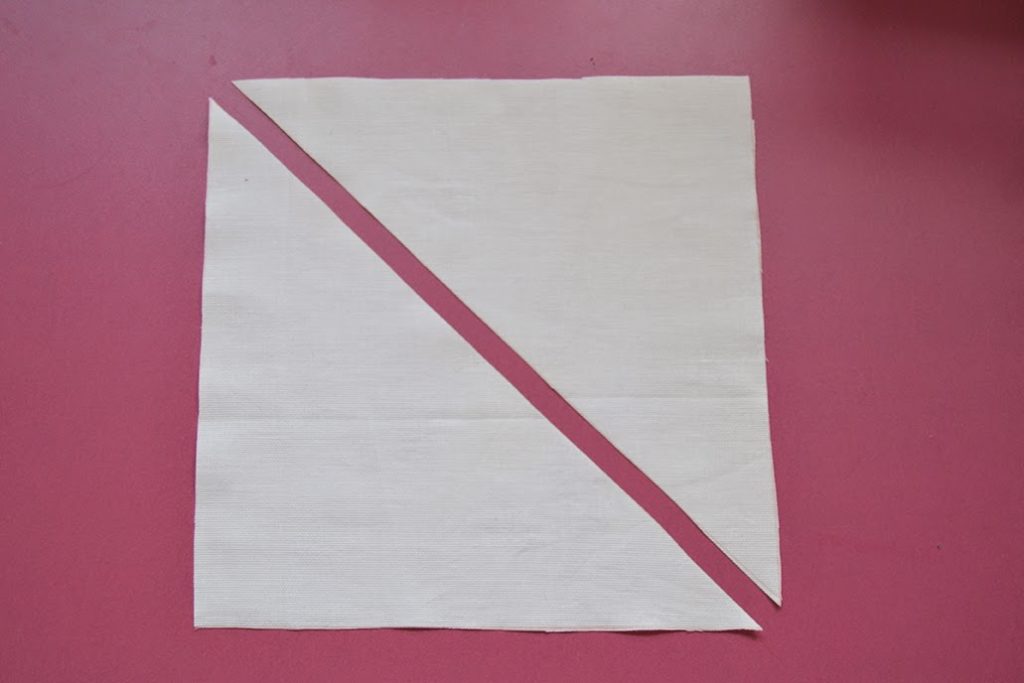
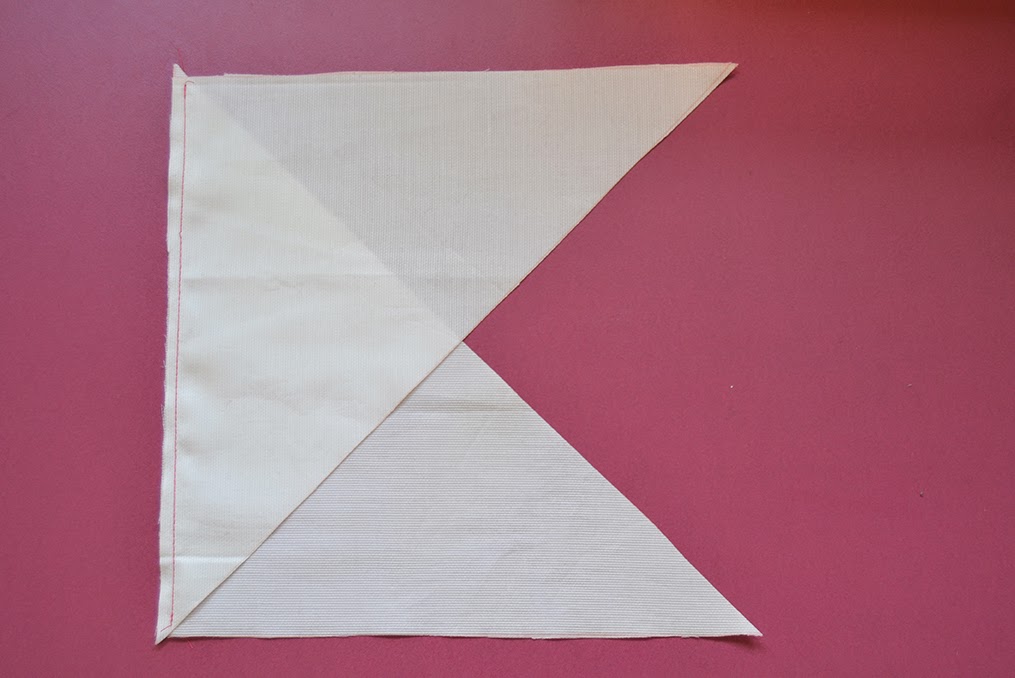
4
3. Cut the square in half diagonally. This will give the bias.
5
4. With right sides together, stitch the sides together (the straight ones, not the diagonal ones!) very close to the edge. 6
 5. Press the seam allowances open with the tip of the iron.
7 6. Draw parallel
lines every 2,5 cm (1″) starting at the top (along the bias) on the wrong side of the fabric. The last line might be slighty smaller (mine’s 2,2 cm), that’s because my seam allowances were a little bit too deep.

8


7. That’s the tricky part, at least for me. With right sides together, bring the edges together and match the lines along the seam line. The first row of each side should be offset, like on the picture. Pin together and stitch very close to the edge.

9
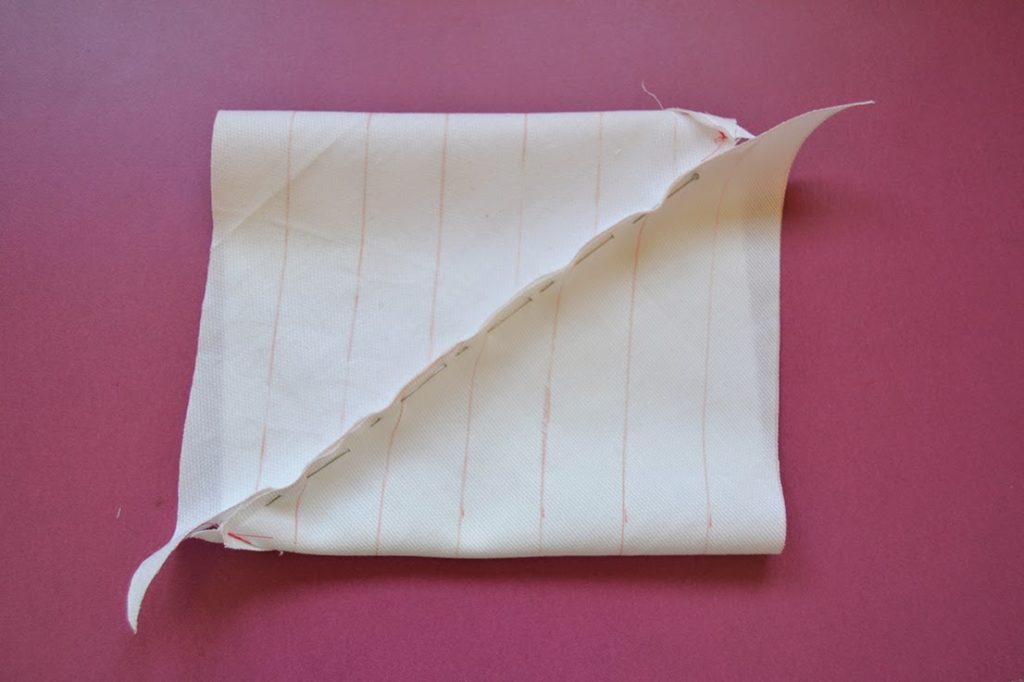
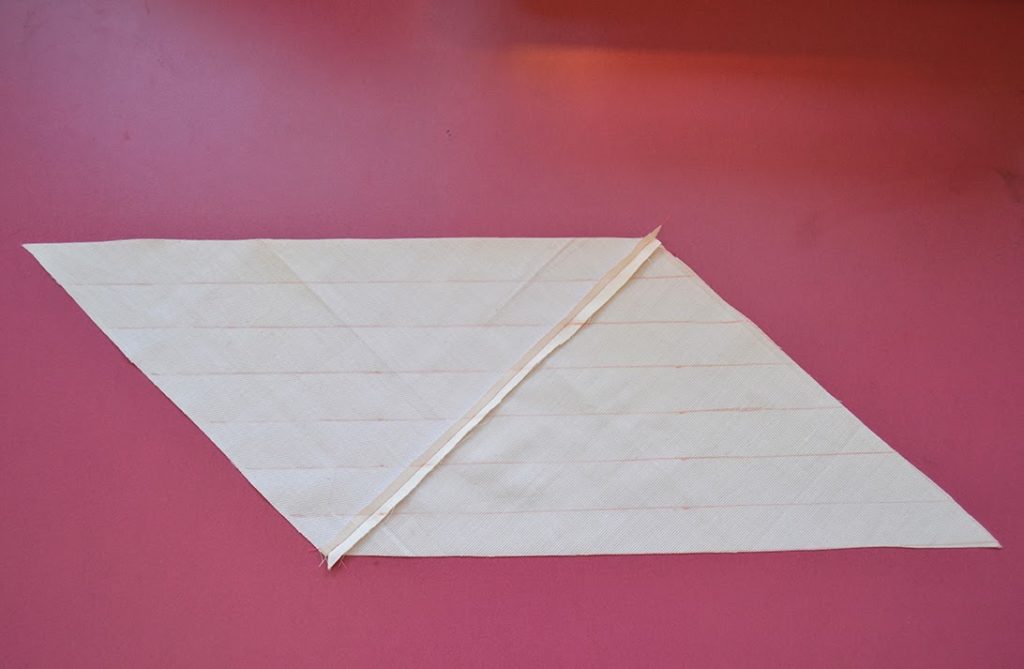
8. After the tricky part, the fun one! Now that you have a tube, start cutting the first offset row following the continuous line until the end.

109. Now you have the strip of fabric cut on the bias and you need your cord.

11
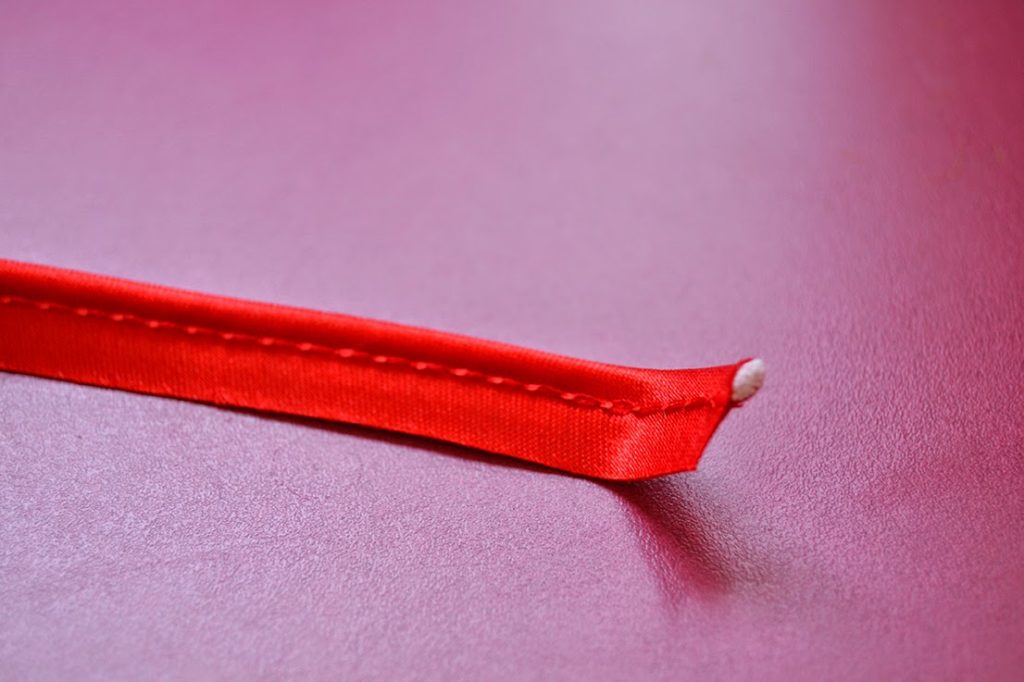
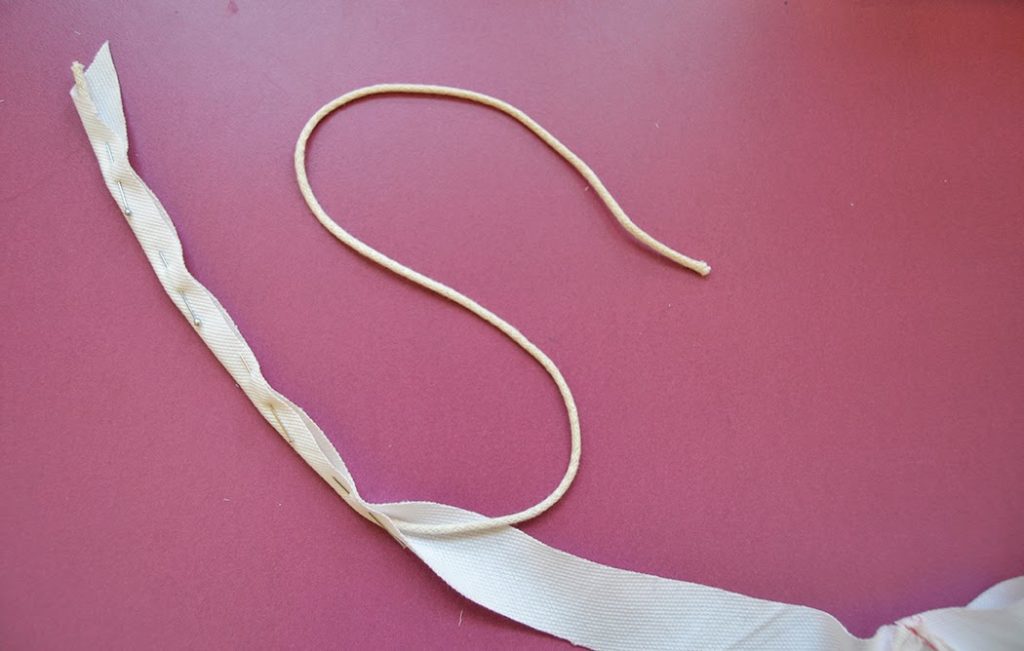
10. Place the cord on the wrong side on the bias, fold the bias in half to sandwich the cord and secure it in place with pins.

12
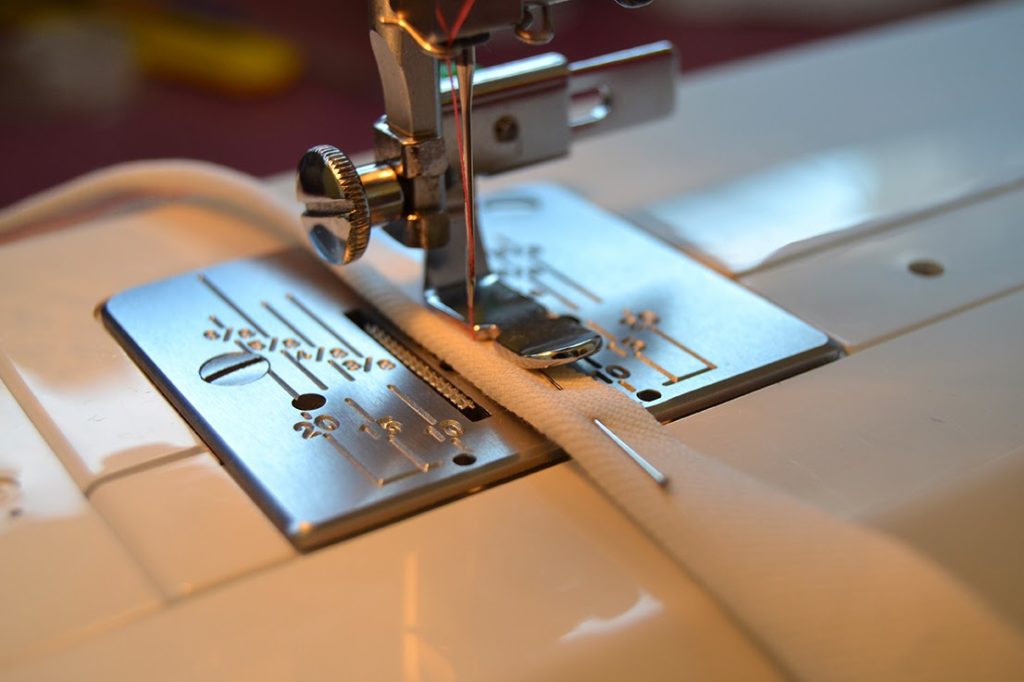
11. With a zipper foot, stitch as close as possible to the cord (possibly with a matching thread! I’m using a constrating one so you see it better).

13
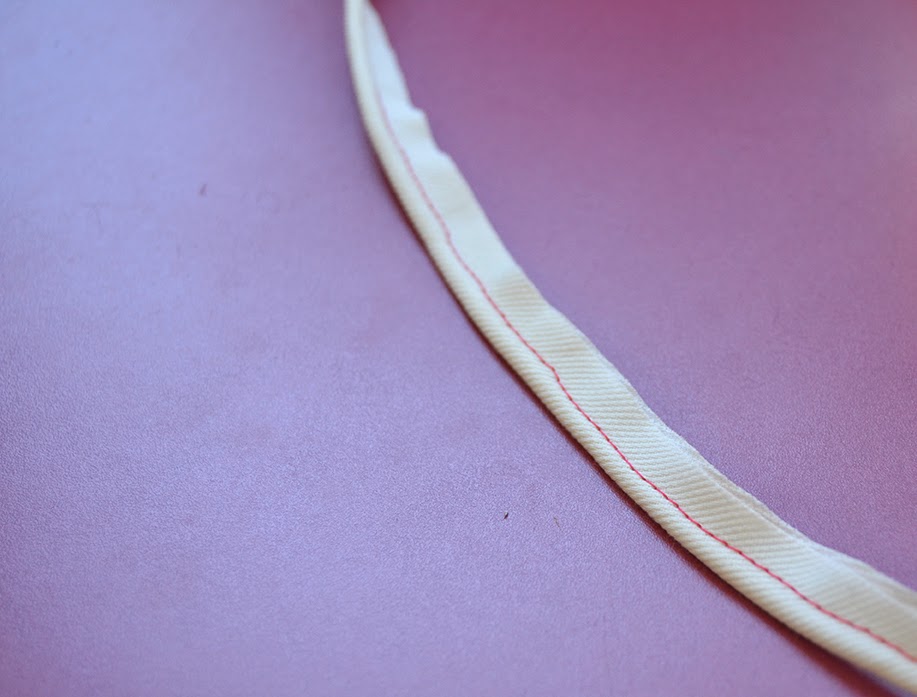
12. There you go! You made your own piping! Now use it in some great outfits!
Here are some ideas: here and here.
Do you use piping often? And do you buy it or make it yourself?


20 comments
1 FacebookTwitterPinterestEmail

Let’s continue with Fall/Winter sewing: after the inspiration, let me show you what I plan on sewing.

Hopefully the weather will behave and the temperatures will go down (but I really don’t know, I might just wear my bikini and go to the beach this afternoon. I’m not joking!).

The fabric is mine and the illustrations are to give you an idea of the shape, but I will draft my own patterns (you might even see some of them later if I am happy of how they turned out!)

fall-winter-sewing-plan-pattern-1
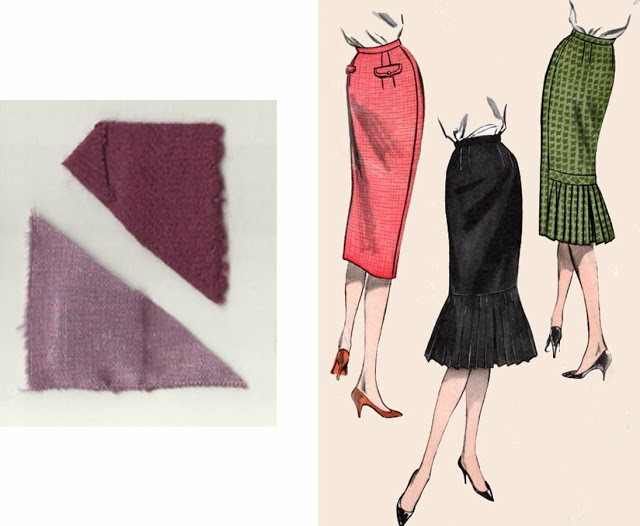
I have this beautiful burgundy wool that will be perfect for a jacket/skirt ensemble. I’m thinking of a short swing jacket and a pencil skirt with knife pleats at the back. And the light pink lining for a little bit of contrast.

fall-winter-sewing-plan-pattern-2
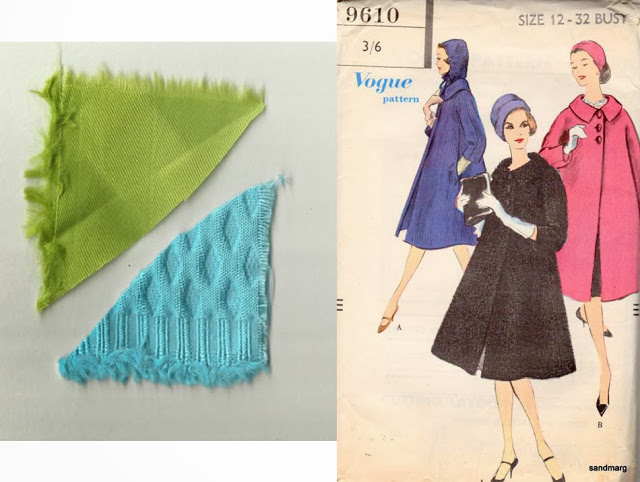
With the same pattern as the short swing jacket, I want to make a swing coat. I will just make it longer (or I hope it will work like that). I have a bright baby blue wool/cotton fabric with a diamond pattern in relief. With a bright green lining, it will be a very nice coat to brighten the winter.

fall-winter-sewing-plan-pattern-3
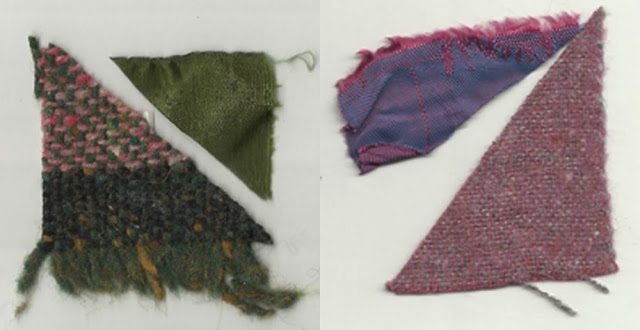
These two combinations are for skirts: A-line skirts with pleats. I need more skirts, I have lots of dresses but very few skirts. So I will add two for the winter: one in wool tweed in green, pink and brown with a bottle green lining and the other one in purple wool with blue/purple lining.

fall-winter-sewing-plan-pattern-4And a winter Camí dress of course! 3/4 sleeves or long, I still don’t know. I have a nice cotton/wool fabric but I might have to change the collar, it might be too heavy. It’s dark grey with purple leaves, very subtle.

Are you ready for next week? I’m so excited to show you the new pattern. I really hope you’ll like it!

It will be out on Thursday! Monday I’ll let you know more…

Have a great week end and see you then…

pauline-sewing-pattern

9 comments
0 FacebookTwitterPinterestEmail
flamenca-dress-part-5-sewing-pattern-1


After so many previews, here are the final pictures of the flamenca dress. Enjoy!
flamenca-dress-part-5-sewing-pattern-2flamenca-dress-part-5-sewing-pattern-3


As I didn’t know if I was going to be able to take good quality pictures during the Andalusian party, we decided to go to the park before and have a little impromptue photoshoot. And just so you can see my accessorizes (blue of course), here is a picture from the party with my friends Mari Paz and Pilar (who brought from Sevilla the beautiful flower and earrings. Thank you Pilar!).
 
flamenca-dress-part-5-sewing-pattern-4
I hope you enjoyed the flamenca dress series and if you have any question, feel free to ask, I’d be delighted to answer (or try to…)!

flamenca-dress-part-5-sewing-pattern-5

signature1_editado-1


49 comments
1 FacebookTwitterPinterestEmail
Let’s follow yesterday’s post and continue on the flamenca dress.
We have set the the sleeves in the body and attached them to the lining, what we need to do now is make the skirt, join it to the dress, sew the zipper on and we are ready to hit the street.

…………………………………………………………………………………………………………………………………………….

I chose not to line the skirt flounces (contrary to the sleeve ones) because the outside is not going to show and it takes too much fabric (I might never wear this dress again for all I know).
1-Sew together all the circles of the same colour so you obtain one big flounce.
2-Stitch a row of basting along the inner curve of the flounce and clip (like for the sleeve).
flamenca-dress-part-4-sewing-pattern-1
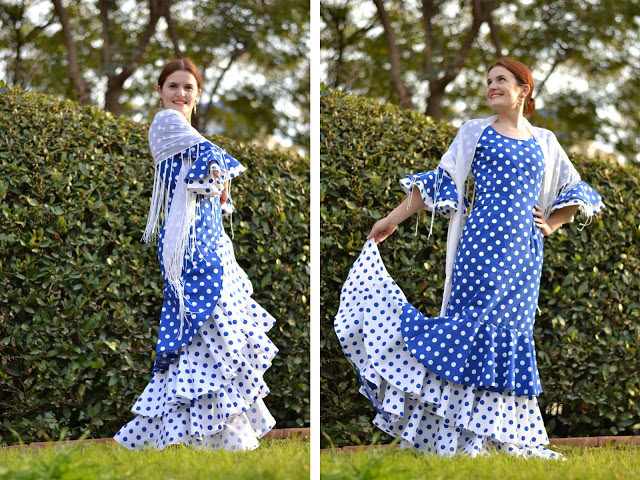
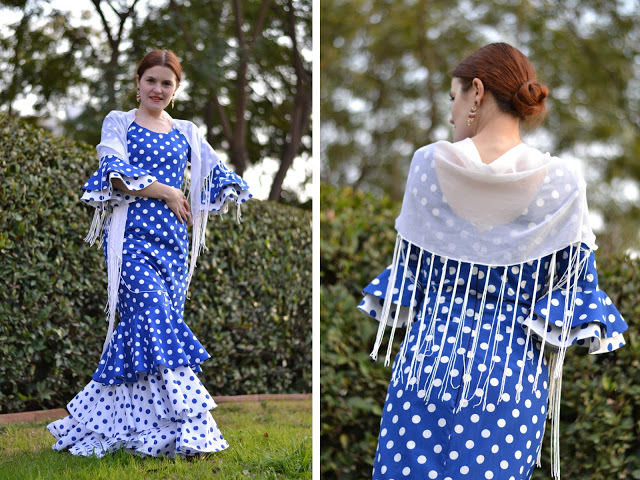
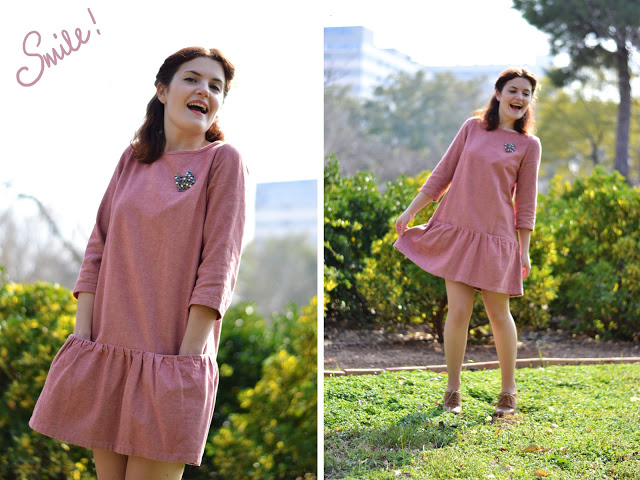
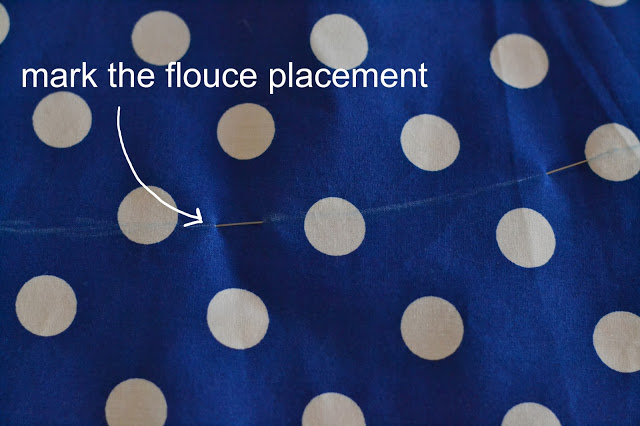
3-Here is a drawing (very bad!) I made to explain how to place the flounces on the skirt. You see that the first flounce is sewn right side up and the following ones wrong side up with the flounce facing upward (that way, the seam allowance is hidden nder the flounce when folded).
flamenca-dress-part-4-sewing-pattern-2flamenca-dress-part-4-sewing-pattern-3flamenca-dress-part-4-sewing-pattern-4
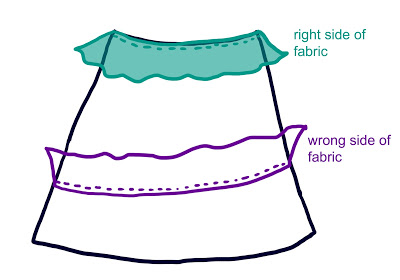
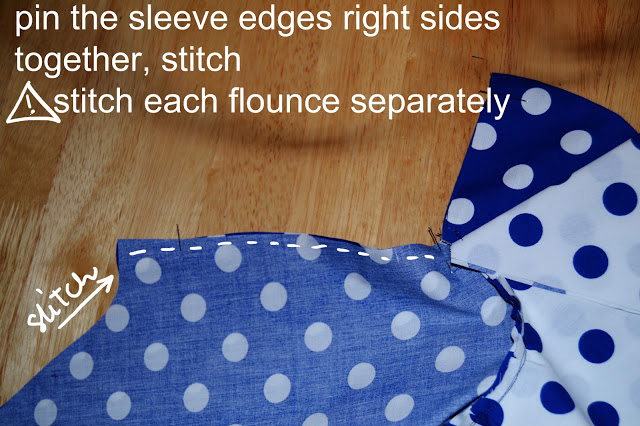
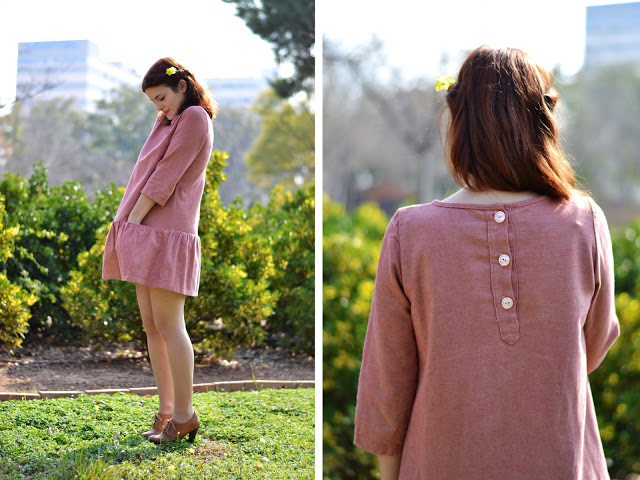
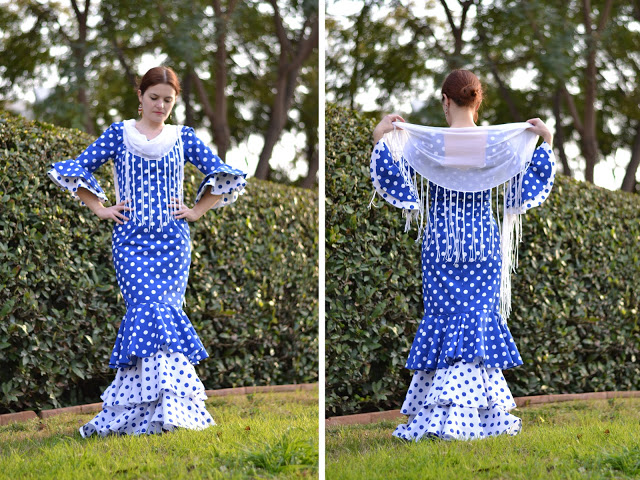
4-Repeat step 7 of the previous post to sew the back the dress (remember to sew each flounce separately).
5-Baste the zipper and sew it to the dress. Attach the lining to the zipper and hem it where the bodice meets the skirt.
flamenca-dress-part-4-sewing-pattern-56-Hem the skirt and the flounces as you choose (decorative binding, turn in hem…).
I wish you all a nice week and I leave you with this picture (the “real” post is coming in a few days, I promise).
flamenca-dress-part-4-sewing-pattern-6signature1_editado-1
17 comments
1 FacebookTwitterPinterestEmail
I am getting ready right now for the Andalusian party tonight so I thought it would be appropriate to make a new post about the flamenca dress.
If you remember, I already made the dress body and the lining. Which leaves me the sleeves and the skirt: these are the parts that are more time-consuming.
Today I’ll start with the sleeve and tomorrow the skirt part will follow.
……………………………………………………………………………………………………………………………………
For the sleeves, I decided to line the flounces with self-fabric as the outside is going to show quite a bit.
1-Take the sleeve flounces and place them right sides together.
flamenca-dress-part-3-sewing-pattern-1flamenca-dress-part-3-sewing-pattern-11
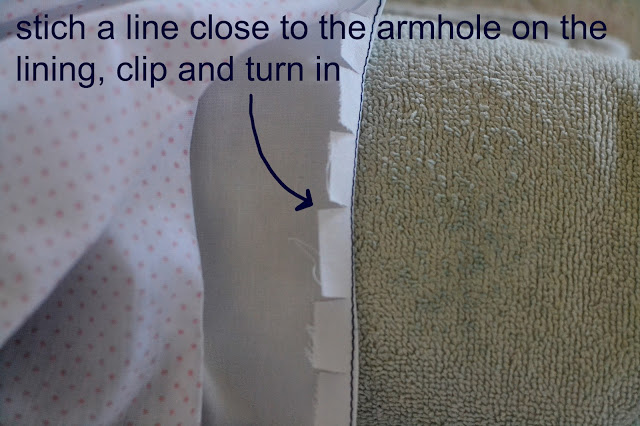
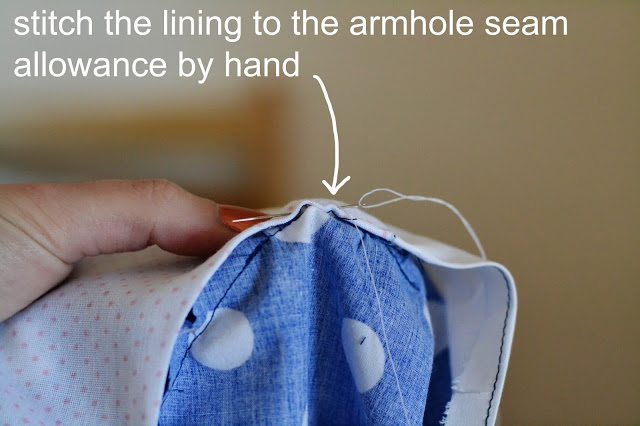
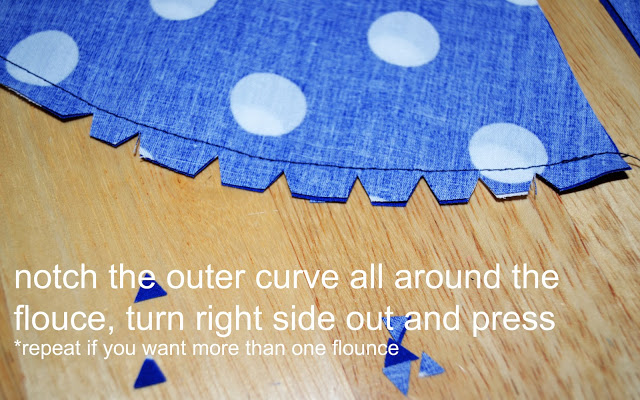
2-Remember to press flat (if the curve isn’t round, notch more closely but be careful not to cut into your row of stitches).
3-Add as many flounces as you want (I have two, one blue, one white).
4-Sew the flounces together at inner curve.

flamenca-dress-part-3-sewing-patter-10
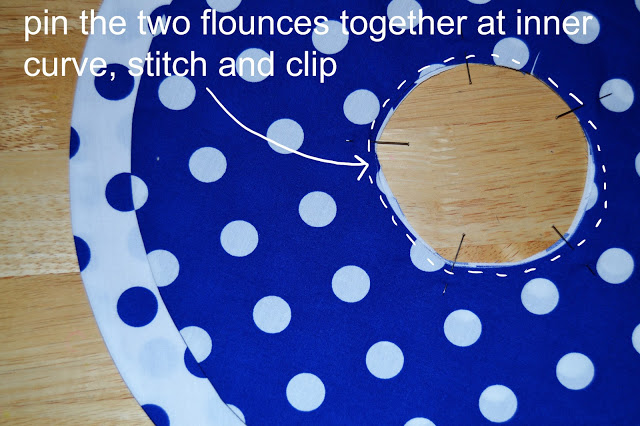
5-Take your sleeve piece.

flamenca-dress-part-3-sewing-pattern-9

 6-Pin the flounces to the sleeve right sides together (for example: blue against blue). Remember to clip the curve of the flounces so it’s easier to pin.
flamenca-dress-part-3-sewing-pattern-8flamenca-dress-part-3-sewing-pattern-7
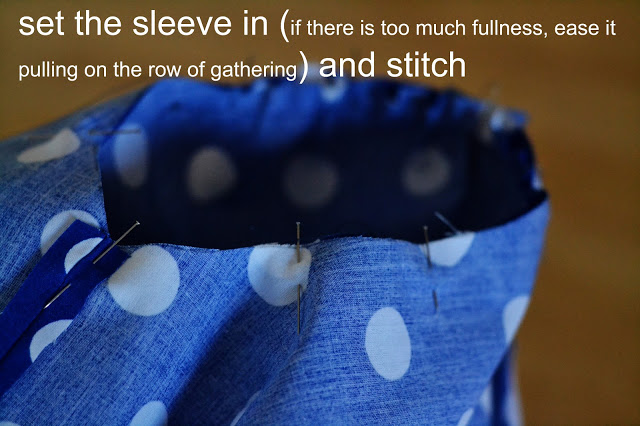
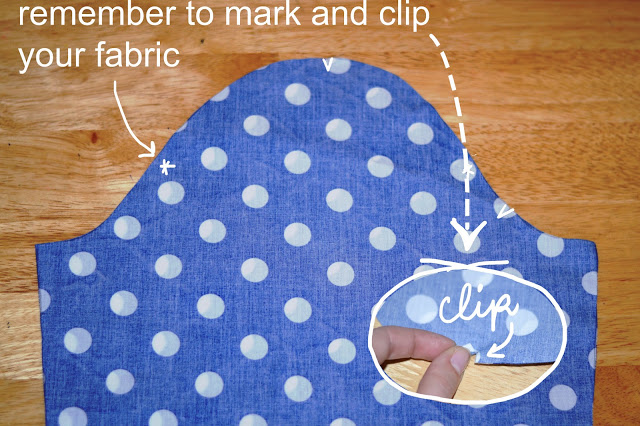
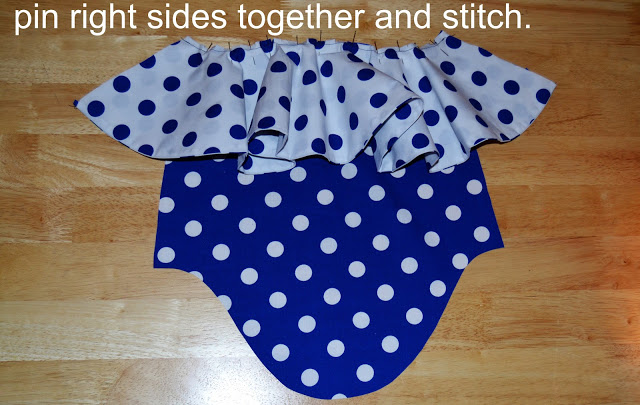
7-Stitch the flounces separately, press the seam allowances open, finish the edges as you prefer (zigzag, serger, bias binding…).
  

flamenca-dress-part-3-sewing-pattern-6flamenca-dress-part-3-sewing-pattern-5flamenca-dress-part-3-sewing-pattern-4flamenca-dress-part-3-sewing-pattern-3flamenca-dress-part-3-sewing-pattern-2

There you go for the moment! I hope it was useful and I will post the skirt explanation tomorrow and the final pictures during the following days.
Now excuse me, I have to finish my make up for the party… Bye!
signature1_editado-1
10 comments
3 FacebookTwitterPinterestEmail

How amazing it is to be able to dress like that in February! This is one of the many reasons I love Valencia…

pink-babydoll-sewing-pattern-1

I made this dress before Christmas and it has been one of my favourites ever since. I am already sewing another one in blue with short sleeves.

I lve the flirty flounce, the hidden pockets, the button placket… And the pink fabric of course! I mean, I wear so much pink it’s actually hard to believe my favourite colour is blue (I swear it is!).

You might have recognised the fabric, it’s the same one I used for the petal coat. I have tried wearing the two garments together and I have to admit that even if such sweetness is not for the faint of heart, I love the matchiness of the outfit.

pink-babydoll-sewing-pattern-2

Lately, I have been experiencing and learning about patternmaking and my last projects have almost all been self-designed. This one follows the same rule.

It was fun to incorporate all my favourite elements in one dress and make it work as a whole. The pockets were particularly exciting to design.

The overall loose shape allowed me to have a placket opening at the back instead of the regular zipper one, but I don’t even need to open the buttons to pass the dress over my head.


pink-babydoll-sewing-pattern-3

I hope you like it as much as I do and hopefully I will be able to show you the spring version soon.

pauline-sewing-pattern

44 comments
1 FacebookTwitterPinterestEmail
Hello everyone,
I hope you all had a nice week-end. Mine was spent cutting large circles of polka dots fabric, it could have been worse. I don’t have any pictures of the cutting process, because it’s just cutting, nothing special about it.
You saw my cutting plan, just make sure everything fits on your fabric before you start cutting. I like to trace all my pieces first and then cut them all at once.
I also followed Bea‘s and Azahara‘s advice to line the dress. At first, I thought I wouldn’t need to as I am planning on wearing it over a slip (that’s something I always do with tight dresses). But as they both had experience in flamenca dresses and told me it would be more comfortable, I went through my fabric and found some white cotton. I cut only the front and back bodice parts, I won’t bother with lining the sleeves. Thank you for the advice girls!


tutorial flamenca dress pattern


tutorial flamenca dress pattern
Here is the dress bodice, with the lining attached, on my dressform. This is just to give you (and me) an idea as this dressform, even if adjustable, does not fit my clothes. The minimum size is too big (bust) and too long for me, that’s why there are some pulling lines on the dress. But this dressform is a great coat-hanger…
tutorial flamenca dress pattern

tutorial flamenca dress pattern

The next step is sewing the sleeves with ruffles. And hopefully I will have time to start on the skirt as well.
Have a nice week!
signature1_editado-1
13 comments
2 FacebookTwitterPinterestEmail

Hello everyone!

I hope you are ready for some flamenco today as this will be the first part of a long challenge for me. Do I need to remind you that I decided to make myself a flamenco dress? If you need a little trip on memory lane, you can find my inspiration in the last post.

This project will be done during my week-ends so here is what I did on Saturday: pattern making!

flamenca dress pattern tutorial
my pattern pieces (not exactly on scale).

About the pattern pieces:

(First, I would suggest you to use a fitted dress pattern with princess seams and possibly with sleeves that fits you perfectly. If you feel really confident in your pattern making skills, then why not draw the whole dress, but that’s a lot more difficult. Personally, I am using Butterick 6582, a fitted dress pattern with darts that I tested before and that fits great. See the modifications in the following list).

1- back dress (cut 2). Modifications from the original pattern: I lowered the neckline and redrew the armhole to allow space for the sleeve to be sewn in.

2- front dress (cut 1 on fold). Modifications from the original pattern: I raised the neckline and eliminate the gathers on the shoulder. This means the front also had to be reshaped slightly in order to avoid the neckline to gap from excess of fabric. The armhole was redrawn as well.

3- sleeve (cut 2). I used a Burda sleeve as a model and cut it above the elbow. It is a very basic sleeve pattern I often use. Be careful, it has to be quite fitted!

4- top sleeve ruffle (cut 2). Now the fun part: please take your calculator out and be ready to scratch your head.

I measured the width of the sleeve (mine: 31 cm) and divided by 3.14 to know the diameter of the inside circle of the ruffle (9.87 cm). Then you decide what length you want your ruffle to be, measure the distance from the circle you just made and draw the outside circle (mine’s 12 cm long).

5- bottom sleeve ruffle (cut 2). The inside diameter is the same as the top ruffle, but the length is increased (mine is 17 cm).  Does that make sense? Let me show you some diagram I made:

flamenca dress pattern tutorial

6- skirt (cut 1 on fold). The skirt pattern is a half-circle, so you only need to draw 1/4 and place it on fold. I measured the dress bottom (where you will join the dress and the skirt parts) and obtained 49 cm (front + back – seam allowances). I need to multiply that amount by 4 to obtain the circumference of the inner circle to draw: 49 x 4 = 196 cm.

And then to find the radius: (196 / 3.14) / 2 = 31.21 cm.

Then you can decide the length of the skirt (for example, 45 cm) and then where you are going to sew your ruffles. Here is the diagram:

flamenca dress pattern tutorial

7- ruffles (cut 8). I want my ruffles to be 25 cm long. In order to know how many circles you would need, I measured the length of the ruffle lines on the skirt and multiplied it by 2, which gave me:

  • 1rst ruffle: 49 x 2 = 98 cm
  • 2nd ruffle: 80 x 2 = 160 cm
  • 3rd ruffle: 108 x 2 = 216 cm

Then, I chose a 20 cm diameter for the inner circle of the ruffle, which gave me a 63 cm circumference. If you are going to make the ruffles in only one fabric, add the three measurements you had and divide it by 63 to know how many ruffle you are going to need:

(98 + 160 + 216) / 63 = 7.52 ——- 8 ruffles.

If, like me, you are planning on using contrasting fabric, then prepare yourself for more mathematics.

  • 1rst ruffle is blue: 98 / 63 = 1.55 ——- 2 ruffles.
  • 2nd and 3rd ruffles are white: (160 + 216) / 63 = 5.96 ——- 6 ruffles.

flamenca dress pattern tutorial

And finally, let me show you the pattern placement I used. Remember that I am using contrasting fabric so I need a little bit more fabric. I have 3 x 1,5 meters of blue with white polka dots fabric and the exact same amount of white with blue polka dots fabric. Fold your fabric in two right sides together, matching the selvedges. Here is how I placed my pattern pieces:

flamenca dress pattern tutorial
white fabric / tela blanca
flamenca dress pattern tutorial
blue fabric / tela azul

Next week end, I will be cutting all my pieces and hopefully start on the bodice. I hope that was useful and that it made sense. If you have an question, feel free to ask. Have a nice week.

 signature1_editado-1

28 comments
2 FacebookTwitterPinterestEmail
As promised, I have some posts to share during the week. I accumulated sewing before the holidays as I knew I was not going to make a lot of things at the beginning of the new year.
new-year-dress-sewing-pattern-1
 
Here is the dress I made for New Year’s Eve. I wanted something dressed up that could also pass as a costume. My friends and I always have a costume party for New Year’s Eve and this year I was Bree Van de Kamp. With our red apples, we looked like a poster for Desperate Housewives.
new-year-dress-sewing-pattern-2
The pattern is my own design: a corset bodice with princess seams and a gathered skirt. I added some boning to the bodice so it would stand up on its own and would allow me to wear the dress without a bra. There is a zipper in the center back.
new-year-dress-sewing-pattern-3
I had some black tulle with grey plumetis in my stash and black piqué left from my Burda black dress to underline it. The bodice has a third layer of thick muslim where the boning is sewn and then is lined for more comfort.
I added a velvet edge for a more festive look.
new-year-dress-sewing-pattern-4new-year-dress-sewing-pattern-5
It was a perfect dress to party and dance, what else could I have asked for?
pauline-sewing-pattern


33 comments
2 FacebookTwitterPinterestEmail