Home Tags Posts tagged with "trousers pattern"
Tag:

trousers pattern

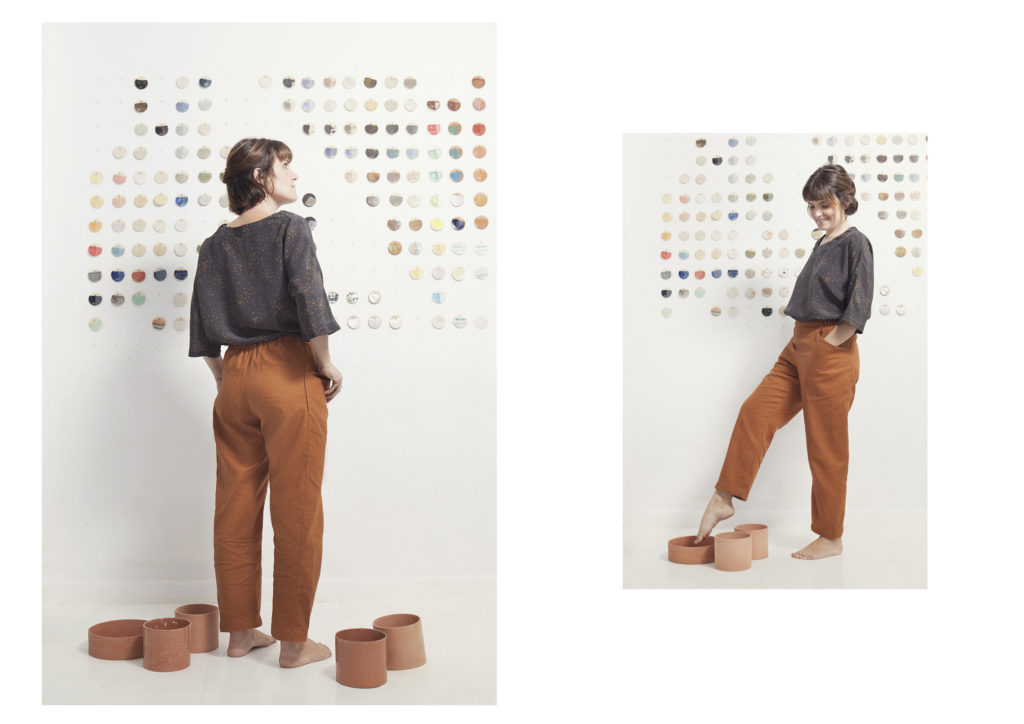
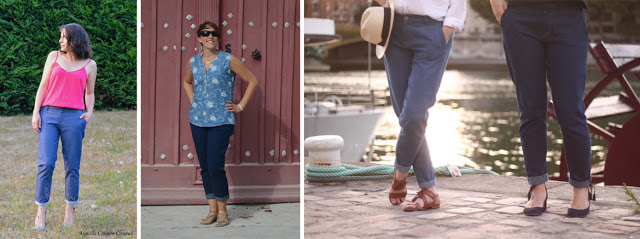
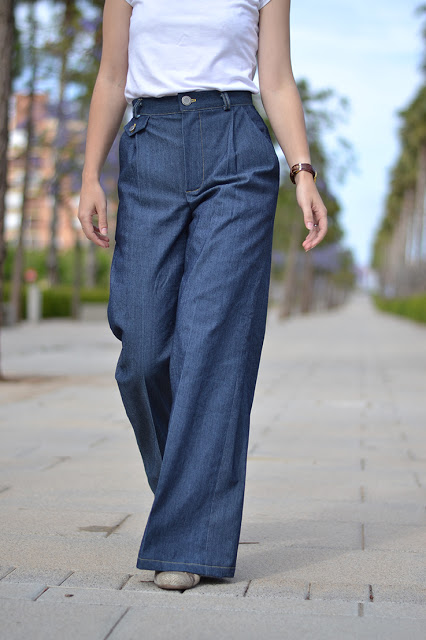
When I designed the Reig trousers pattern, I wanted to make a classic pair of trousers that would be a great basis for almost any type of wide leg trousers. So I thought I would show you how to modify your pattern to make some wide leg jeans.


FRONT


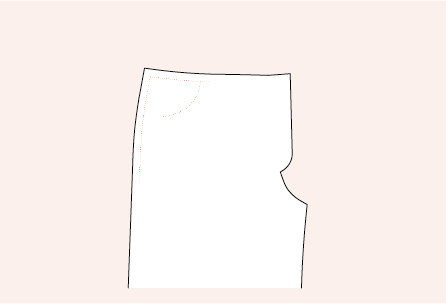
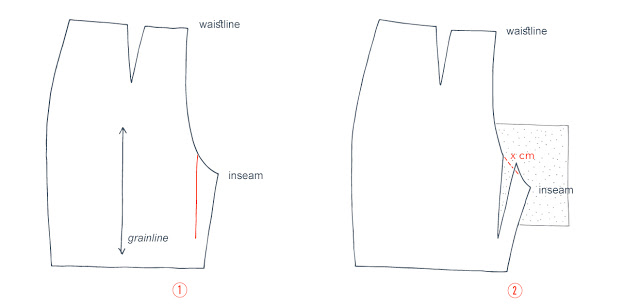
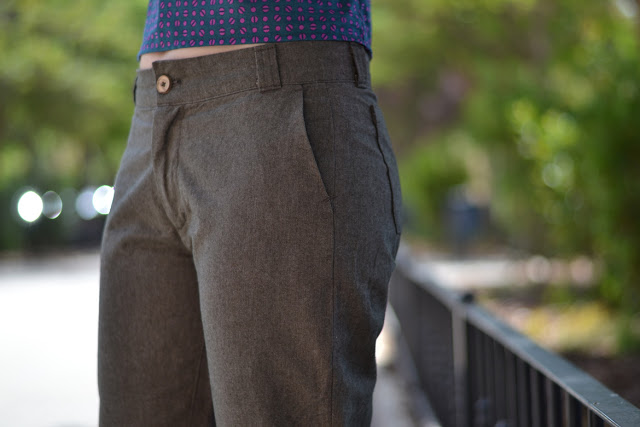
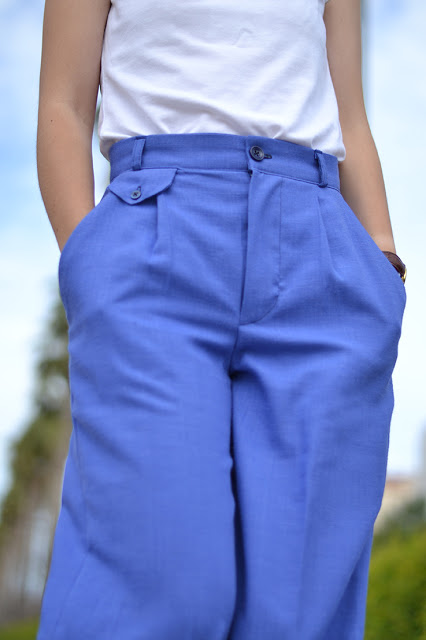
On the front piece, we’ll start by drawing the seam allowances on the top edge and the side (remember, they are 1,5 cm – 5/8″). Then, we will draw the shape of the pocket opening. It needs to be big enough for your hand to enter! You might want to check the dimensions on a pair of jeans and copy it.

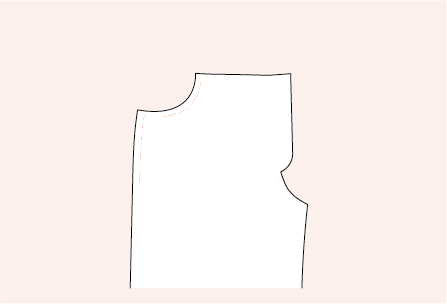
Once you have your pocket opening, add seam allowances to the curved opening (1,5 cm – 5/8″ again) and cut along the new line.
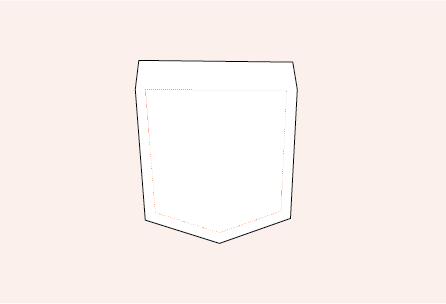
 

POCKETS

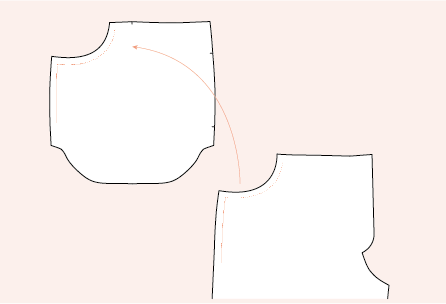
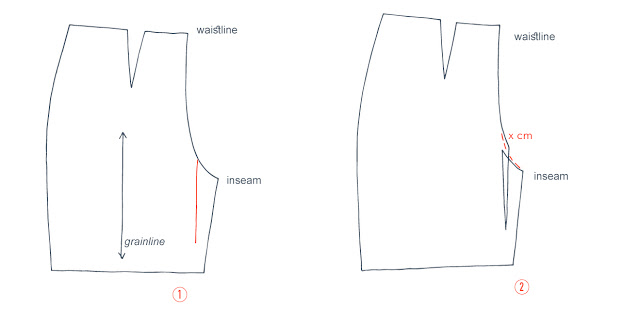
Take the pocket pattern piece and place it under the new front piece. Draw the shape of the pocket opening (with the seam allowances included). That’s your new pocket bag piece.

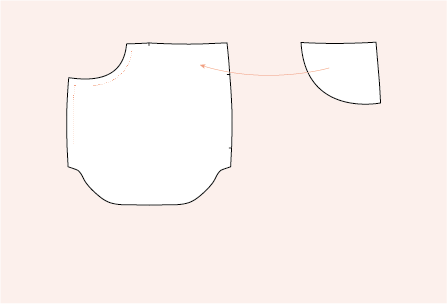
Draw a pocket facing for the other side of the pocket bag: it needs to be wider than the pocket opening. You can add about 2,5 cm – 1″ to the curved seam. This piece will be cut in your main fabric and applied to the pocket to prevent the lining from showing.
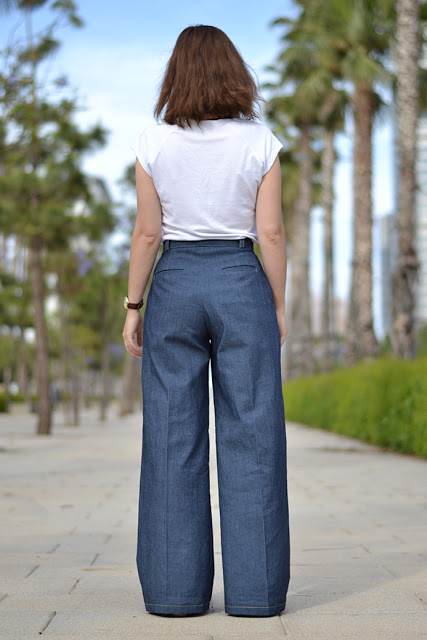
 

BACK

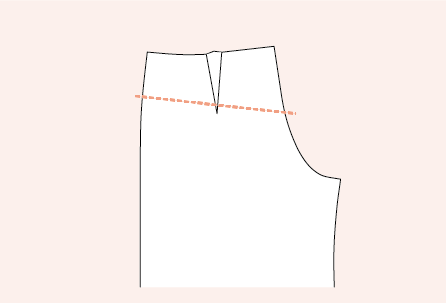
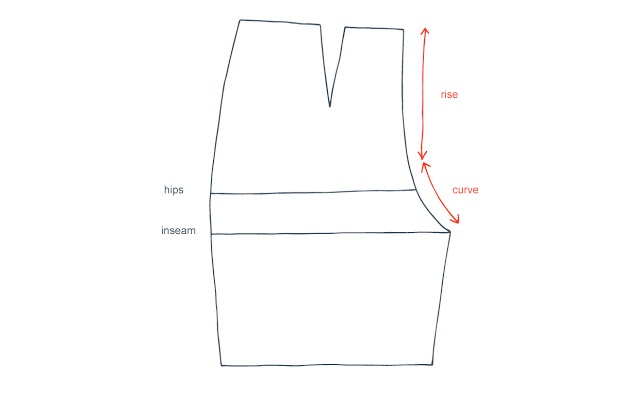
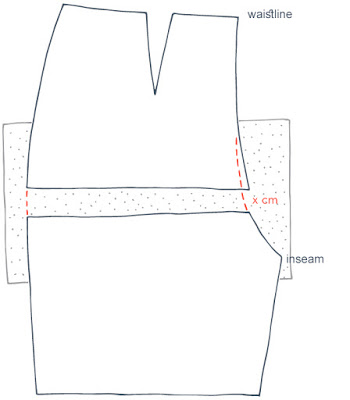
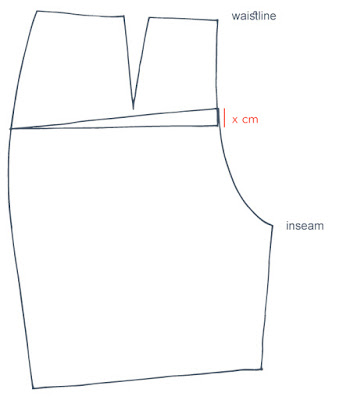
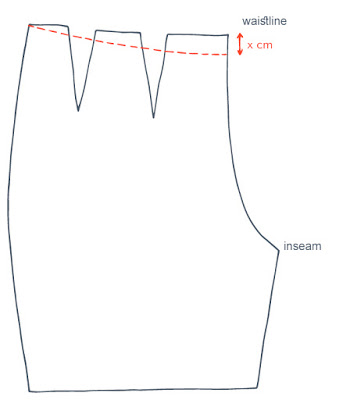
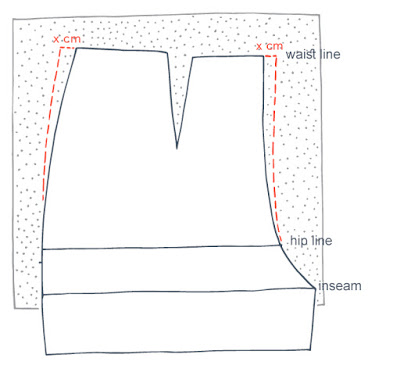
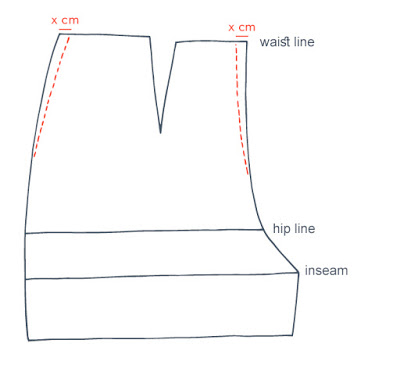
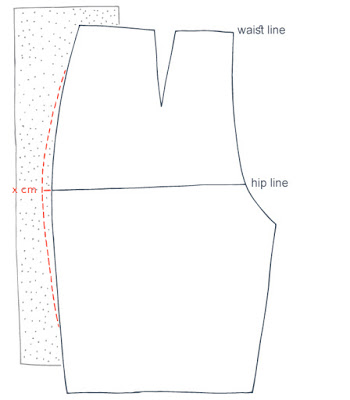
On the back piece, draw a line from the side to the crotch, passing by the tip of the back dart. The line should dip down in the center back. Cut.

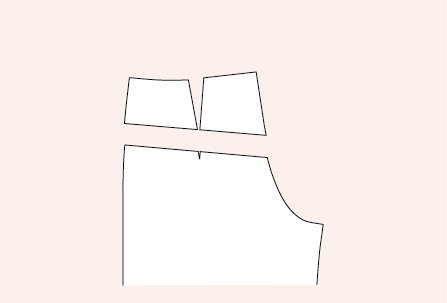
Cut the new back yoke along the dart lines.

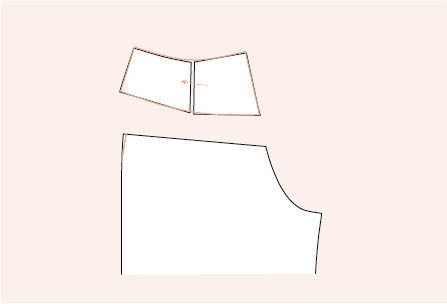
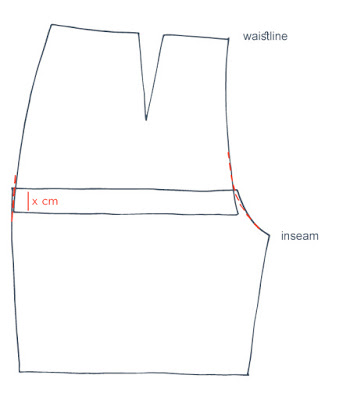
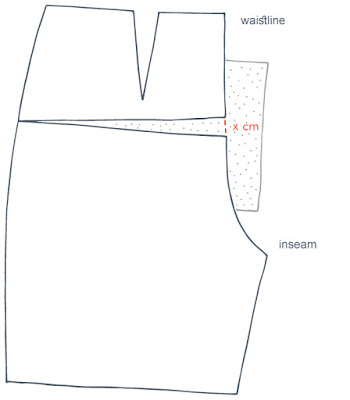
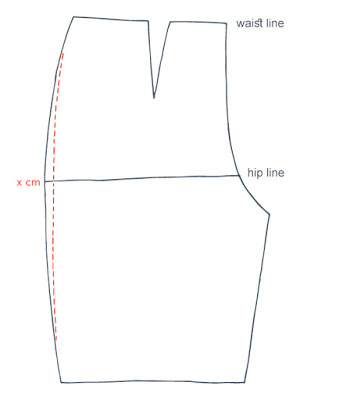
Close the dart by tapping the two pieces together and round the angles. On the back leg piece, shape the side slighty; remove the tip of the dart and bring the side in (remove the same width of the dart).

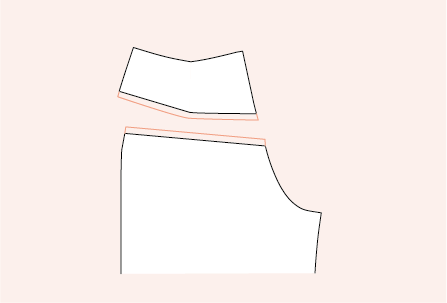
Add seam allowances to the new pieces: the bottom of the yoke and the top of the leg.


BACK POCKET

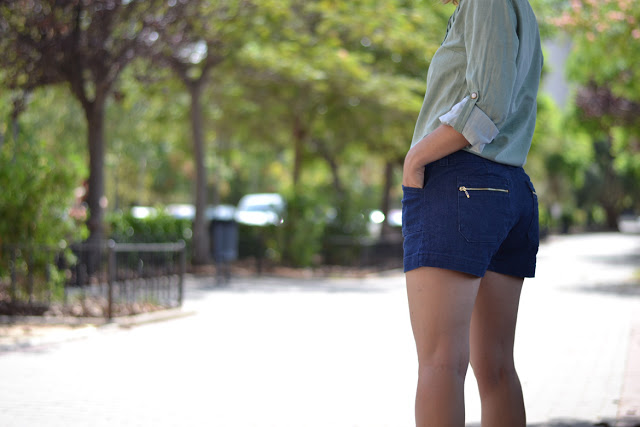
Draw the back pocket. I traced my from my favourite jeans and just added seam allowances around (add twice the seam allowances to the top edge as it will be folded in twice).
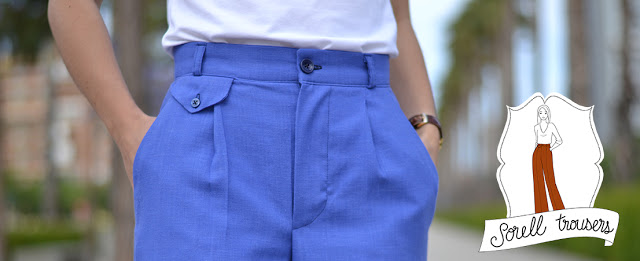
 

WAISTBAND

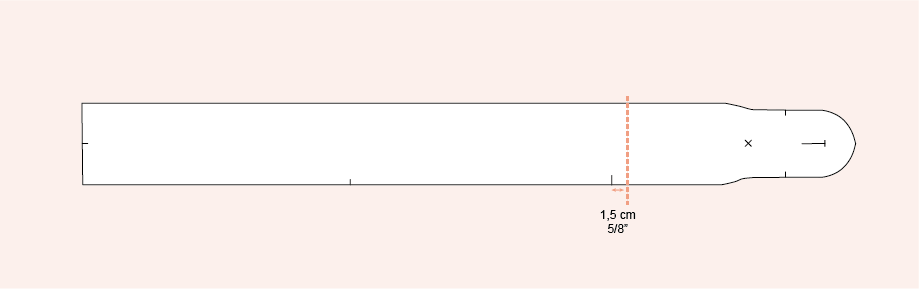
If you want a regular waistband, you just need to cut the right side waistband 1,5 cm – 5/8″ after the center front notch. The left side waistband will stay the same.


Have you ever made some jeans from a trousers pattern? If you want to make some, the REIG trousers are such a great pattern. You can get a copy here!


0 comment
0 FacebookTwitterPinterestEmail

This Morella set has not been easy to finalize! I started designing a pair of trousers to find out 3 weeks later that there already was a very similar pattern. I made changes to keep the same style but with different lines so they would not be confused. And then, another pattern company released a pattern that was quite close, even if not exactly similar. I guess my design was very trendy ? After some time spent changing the Morella pattern again, I’m very happy how it turned out in the end (hopefully there won’t be any pattern release before this one!).

MORELLA

Morella offers two views: trousers and a skirt. For both, you’ll find the same style and details: big pockets, a flat front waistband with elastic in the back and my favorite detail, the side seam that is moved to the back of the leg.

The cut of the trousers is slightly tapered and the hem hits at the ankle. It’s easy to wear, to pull on (thanks to the elasticized back) and will be perfect in every occasion, be it at home, traveling or working. The skirt has a midi length, flattering and easy to accessorize with a pair of sandals in summer or boots in winter.

This collection rhymes with comfort so you’ll find the big pockets and a very practical elasticized waistband. Pull Morella on and you’re ready for a great day!

Here we are showing both versions in linen, but you can also use lots of different fabrics: viscose, Tencel, cotton, light gabardine, chambray, light woolen…

– You can find the MORELLA set in PDF (A4 print-at-home and A0 copy shop included) in sizes 34-52 in the shop! –
And enjoy the Diago + Morella pack at a special price!


Fabric: linen col. Light cognac and linen col. beige – Active Fabrics

1 comment
2 FacebookTwitterPinterestEmail

Romero is a pair of sailor trousers (or shorts) so my first thought was to make them in navy or white gabardine to get a very classic pair of trousers. But it would look amazing with so many different fabrics and style! Here are some examples:


DENIM

1. Black denim – Merchant & Mills

2. Blue jeans – Atelier de la création

3. Dark blue denim – Amandine Cha


NAUTICAL

1. Blue linen – Cousette

2. White gabardine – Amandine Cha

3. Striped denim – Merchant & Mills


PLAYFUL

1. Mustard linen – Cousette

2. Blue print wax – Henry & Henriette

3. Red gabardine – Amandine cha


– You can get the Romero trousers pattern in printed copy or PDF in the shop. –


Inspiration pictures:

1 / 2 / 3

1 / 2 / 3

1 / 2 / 3

0 comment
0 FacebookTwitterPinterestEmail
pattern port trousers alter the crotch 2

Once again, the wonderful team of Artesane share the second part of the trousers adjustments with us! Thanks so much!

…………………………………………………………………………………………………………………..

Now that you can alter the legs of a trousers pattern in your sleep, let’s focus on altering a more difficult area : the crotch.

1/ BEFORE STARTING

MATERIAL

Material needed :

  • Your trousers pattern (front leg and back leg)
  • Pattern paper or Kraft paper (cardboard)
  • Pens in different colours
  • tape
  • scissors

HOW IS MADE THE CROTCH OF A PAIR OF TROUSERS ?

pattern port trousers alter the crotch

The crotch of a pair of trousers is the curved seam that goes from the waistband center front to the waistband center back. It is made of two parts : the rise (the less curved part) and the curve.

You can alter the rise or the curve, or both at the same time. However, we recommend starting by altering only the rise of the crotch as it’s easier to adjust and most of the time, it’s enough to modify the few issue you might have with the inseam, seat or waist area.

WHICH SOLUTION FOR WHICH PROBLEM ?

pattern port trousers alter the crotch 2

The crotch line will determine the fit of a pair of trousers. And a crotch line not adapted to your body specificities might create some issues in the following areas : seat, waist and inseam.
But don’t worry ! To each problem there’s a solution.
 
THE SEAT
 
1/ Your behind is very round (it’s too tight) : you need to widen the curve of the crotch in the back. Moreover,  if the waist tends to go down when you sit, you need to add length to the crotch at the back.
2/ Your behind is flat (there are some lines under the bottom) : you need to shorten the crotch length at the back.
 
THE WAIST
 
3/ Your belly is round (there are some lines around the belly) : you need to lengthen the rise of the crotch at the front.
4/ Your waist is very small (there are some lines just below the waist in the back) : you need to shorten the rise at the back.
 
THE INSEAM
 
6/ The inseam is too tight (There are horizontal lines) : you need to widen the curve at the front.
7/ The inseam is extremely tight (it cuts the legs and the waist) : you need to lengthen the crotch at the front and the back.
8/ The inseam is too wide (it’s too loose) : you need to shorten the crotch line at the front and at the back.
 
THE CASE OF THE ARCHED BACK
 
5/ If your back is really arched, there’s a chance your trousers waist will gape at the back. You need to shorten the crotch line at the back in a specific way that we’ll explain at the end of this post.
2/ LENGTHEN OR SHORTEN THE RISE OF THE CROTCH LINE (front and back at the same time)
 
Some of the issues (nº7 and nº8) need to alter the crotch length a few cm at the front and the back. In theses cases, you’ll apply the following method (that you need to apply on the front piece and the back piece).
LENGTHEN THE RISE
pattern port trousers alter the crotch 3
1/ Cut your pattern piece along the hip line.
2/ Place a piece of paper below the pattern pieces. Determine how many cm you need to add and add them between the two pattern pieces (make sure the pieces stay parallels).
3/ Tape the pieces to the paper and redraw the curves of the crotch and the side.
SHORTEN THE RISE
pattern port trousers alter the crotch 4
1/ Cut your pattern piece along the hip line.
2/ Determine how many cm you need to remove and overlap the two patten pieces (make sure the pieces stay parallels).
3/ Tape the pieces to the paper and redraw the curves of the crotch and the side.
 
3 / LENGTHEN OR SHORTEN THE RISE OF THE CROTCH LINE (only at the back or the front)
 
Some of the issues (nº3 and nº4) need to alter the crotch length a few cm only at the front or the back. In theses cases, you’ll apply the following method to the front piece or the back piece.
LENGTHEN THE RISE
pattern port trousers alter the crotch 5
1/ Draw a line perpendicular to the grainline at the point of the dart. Cut along the line starting from the crotch but stoping before the end. 
2/ Determine how many cm you need to add and spread the pieces according to the cm needed.
3/ Tape the pieces and redraw the crotch line.
 
SHORTEN THE RISE
pattern port trousers alter the crotch 6
1/ Draw a line perpendicular to the grainline at the point of the dart. Cut along the line starting from the crotch but stoping before the end.
2/ Determine how many cm you need to remove and overlap the two patten pieces
3/ Tape the pieces and redraw the crotch line.
4/ WIDEN OR SHORTEN THE CROTCH CURVE
WIDEN THE CURVE
pattern port trousers alter the crotch 7
1/ Trace a line parallel to the grainline at the deepest of the curve. Cut along this line. 
2 / Place paper under the pattern pieces and spread the pieces apart according to the cm you need to add.
3/ Tape the pieces and redraw the crotch line.
 
SHORTEN THE CURVE
pattern port trousers alter the crotch 8
1/ Trace a line parallel to the grainline at the deepest of the curve. Cut along this line.
2/ Determine how many cm you need to remove and overlap the two patten pieces at the crotch.
3/ Tape the pieces and redraw the crotch line.
 
5/ THE CASE OF THE ARCHED BACK
pattern port trousers alter the crotch 9
If you have an arched back and your trousers gape at the back waist, you need to alter the length of the crotch. But we’ll modify it directly from the waist.
1/ Determine how many cm you need to remove (maximum 2 cm). 
2/ Lower the waist line on the crotch side.
3/ Redraw the waist line with a lsightly curved line instead of a straight one.
Now hopefully, you’ll be able to alter the legs or crocth of any trousers pattern to fit you perfectly ! 
signature1_editado-1
16 comments
15 FacebookTwitterPinterestEmail
pattern Port Trousers

I’m very happy to welcome the lovely girls behind Artesane today on the blog for a special post. In case you don’t know Artesane, it’s an online community platform with video classes and tutorials on sewing, knitting, crocheting, bag making, embrodery, pattern making… and many more to come. I am very greatfull to Artesane to have given me the opportunity to teach a sewing class for them on how to make a tailored jacket and I hope to repeat this amazing experience with them. Classes are only available in French for the moment but be sure to check their inspirational site just the same.

Thanks to Artesane for sharing here a great tutorial on how to alter a trousers pattern. That will be very useful for the Port trousers pattern! Let’s start!

……………………………………………………………………………………………………………………..

TROUSERS ALTERATIONS

If there’s one type of pattern that’s difficult to standarize, it has got to be trousers. Everybody has got different body types and it’s quite rare not to have to alter a trousers pattern. That’s why we often have a favorite store-bought trousers brand or model ! It’s not easy to find a ready-to-wear model that fits perfectly at first try.

The best thing would be to make a muslin for every model that you like and think could be a go-to pattern.

Once this pattern is altered and fitted, you’ll have a tailored trousers pattern and will be able to use it again and again !

1/ Before starting

Material needed :

  • Your trousers pattern (front leg and back leg)
  • Pattern paper or Kraft paper (cardboard)
  • Pens in different colours
  • tape
  • scissors

How is made a pair of trousers ?

Trousers are made of two legs, a waistband and a type of closure (a fly for example).

Each leg is made of a front piece and a back piece. The back pieces is usually bigger than the front one. The back crotch is longer and curvier (that’s where our bum goes !).

Before starting any alteration, you need to add five reference lines on your pattern :

  •  waist line
  •  hip line (measure at the largest point)
  •  inseam line (it corresponds to the end of the seat)
  •  knee line
  •  hem line

ENSchemas1

Once you’ve added these lines to your pattern, it’s time to alter the trousers leg (there’ll be a second post on how to alter the crotch as it’s a vast subject).

So apart from the crotch adjustment, once you’ve made your muslim, you can see various type of issues :

– your trousers are too long o too short ; you have thus to lengthen or shorten the trousers leg ;

– your trousers are too wide or too small around the waist ; you have to adjust the waist ;

– your trousers are too wide at the hips or on the contrary, they’re too tight and uncomfortable ; you need to alter the trousers at the hips ;

2/ Lengthen or shorten the trousers legs

The technics used to lengthen or shorten a pattern piece are the same for any kind of garments. But still, let’s have a little reminder.

HOW TO SHORTEN A PATTERN PIECE ?

ENSchemas3

1/ You need to determinate how many cm you need to remove. Above the shorten/lengthen line on the pattern, trace a parallel line at X cm.

2/ Folding the pattern piece, overlap the two lines.

3/ Tape the fold close.

HOW TO LENGTHEN A PATTERN PIECE ?

ENSchemas4

1/ Cut the pattern piece along the shorten/lengthen line.

2/ Place a new piece of paper below the two pattern pieces. Determinate how many cm you need to add and spread the two pieces apart X cm (make sure the lines stay parallel).

3/ Tape the two pieces to the paper and join the two pieces together.

WHERE TO PLACE THE SHORTEN/LENGTHEN LINES ON A TROUSERS LEG
pattern Port Trousers 4

Now that we’ve seen the techniques, the important thing is to know where to apply them. Indeed, if you were to lengthen a trousers leg at the wrong place, there’s a good chance the general shape will get distorted.

1/ If the shortening/lengthening is small (up to 3 cm), the line has to be placed just above the knee (line 1).

2/ If the alteration is more important, it needs to be made in two places. Divide the length you have to add or remove from the leg in two. Then draw two adjustment lines above and below the knee (line 1 & 2).

If the alteration is minimal, you can do it at the hem line.

3/ Widen or tighten at waist

The secret of a great waist adjustment resides in distribution ! The more you distribute evenly the cm you have to add or remove, the less you’re going to change or distort the shape of the trousers. And this is even more true if the adjustment is important ! You’re going to add or remove the cm needed on both sides of each front and back leg, meaning at 8 different places !

HOW TO WIDEN THE WAIST ?

pattern Port Trousers 5

1/ You need to determinate how many cm you need to add at the waist.

2/ Divide by 8. The end result is X cm.

This adjustment applies to both the front and back pieces (make sure you don’t forget one of the two pieces!) :

3/ Place some paper below your pattern piece.

4/ Extend the waist line on both sides of the pattern piece. Add X cm to both sides (see diagram below).

5/ From these marks, trace the new stitching lines joining gradually the existing ones. The key is to draw progressively the new line so that we don’t get any « bump ».

HOW TO TIGHTEN THE WAIST ?

pattern Port Trousers 5

1/ You need to determinate how many cm you need to remove at the waist.

2/ Divide by 8. The end result is X cm.

This adjustment applies to both the front and back pieces (make sure you don’t forget one of the two pieces!) :

3/ At the waist line, remove X cm on both sides of the pattern piece (see diagram below).

4/ From these marks, trace the new stitching lines joining gradually the existing ones. The key is to draw progressively the new line so that we don’t get any « bump ».

4/ Widen or tighten at hips

Again, the secret of a great hip adjustment is in distribution ! The more you distribute evenly the cm you have to add or remove, the less you’re going to change or distort the general shape of the garment. And this is even more true if the adjustment is important ! You’re going to add or remove the cm needed on both sides of each front and back leg, meaning at 4 different places !

HOW TO WIDEN THE HIPS ?

pattern Port Trousers 6

1/ You need to determinate how many cm you need to add at the hips.

2/ Divide by 4. The end result is X cm.

This adjustment applies to both the front and back pieces (make sure you don’t forget one of the two pieces!) :

3/ Place some paper below your pattern piece.

4/ On the exterior side of the leg, we’ll extend the hip line a few cm. Add X cm (see diagram above).

5/ From this mark, trace the new stitching line joining gradually the existing one from waist to hem. The key is to draw progressively the new line so that we don’t get any « bump ».

Be careful, if the trousers have a straight leg, you have to join the new hip line to the waist but you should extend the leg in a straight line to the hem, parallel to the previous stitching line.

HOW TO TIGHTEN THE HIPS ?

pattern Port Trousers 7

1/ You need to determinate how many cm you need to remove at the hips.

2/ Divide by 4. The end result is X cm.

This adjustment applies to both the front and back pieces (make sure you don’t forget one of the two pieces!) :

3/ On the exterior side of the leg, we’ll remove X cm to the hip line (see diagram above).

4/ From this mark, trace the new stitching line joining gradually the existing one from waist to hem. The key is to draw progressively the new line so that we don’t get any « bump ».

Be careful, if the trousers have a straight leg, you have to join the new hip line to the waist but you should extend the leg in a straight line to the hem, parallel to the previous stitching line.

With these techniques, you’ll be able to adjust the legs of your favourite trousers pattern (length, waist or hips) ! We’ll see how to adjust the inseam and the crotch as well as how to alter the seat very soon.

…………………………………………………………………………………………………

THANKS ARTESANE!

signature1_editado-1

0 comment
4 FacebookTwitterPinterestEmail
Testers PortTrousers2
First of all, I want to thank you all for the warm welcome you gave to the Port trousers & shorts pattern! I hope to see lots of them stitched up very soon 😉
And because it’s always easier to get inspiration for a project when you’ve seen a few versions made in different fabrics and worn by different people, let’s review some of the testers’ Port trousers.
As you can see, denim has been a favourite amongs the testers. You can play with contrasting topstitching to give your Port trousers a jeans style or keep it casual. Just remember than denim has a tendency to stretch when worn (going down a size might be a good idea. My shorts version is perfect on the first day but a little too big on the following one for example).
TestersPortTrousers1
If you want a more dressed-up version, you can use gabardine, cotton twill or chambray like these testers. I think the Port trousers are really easy to wear (and sew by the way!) and it’s the kind of garments you can wear from day to night depending on how you accesorize.
TestersPortTrousers2
Un chas un chasLise TailorSur un fil – my striped version
I hope all these beautiful Port trousers will give you some inspiration. If you want more, check out the Port trousers & shorts board on Pinterest.
Which version do you like best? And what about fabric choice? Let me know how your Port trousers are going to look like…
signature1_editado-1
0 comment
1 FacebookTwitterPinterestEmail
port trousers 6

PortA6

Here it is, the new pattern: the Port trousers and its short version. Its casual look will be perfect for the back at school/work season or the ones who don’t want to say good-bye to summer.
The chino cut, military inspired, makes it perfect all year-round. How about wearing view A with cuffed hems and heels for work or view B to make the most of the last summer days?
PortA4
PortA5
PortB4
The Port trousers have a relaxed fit at the waist and hips with a slightly tapered leg and ankle length, as well as a mid-rise waistband with belt loops. There are many pockets options (you all know my love for pockets by now, no?): view A with front slant pockets and back patch pockets, view B with front patch pockets and back zipped pockets.
I recommend using medium-weight fabrics such as gabardine, twill cotton, linen, denim… or even lightweight woolen fabrics for a more dressed-up version.
PortB2
PortB3
The Port trousers pattern is available at the shop only as a PDF download.
I wanted to propose an easy trousers pattern, with interesting details, that could be made quite quickly (print it, stitch it on the very same day! Great as the week end is coming!). And printed pattern are coming back very soon…
I’m preparing a series of posts on trousers common adjustments, inspiration and a few tutorials in the up-coming weeks.
PortB5
PortA2
Fabrics:
View A: gabardine from Cousette (worn with a Bailén top in rayon from Cousette)
View B: denim from Julían López (worn with a Carme blouse)
I hope you’ll like the Port trousers and that it will join your fall wardrobe!
signature1_editado-1
0 comment
1 FacebookTwitterPinterestEmail
I would like to start this post with an giant THANK YOU!
Thank you to all of you who bought the new patterns, the Sorell trousers and the Xerea dress! I’m so happy (and relieved) that you like them!And Thank you to my testers! I’m so grateful for your help, your advices on the design and instructions… Without you all, I wouldn’t have been able to release these new patterns!And now, let’s talk about the Sorell trousers! Again!
I know sewing trousers can be intimidating: what with the fly, the pockets, the waistband… so many details that can go wrong.
I knew a step-by-step photo tutorial would be the perfect support for this pattern and that many beginners would feel better with extra pictures and instructions.You can download the Sorell trousers Tutorial here (in English).If you have questions, feel free to ask them in the comment section below.
Want some ideas for your Sorell trousers? Check out my inspiration board on Pinterest.

signature1_editado-1.

2 comments
1 FacebookTwitterPinterestEmail
sorell-trousers-pattern-sewing-1

After a post last week, here I am again, back from my hibernation with 2 new patterns: The Xerea Dress and the Sorell Trousers.Let’s talk about the latter today:

sorell-trousers-pattern-sewing-2sorell-trousers-pattern-sewing-3
The Sorell trousers are high waist pants with a lot of details inspired by men’s trousers (even the zipper side!). And you’ll recognize the style of the Hollywood actresses I admire: Katherine Hepburn’s casual confidence, Marlene Dietrich’s androgyny, Vivien Leigh’s modernity…
sorell-trousers-pattern-sewing-4sorell-trousers-pattern-sewing-5
If you’re a fan of pockets, you’ll be more than happy with its 4 kinds of pockets: slash pockets, watch pockets and then View A has back welt pocket whereas View B has patch pockets. Of course you can choose to make only the front slash pockets to make it easier or if you plan to use a printed fabric.
sorell-trousers-pattern-sewing-6
Talking about fabrics: Sorell is perfect with a woolen fabric for winter, linen for summer or denim for a retro look. And if your fabric has a little bit of stretch, no problem (but I wouldn’t recommend anything with more than 3 %).
sorell-trousers-pattern-sewing-7
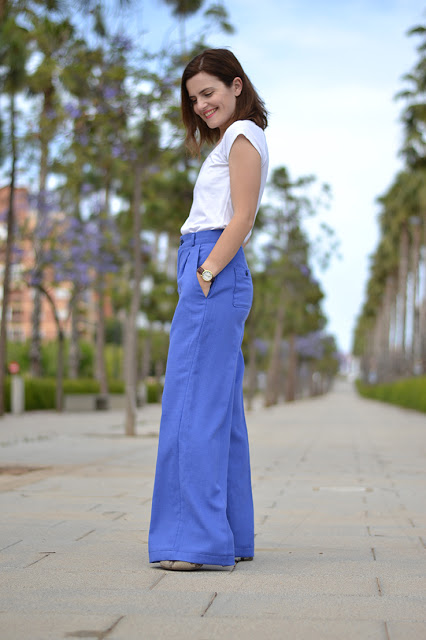
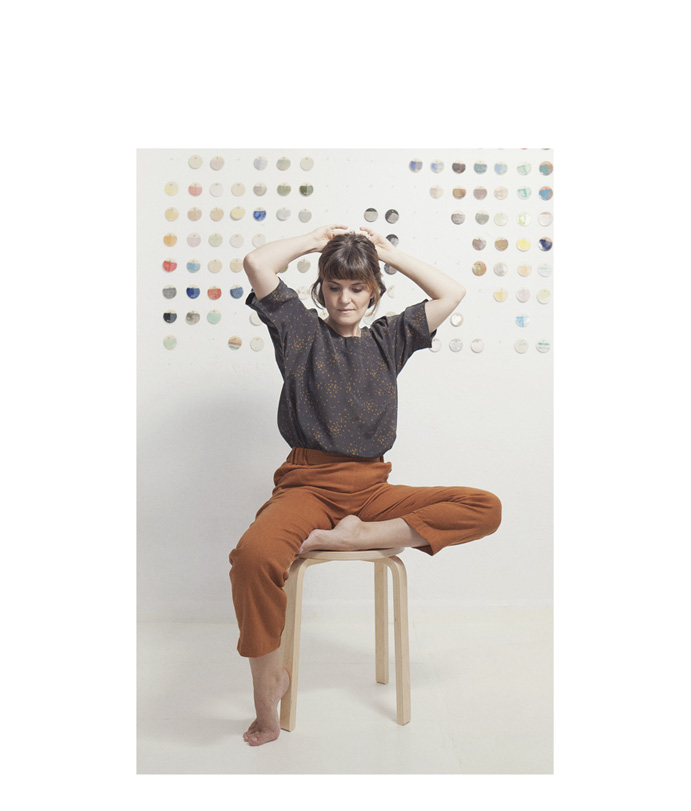
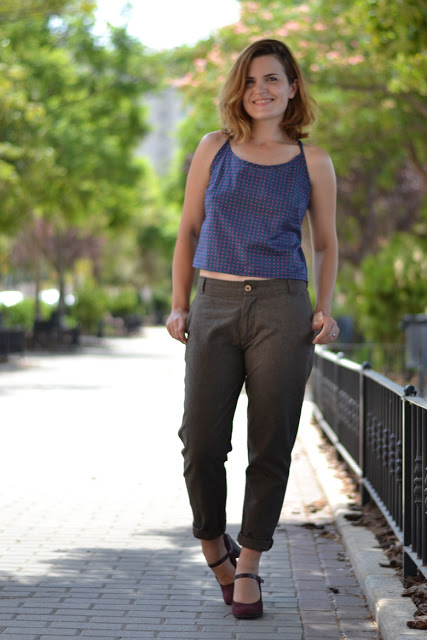
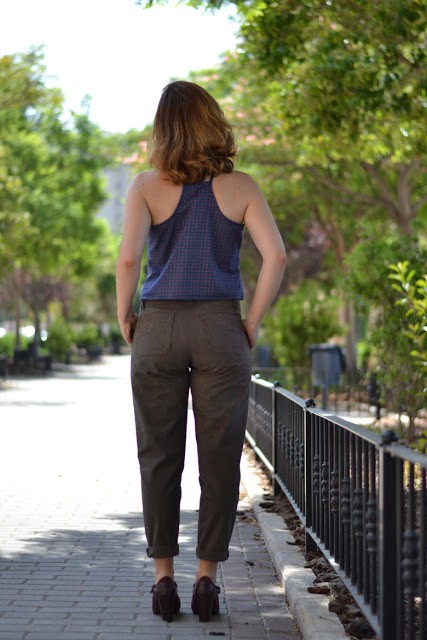
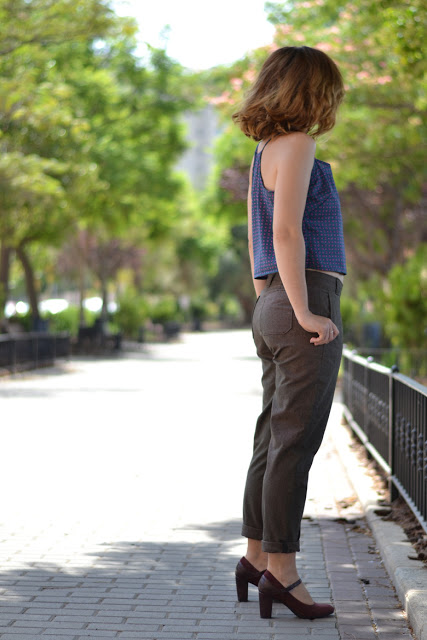
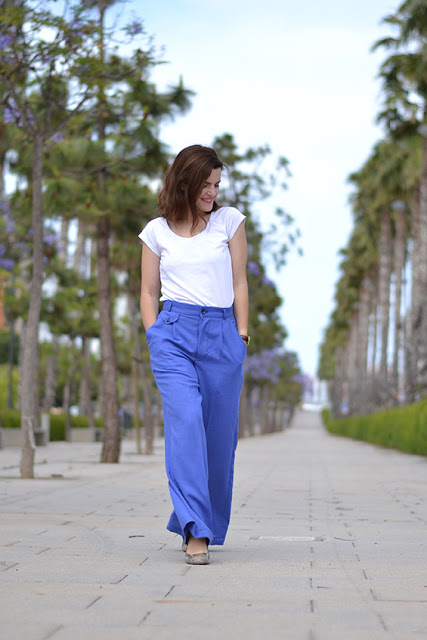
For a vintage look, the trousers legs are wide but the waist and hips are fitted so if you are between 2 sizes or you’re afraid to be unable to sit after lunch, choose the bigger. Anyway, the best solution it still to make a muslin (even a simplified one with the main pieces).
I’ll be coming back with a step-by-step photo tutorial very soon, so even if it’s your first pair of trousers, don’t be afraid to try it!
sorell-trousers-pattern-sewing-8Just a word on the fabrics i used: View A is made in denim from The Sweet Mercerie and View B in a linen/silk mix from Julián López.

signature1_editado-1

20 comments
0 FacebookTwitterPinterestEmail