It all begins with this amazing fabric: I saw it 3 months ago at my local shop when I went for interfacing (and the plan was to leave with only interfacing). I remember thinking ” wow, what a great print!” and then touching it and thinking “wow, and it’s super soft as well”. So I grabbed 1,5 m and went home with it!
It reminded me of last seasons Dolce & Gabbana printed dresses with large florals and fruits, and I love Dolce & Gabbana retro classic italian (and a little over-the-top) style.
Back of the seda dress pattern
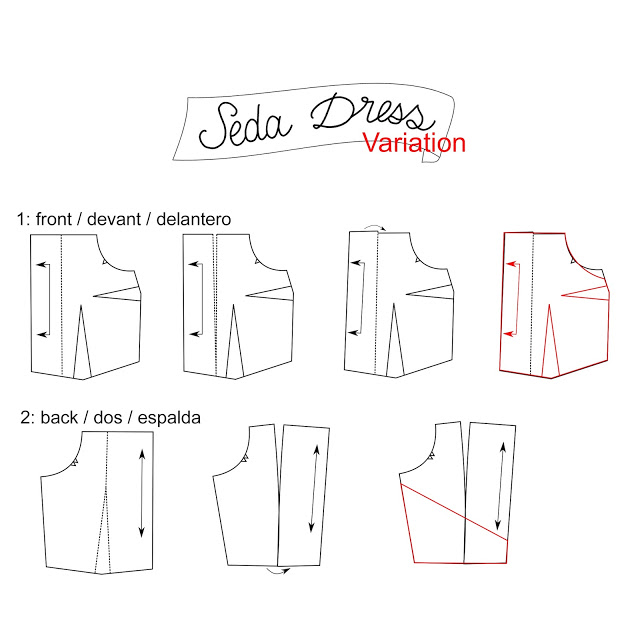
Steps to change the dress
I knew I was going to use it for a double wedding* I had in June (*2 weddings on the same day! That was crazy but so much fun!) and I wanted a simple retro shape for the dress. I thought about the Seda dress pattern and decided to hack it. Here are the changes I made with a diagram:
- First I made a muslin of the bodice without sleeve, adding some straps. As the bodice top is supposed to be attached to sleeves, I had to remove some ease at the neckline to bring it closer to the chest. I just cut a line parallel to the grainline/foldline and overlapped by 2 cm (removing 4 cm in total).
- I redrew slightly the front armhole and lowered it.
- I cut open the back bodice dart and taped the two pieces together (no need for dart with this low back). I redrew the back tracing a diagonal from the armhole (making it match the new front one), ending about 10 cm above the waistline.
- I made fabric loops, long ones! The loops go from the back and cross each other passing through a smaller loop in the front.
- I used the same skirt pattern but had to remove some width as my fabric only had a 45″ width. It’s not as full as the original Seda dress pattern.
- I lined the bodice only.

Verdict: Love it! The simple shape of the dress allows the fabric to shine and that was the idea. It was really comfortable to wear all day (the fabric is cotton twill with a bit of stretch!). I love the straps detail, it’s my favorite part of the dress, even if I could have added 2 cm to each strap to make the waistline sit a little bit lower.
And the best thing is that I’ve been wearing many times since!
I hope you’ll like it and that you’ll give a try to this summer variation!
11 comments
Me encanta!!!❤❤❤❤❤❤
Me encanta!!!❤❤❤❤❤❤
Muchas gracias guapa!
Gorgeous dress, the straps are so cute and loving the bright fabric
Thanks!
So pretty! Very Dolce too:)… I love their style.
Thank you Francesca!
Gorgeous dress!! I love this variation 🙂
Thanks Anya
Merci pour ce tutoriel, c'est une super idée ! Serait-il possible de connaître la longueur totales des bretelles ?
Merci Isa, contente que le tuto te plaise! Pour les bretelles, le mieux c'est d'adapter la longueur sur toi selon la position et l'effet voulu, mais par exemple, mes bretelles mesurent 80 cm environ (il y a deux bretelles qui se croisent).