Home Tags Posts tagged with "self-drafted"
Tag:

self-drafted

silk-maxi-dress-sewing-pattern-1
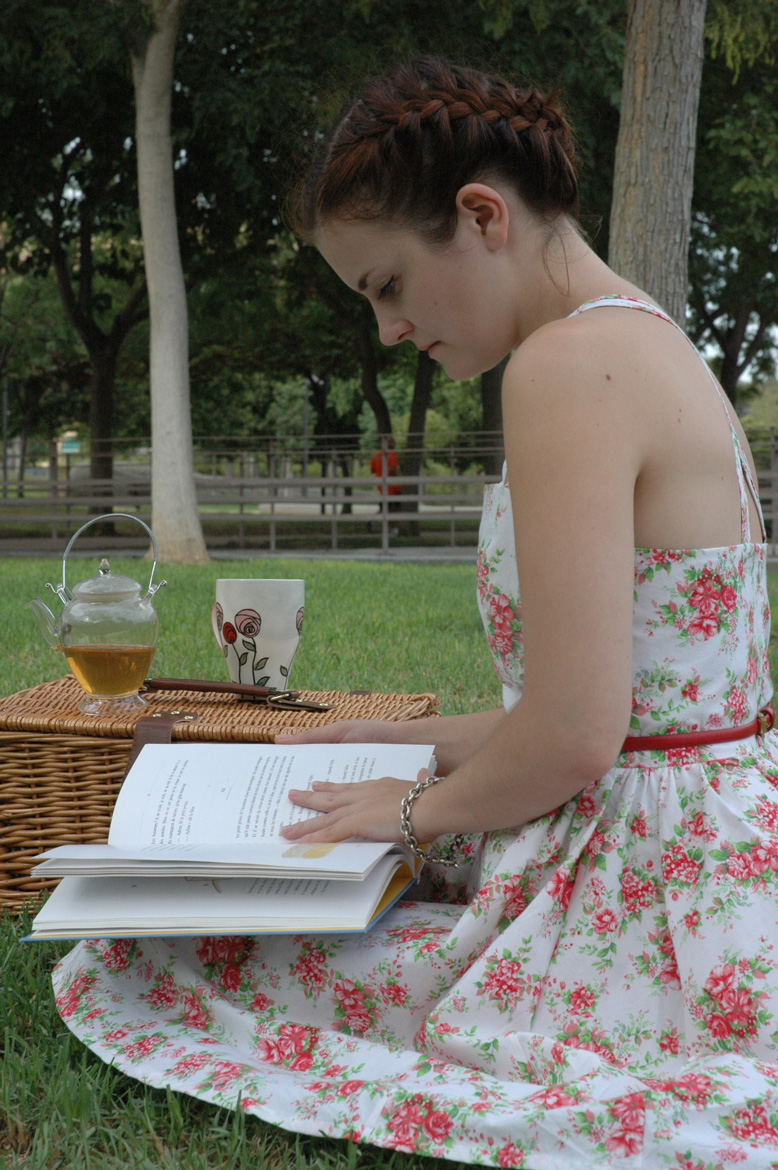
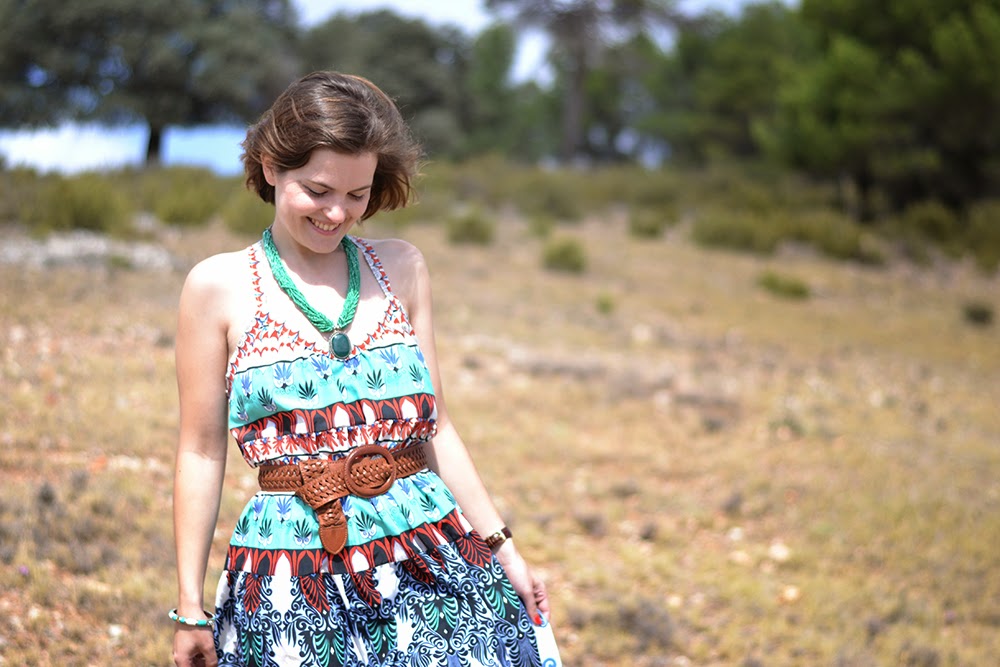
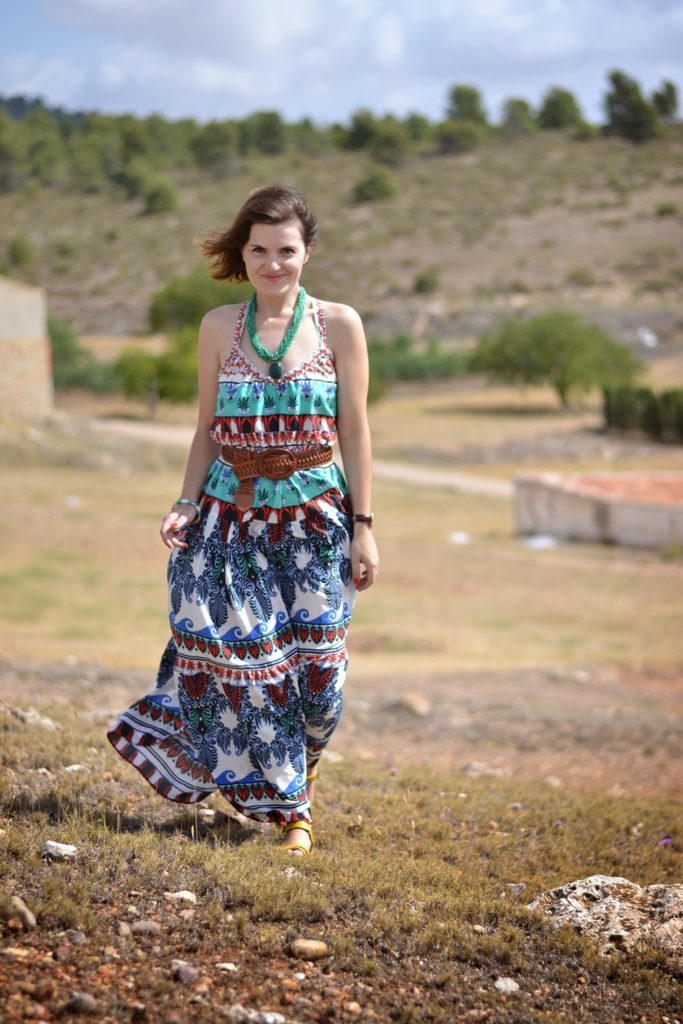
J’adore les robes maxi, les jupons romantiques qui volent au vent… Et oui, je vais vous faire une confession: à la fac, j’étais plutôt hippie! Et donc parfois l’envie me reprend de mettre une robe longue jusqu’aux pieds, des sandales et des perles…


silk-maxi-dress-sewing-pattern-2

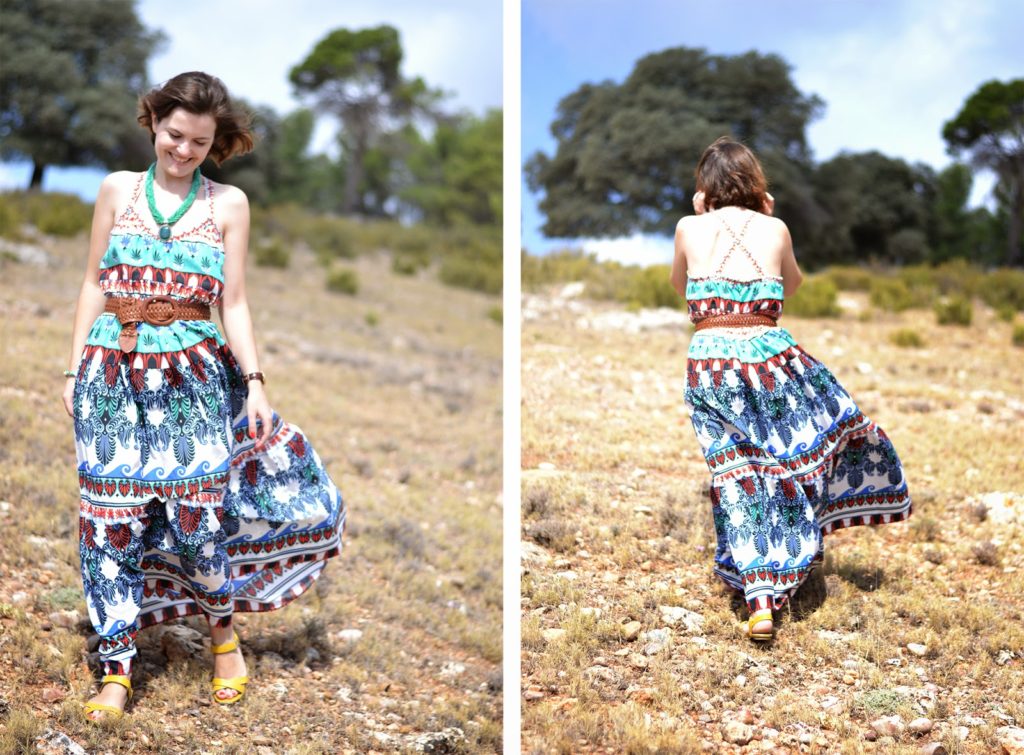
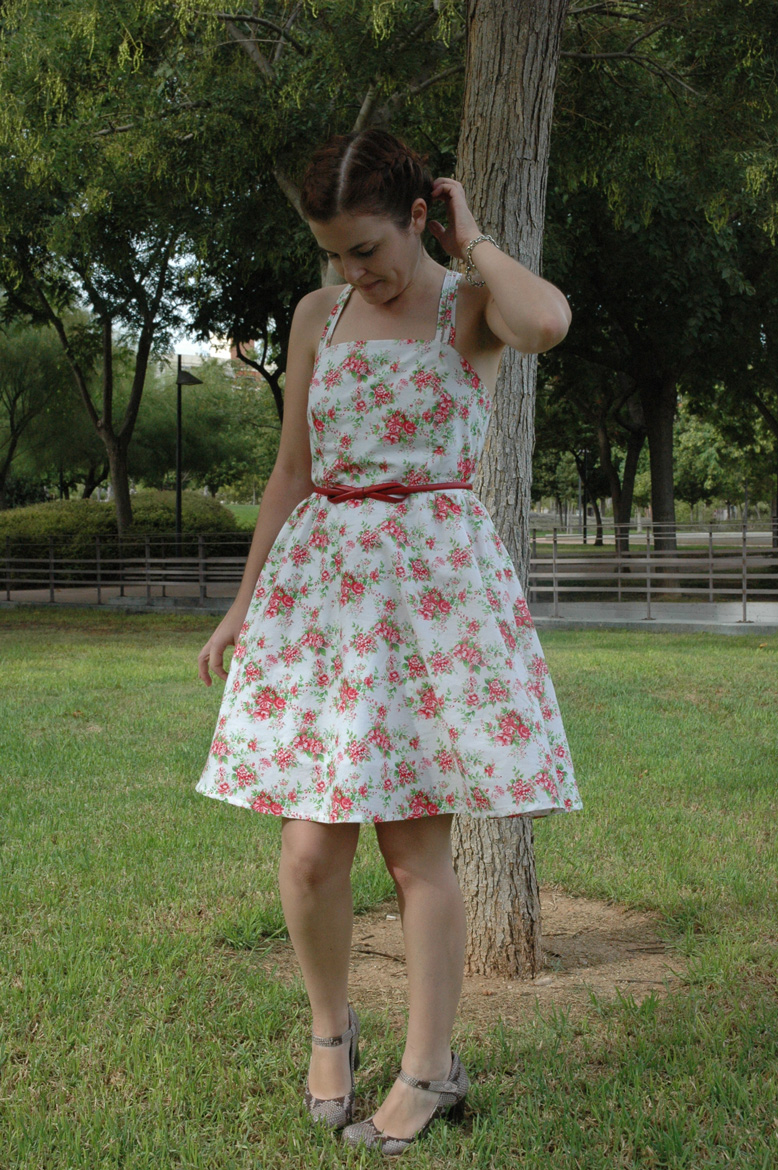
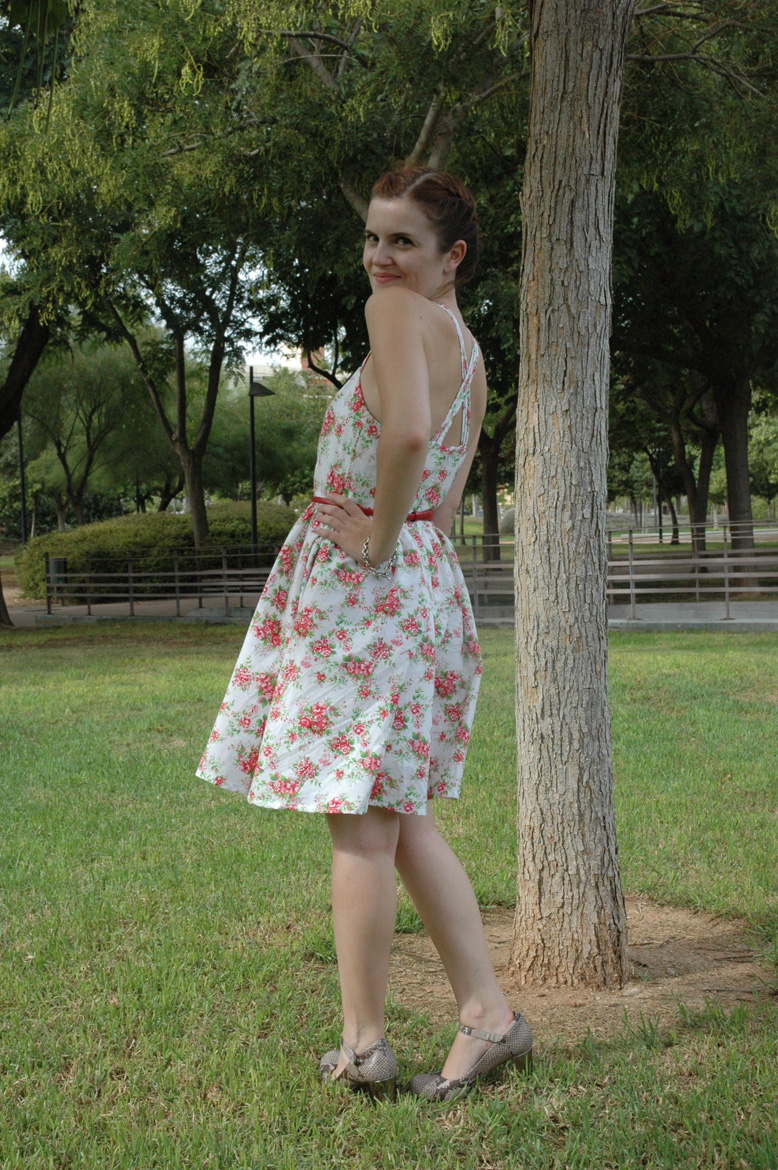
J’ai trouvé cette magnifique soie pendant les soldes cet été et en voyant les lignes de l’imprimé, j’ai tout de suite pensé à cette forme de robe. Je ne voulais pas de patron compliqué mais plutôt les pièces les plus grandes possibles pour mettre en valeur l’imprimé et les couleurs.
J’ai découpé des rectangles pour les volants en suivant les lignes de l’imprimé. La robe est faite de 3 grands rectangles pour la jupe et un plus petit en forme pour le corsage (celui-ci est doublé car interdiction de porté un soutien-gorge). Le volant du bas mesure 3 m de large (2  laizes), le second 2 m et le troisième 1,5 m (une laize). Les bretelles croisées sont faites avec une bande de tissu pliée comme un ruban de biais. J’ai aussi ajouté un élastique dans le dos.

silk-maxi-dress-sewing-pattern-3


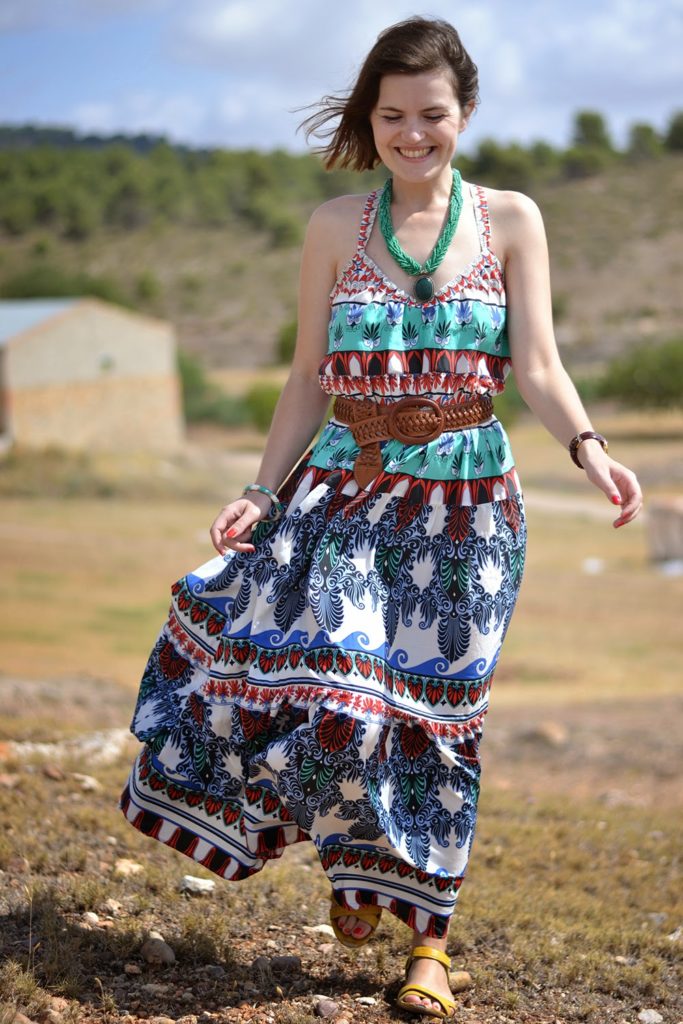
C’est vraiment une robe facile à faire (une après-midi) et tellement agréable à porter. La soie est légère à souhait et douce, elle s’envole à la moindre brise pour un des plus joli effet.
Et en plus, sans ceinture et avec talons, elle fera une robe de fête parfaite.
Surtout ne laissez personne vous dire que les maxis ne sont pas faites pour les petites: moi et mon mètre 55, on est fan!


silk-maxi-dress-sewing-pattern-4

signature1_editado-1.

0 comment
0 FacebookTwitterPinterestEmail
Pendant la conception du patron de la robe Camí, j’ai longtemps hésité entre faire un col chemisier classique et un col claudine. Bon, vous savez lequel l’a remporté mais j’ai quand même gardé l’idée du col claudine dans un coin de ma tête, juste au cas où. Je vais donc vous montrer comment dessiner votre propre co claudine pour la robe Camí (ou toute autre robe ou blouse). Si vous ne vous sentez pas prête à attaquer le col chemisier ou que vous voulez une robe au style encore plus féminin, voilà la parfaite alternative!

cami-sew-along-collar-variation-peter-pan-collar-1cami-sew-along-collar-variation-peter-pan-collar-2

1. Prenez les pièces de corsage devant et dos du patron. Sur le corsage devant, choisissez où vous voulez que le col arrive: superposé au dessus de la patte de boutonnage (première photo – pliez la première partie de la patte), au milieu de la patte (pas de photo – pliez sur la ligne de boutons), avant la patte de boutonnage (deuxième photo – pliez la patte entièrement). Marquez les marges des épaules (1,5 cm).


cami-sew-along-collar-variation-peter-pan-collar-3
2.Faites coïncider les marges à l’encolure.

cami-sew-along-collar-variation-peter-pan-collar-4
3.De l’autre côté (emmanchure), superposez une ligne de l’épaule sur l’autre. Plus vous augmentez l’angle, plus le col se tiendra debout. Un bon compromis est de mesurer environ 2 ou 3 cm entre les deux lignes de marges.


cami-sew-along-collar-variation-peter-pan-collar-5
4.Maintenant scotchez ensemble les pièces du patron afin qu’elles ne bougent pas et prenez du papier à patron. Décalquez le contour de l’encolure.


cami-sew-along-collar-variation-peter-pan-collar-6
5.Comme le dos est coupé sur la pliure du tissu, je vais dessiner un col plein dans le dos. Le patron du col claudine sera aussi à couper dans la pliure du tissu. Décidez la longueur voulue du col et ajoutez 3 cm (marges de 1,5 cm en haut et en bas).  Commencez à tracer la longueur totale tout autour de l’encolure.


cami-sew-along-collar-variation-peter-pan-collar-7
6.Quand vous arrivez au milieu du corsage devant, ajoutez une marge de 1,5 cm. Finissez le col en courbe.
7.Découpez deux pièces de ce patron sur la pliure du tissu dans le tissu et l’entoilage. Thermocollez et piquez la couture extérieure, endroit contre endroit. Crantez ou coupez les marges à ras, retournez sur l’endroit et repassez. Prêt pour être attaché à l’encolure de la robe!

pauline-sewing-pattern

0 comment
0 FacebookTwitterPinterestEmail
If you’re like me, when you see a garment you like on the internet, you want to know how it’s made. There is nothing more frustating than finding the perfect dress or skirt and having no idea of what pattern was used or good enough pictures to figure it out. What I love are blogs with construction pictures, that way, even if I don’t have the pattern, I can try to make something similar. If only I did that! But everytime I try to take pictures of the construction, I forget and keep on sewing until it’s almost finished… Do what I say, not what I do 🙂
Ok, I made an effort and took pictures of the construction of the Scarlett dress, good girl!
Let’s start with the corset:

scarlett-dress-construction-sewing-pattern-1scarlett-dress-construction-sewing-pattern-2scarlett-dress-construction-sewing-pattern-3scarlett-dress-construction-sewing-pattern-10

It’s made of heavy muslin (or coutil in the corset world). I am pretty happy with it being my first corset but I would make some changes for the next one. I wasn’t able to find spiral metal boning in any notion stores in Valencia so I had to use plastic boning. Not bad for a night but I don’t think it would be confortable for a longer time. Nor was I able to find a busk to close and open the front. So I have to lace it open everytime I want to wear it.
The pattern is made from my measurements and is amazing. I found it here, the fit is perfect and it’s very easy to follow and make, you just need a piece of paper, a ruler and a calculator. The same girl also has a tutorial on how to sew the corset here. I didn’t make the same flat-felt seams, just regular seams with slip-in-the-ditch to create boning channels.
I didn’t have metal grommets so I sewed them by hand like small buttonholes. Took me a whole movie, not so bad…

scarlett-dress-construction-sewing-pattern-4scarlett-dress-construction-sewing-pattern-5

Here is the hoop-skirt: the most important part of the costume as it support the whole dress. The volume depends of how many hoops you add and the width. Here is how I made mine:

scarlett-dress-construction-sewing-pattern-6 scarlett-dress-construction-sewing-pattern-7scarlett-dress-construction-sewing-pattern-8


Now the underskirt: you need it to cover the hoop skirt and smooth the boning lines. It’s very simple to make: gather a big rectangle of fabric! For example, mine is 4 meters wide (it has to be wider than the hoop skirt, important). I made a small gathered flounce at the bottom (6 meters x 20 cm) and sew it to the big piece. I also made a separate waistband so it would be easier to gather the ribbon around my waist to close the skirt.


scarlett-dress-construction-sewing-pattern-9
I also found this pattern on the internet but I think it’s out of print. Maybe you can find it on ebay or etsy.
And for the umbrella, I found the recover tutorial here. I had a vintage umbrella from the 20’s with a broken fabric so I decided to recover it. It’s not difficult to do and it’s a great way to customize an old umbrella.
I hope it was useful and that you enjoyed it. If you’re still reading, sorry, this has to be the longest post ever 🙂 If you have any questions, just ask in the comment section, I’d be happy to help.
Have a nice week end!

pauline-sewing-pattern


0 comment
0 FacebookTwitterPinterestEmail
scarlett-ohara-barbacue-dress-sewing-pattern-1

That’s the last dress I made: the famous barbecue dress worn by Scarlett O’Hara in Gone with the wind.
I made it for a special occasion (I don’t wear that kind of dresses on a daily basis, sorry to disappoint you): a costume birthday party! How cool is that? I love costume parties…
And as the theme was the cinema, I couldn’t think of a better heroine than Scarlett.

scarlett-ohara-barbacue-dress-sewing-pattern-2scarlett-ohara-barbacue-dress-sewing-pattern-3
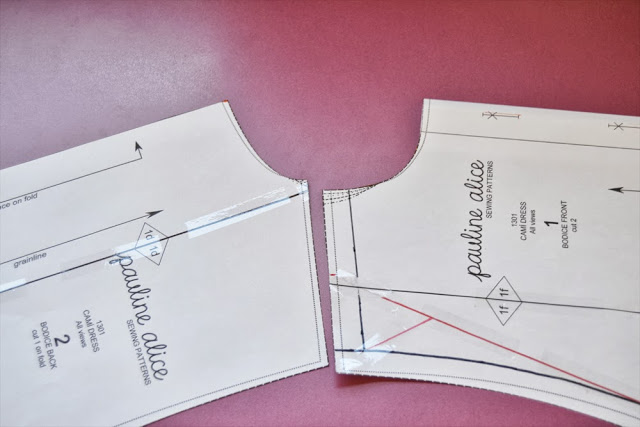
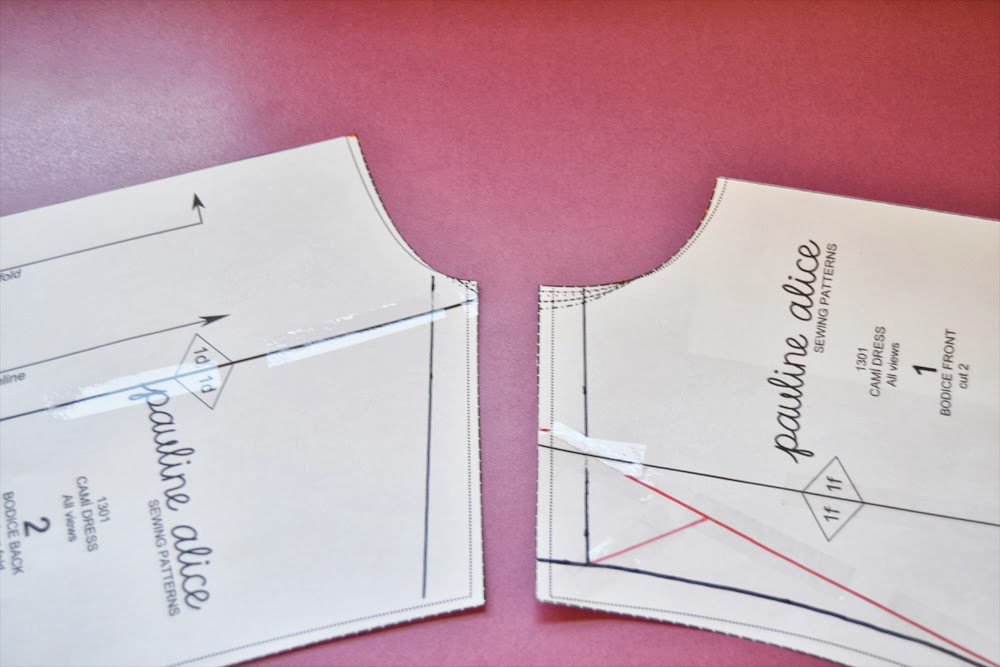
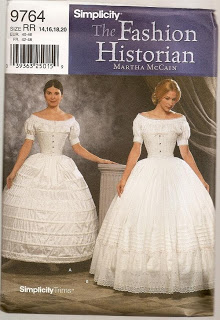
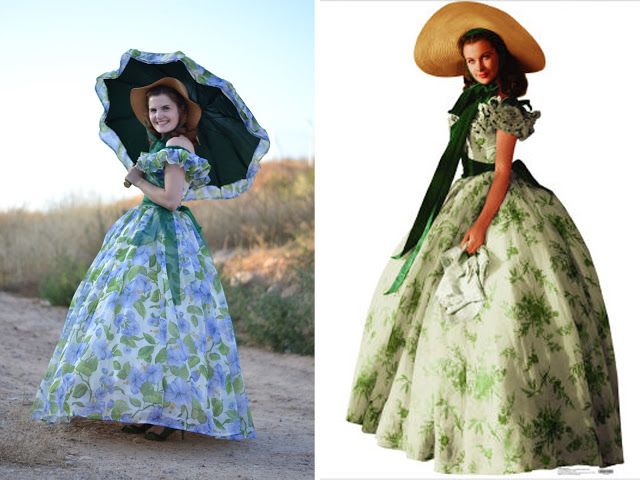
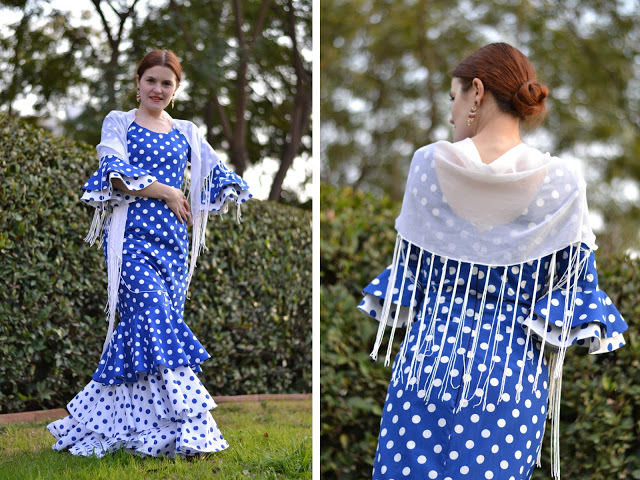
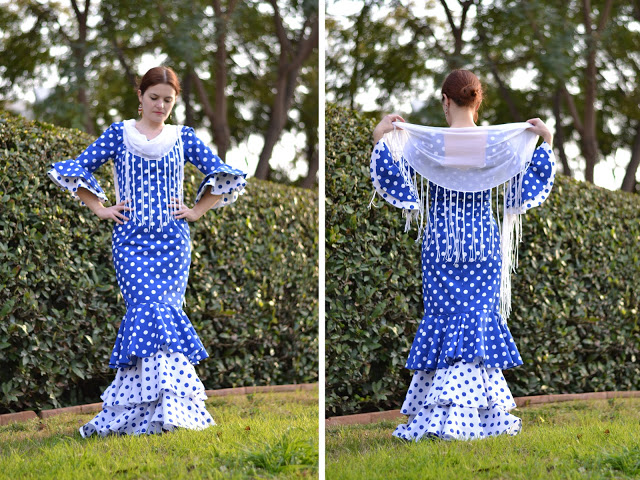
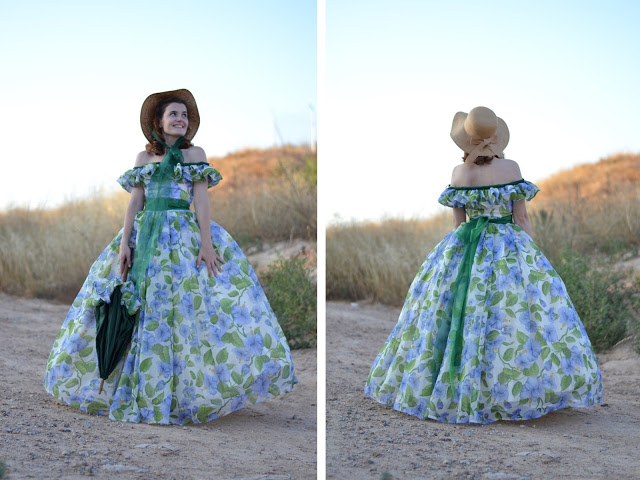
I drafted the pattern myself: the skirt is gathered (5 meters of fabric) and the bodice has front and back darts. It was not a dificult dress to make even if it looks like it, but quite time consumming (one week-end non-stop).
The most important part of the costume is the foundation: a corset, a hoop-skirt and an underskirt. I will explain all those parts in the following post.


scarlett-ohara-barbacue-dress-sewing-pattern-4
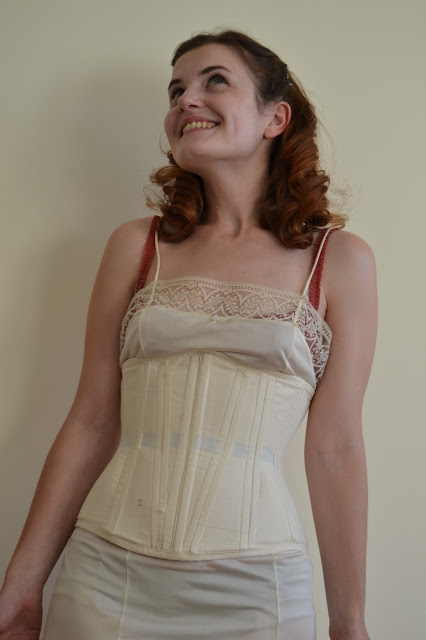
The dress was surprisingly very confortable and so dramatic. I didn’t want to take it off at the end of the night…
I leave you with a short excerpt from the movie where you can see the dress and the foundation worn by Scarlett I used as inspiration.
See you on Friday for the details post.


pauline-sewing-pattern


0 comment
0 FacebookTwitterPinterestEmail
flamenca-dress-part-5-sewing-pattern-1


After so many previews, here are the final pictures of the flamenca dress. Enjoy!
flamenca-dress-part-5-sewing-pattern-2flamenca-dress-part-5-sewing-pattern-3


As I didn’t know if I was going to be able to take good quality pictures during the Andalusian party, we decided to go to the park before and have a little impromptue photoshoot. And just so you can see my accessorizes (blue of course), here is a picture from the party with my friends Mari Paz and Pilar (who brought from Sevilla the beautiful flower and earrings. Thank you Pilar!).
 
flamenca-dress-part-5-sewing-pattern-4
I hope you enjoyed the flamenca dress series and if you have any question, feel free to ask, I’d be delighted to answer (or try to…)!

flamenca-dress-part-5-sewing-pattern-5

signature1_editado-1


0 comment
0 FacebookTwitterPinterestEmail
Let’s follow yesterday’s post and continue on the flamenca dress.
We have set the the sleeves in the body and attached them to the lining, what we need to do now is make the skirt, join it to the dress, sew the zipper on and we are ready to hit the street.

…………………………………………………………………………………………………………………………………………….

I chose not to line the skirt flounces (contrary to the sleeve ones) because the outside is not going to show and it takes too much fabric (I might never wear this dress again for all I know).
1-Sew together all the circles of the same colour so you obtain one big flounce.
2-Stitch a row of basting along the inner curve of the flounce and clip (like for the sleeve).
flamenca-dress-part-4-sewing-pattern-1
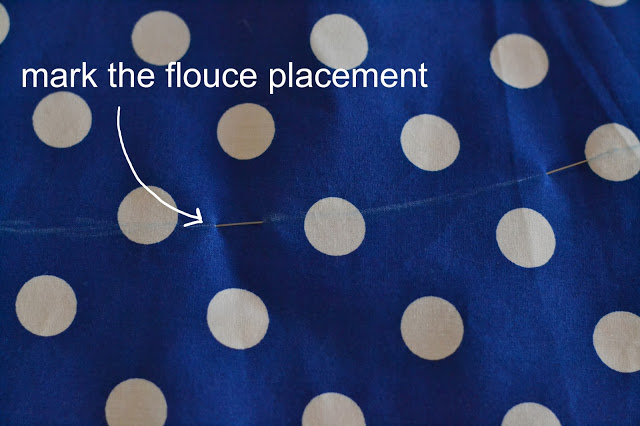
3-Here is a drawing (very bad!) I made to explain how to place the flounces on the skirt. You see that the first flounce is sewn right side up and the following ones wrong side up with the flounce facing upward (that way, the seam allowance is hidden nder the flounce when folded).
flamenca-dress-part-4-sewing-pattern-2flamenca-dress-part-4-sewing-pattern-3flamenca-dress-part-4-sewing-pattern-4
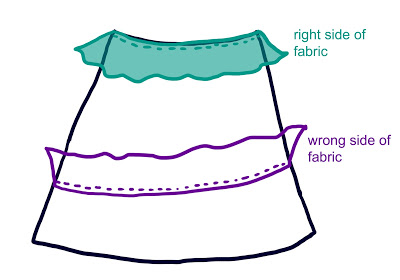
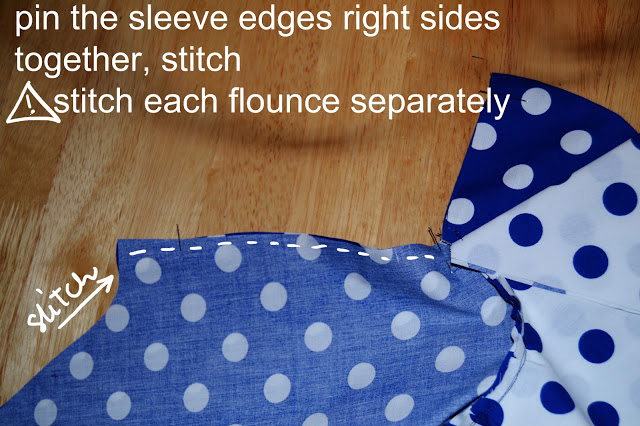
4-Repeat step 7 of the previous post to sew the back the dress (remember to sew each flounce separately).
5-Baste the zipper and sew it to the dress. Attach the lining to the zipper and hem it where the bodice meets the skirt.
flamenca-dress-part-4-sewing-pattern-56-Hem the skirt and the flounces as you choose (decorative binding, turn in hem…).
I wish you all a nice week and I leave you with this picture (the « real » post is coming in a few days, I promise).
flamenca-dress-part-4-sewing-pattern-6signature1_editado-1
0 comment
0 FacebookTwitterPinterestEmail
I am getting ready right now for the Andalusian party tonight so I thought it would be appropriate to make a new post about the flamenca dress.
If you remember, I already made the dress body and the lining. Which leaves me the sleeves and the skirt: these are the parts that are more time-consuming.
Today I’ll start with the sleeve and tomorrow the skirt part will follow.
……………………………………………………………………………………………………………………………………
For the sleeves, I decided to line the flounces with self-fabric as the outside is going to show quite a bit.
1-Take the sleeve flounces and place them right sides together.
flamenca-dress-part-3-sewing-pattern-1flamenca-dress-part-3-sewing-pattern-11
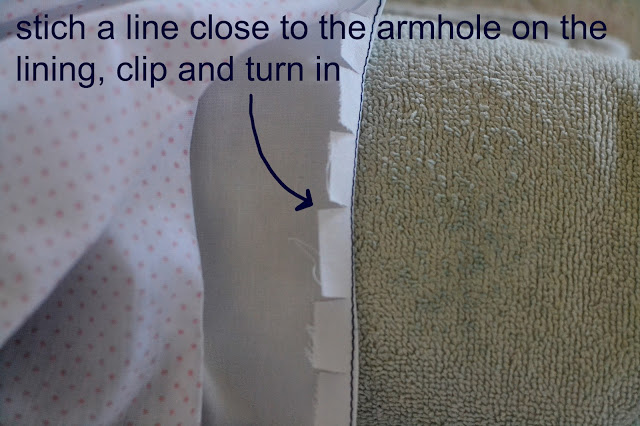
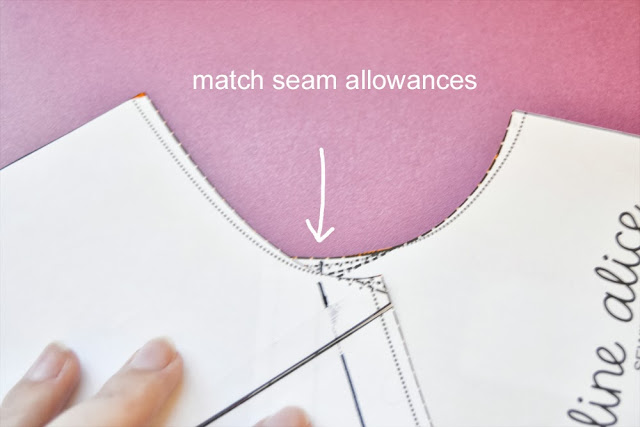
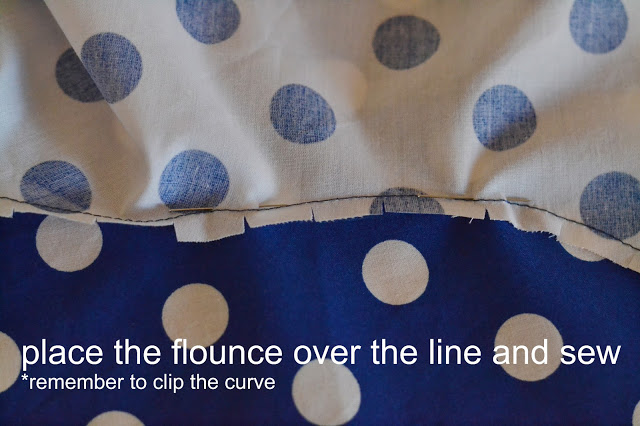
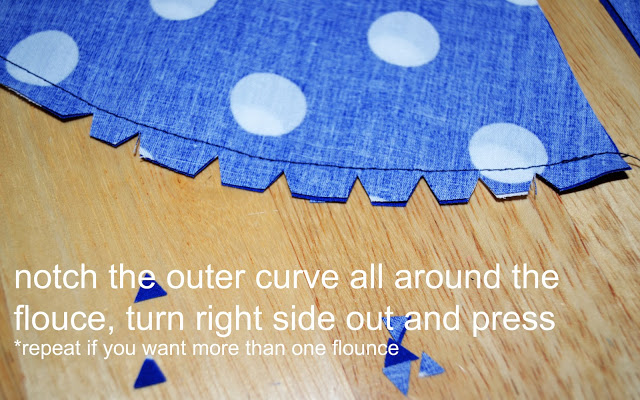
2-Remember to press flat (if the curve isn’t round, notch more closely but be careful not to cut into your row of stitches).
3-Add as many flounces as you want (I have two, one blue, one white).
4-Sew the flounces together at inner curve.

flamenca-dress-part-3-sewing-patter-10
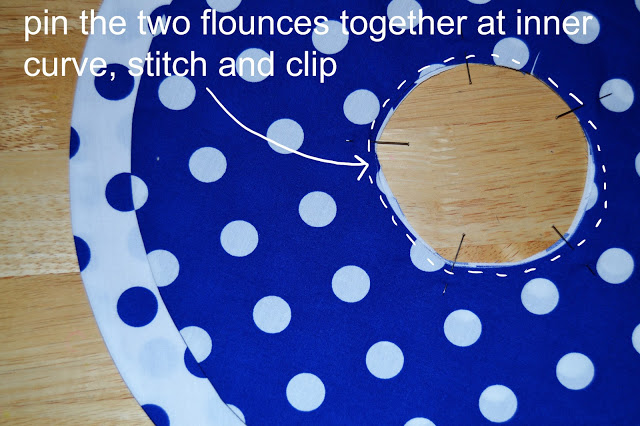
5-Take your sleeve piece.

flamenca-dress-part-3-sewing-pattern-9

 6-Pin the flounces to the sleeve right sides together (for example: blue against blue). Remember to clip the curve of the flounces so it’s easier to pin.
flamenca-dress-part-3-sewing-pattern-8flamenca-dress-part-3-sewing-pattern-7
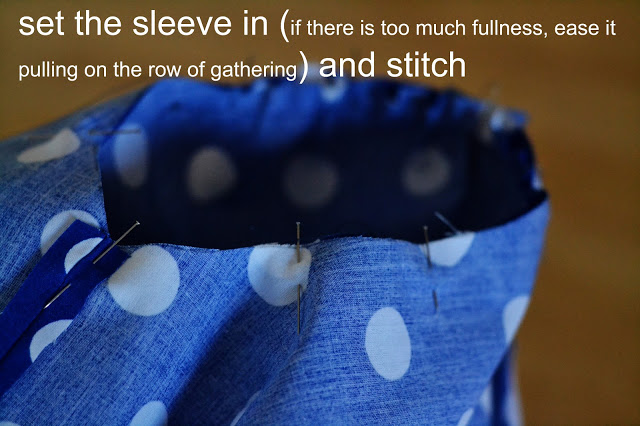
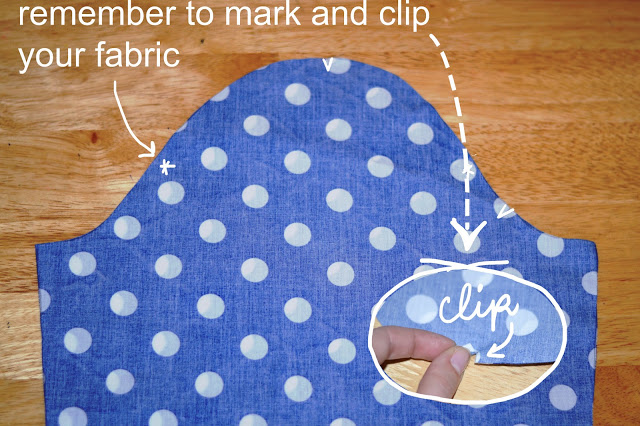
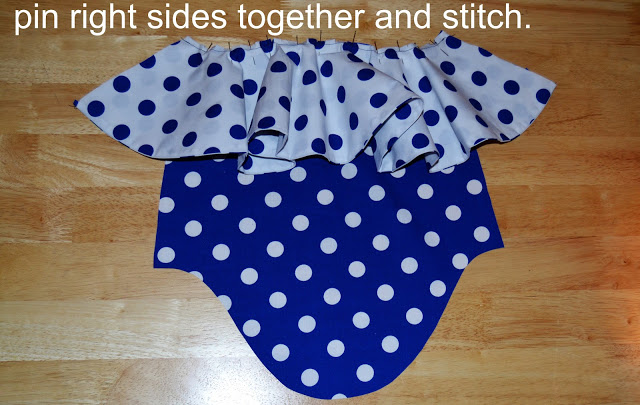
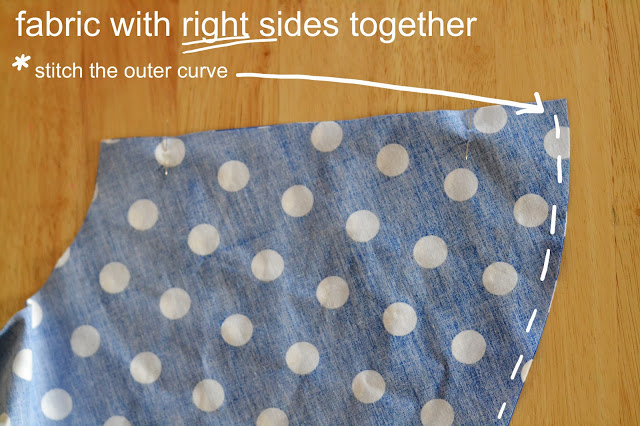
7-Stitch the flounces separately, press the seam allowances open, finish the edges as you prefer (zigzag, serger, bias binding…).
  

flamenca-dress-part-3-sewing-pattern-6flamenca-dress-part-3-sewing-pattern-5flamenca-dress-part-3-sewing-pattern-4flamenca-dress-part-3-sewing-pattern-3flamenca-dress-part-3-sewing-pattern-2

There you go for the moment! I hope it was useful and I will post the skirt explanation tomorrow and the final pictures during the following days.
Now excuse me, I have to finish my make up for the party… Bye!
signature1_editado-1
0 comment
0 FacebookTwitterPinterestEmail
Hello everyone,
I hope you all had a nice week-end. Mine was spent cutting large circles of polka dots fabric, it could have been worse. I don’t have any pictures of the cutting process, because it’s just cutting, nothing special about it.
You saw my cutting plan, just make sure everything fits on your fabric before you start cutting. I like to trace all my pieces first and then cut them all at once.
I also followed Bea‘s and Azahara‘s advice to line the dress. At first, I thought I wouldn’t need to as I am planning on wearing it over a slip (that’s something I always do with tight dresses). But as they both had experience in flamenca dresses and told me it would be more comfortable, I went through my fabric and found some white cotton. I cut only the front and back bodice parts, I won’t bother with lining the sleeves. Thank you for the advice girls!


tutorial flamenca dress pattern


tutorial flamenca dress pattern
Here is the dress bodice, with the lining attached, on my dressform. This is just to give you (and me) an idea as this dressform, even if adjustable, does not fit my clothes. The minimum size is too big (bust) and too long for me, that’s why there are some pulling lines on the dress. But this dressform is a great coat-hanger…
tutorial flamenca dress pattern

tutorial flamenca dress pattern

The next step is sewing the sleeves with ruffles. And hopefully I will have time to start on the skirt as well.
Have a nice week!
signature1_editado-1
0 comment
0 FacebookTwitterPinterestEmail
As promised, I have some posts to share during the week. I accumulated sewing before the holidays as I knew I was not going to make a lot of things at the beginning of the new year.
new-year-dress-sewing-pattern-1
 
Here is the dress I made for New Year’s Eve. I wanted something dressed up that could also pass as a costume. My friends and I always have a costume party for New Year’s Eve and this year I was Bree Van de Kamp. With our red apples, we looked like a poster for Desperate Housewives.
new-year-dress-sewing-pattern-2
The pattern is my own design: a corset bodice with princess seams and a gathered skirt. I added some boning to the bodice so it would stand up on its own and would allow me to wear the dress without a bra. There is a zipper in the center back.
new-year-dress-sewing-pattern-3
I had some black tulle with grey plumetis in my stash and black piqué left from my Burda black dress to underline it. The bodice has a third layer of thick muslim where the boning is sewn and then is lined for more comfort.
I added a velvet edge for a more festive look.
new-year-dress-sewing-pattern-4new-year-dress-sewing-pattern-5
It was a perfect dress to party and dance, what else could I have asked for?
pauline-sewing-pattern


0 comment
0 FacebookTwitterPinterestEmail
pink Dior coat


Je suis ravie de vous présenter mon chef-d’oeuvre: le manteau Dior!

Dior coat full view pink Dior coat side view

J’ai réalisé le patron du manteau Dior à partir d’un autre manteau que j’ai fait cet automne. J’ai fait quelques changements à la base: une taille plus accentuée, un bas beaucoup plus volumineux pour une silhouette années 50 et un col tailleur arrondi.
Ce qui m’a vraiment aidé dans la réalisation de ce manteau, c’est un cours Craftsy acheté cette année. Il s’agit du cours « Starlet Suit Jacket » animé par Gretchen Hirsh du blog Gertie’s blog for better sewing. Je suis fan de son blog et de son livre, j’ai donc acheté le cours. Bien que n’ayant pas réalisé la veste comprise dans le cours, j’ai apliqué presque toutes les techniques expliquées pour la réalisation de mon manteau. J’ai donc appris à entoiler mon tissu, faire des poches paysannes, des boutonnières passepoilées, coudre des épaulettes…

pink Dior coat front details


Quelques détails: j’ai entoilé les devants et les côtés avec de l’entoilage thermocollant car l’entoilage tailleur me faisait un peu peur (au niveau technique et surtout au niveau temps), ja’i pu aussi apprendre à faire des cigarettes de manche pour soutenir ma tête de manche.

Le manteau s’appelle Dior car j’ai utilisé un magnifique lainage de cette marque. Il est très épais (double face) et chaud et doublé avec une soie du même ton.J’ai bien cru que ma machine allait rendre l’âme plusieurs fois à cause de l’épaisseur, surtout au niveau du col!

pink dior coat back
C’est mon projet le plus abouti aussi bien au niveau patronage que couture, j’en suis vraiment très fière! Les heures passées ont valu la peine!

Et surtout, quoi de mieux qu’un manteau rose fuschia pour égayer une journée pluvieuse?

0 comment
7 FacebookTwitterPinterestEmail
self-drafted garden roses dress back

J’ai bien profité du beau temps de Valence dans ma nouvelle robe faite à partir d’un patron maison. Elle est faite pour les promenades dans la ville, les ballades à vélo, les pique-niques et les soirées fraîches de fin d’été.

self-drafted garden roses dress front self-drafted garden roses dress side

J’avais en tête cette forme de robe depuis un petit bout de temps et je me suis décidée à en faire le patron. Le corsage est composé de découpes princesses sur le devant, un dos d’une seule pièce, une fermeture écalir sur le côté. Quand à la jupe, il s’agit d’un rectangle avec des fronces réparties sur les côtés et le dos. Les bretelles croisées ont été faites avec un appareil à biais que je viens d’acheter (comment ai-je pu m’en passer?).

Bien qu’un peu transparent, ce coton feuri est vraiement très joli et agréable à porter. J’ai décidé de doubler la robe entièrement!

self-drafted garden roses dress details

0 comment
0 FacebookTwitterPinterestEmail