Have you found your fabric for the Camí Sew-Along?
Well, you still have this week end to go shopping as today you are supposed to be making your muslin and we’ll see how to make the basic adjustments before cutting the “real” fabric.
You might be tempted to jump ahead and start directly with your final dress but it’s highly recommended to make a muslin. The bodice with one sleeve is enough to see if the fit is correct, no need for the skirt or the collar. And then you can decide if you need any of the following adjustments.
LENGTHEN/SHORTEN LINE
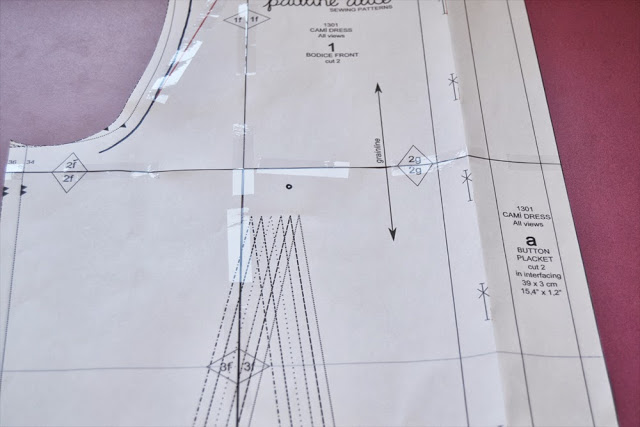
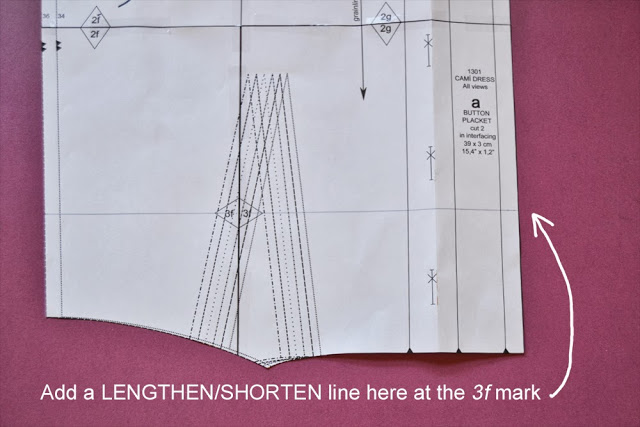 1.If the waist line of the muslin doesn’t hit at your natural waist, you might want to lengthen or shorten the bodice. First, you’ll need to add a lengthen/shorten line. It’s not on the pattern but it can be added at the 3f mark.
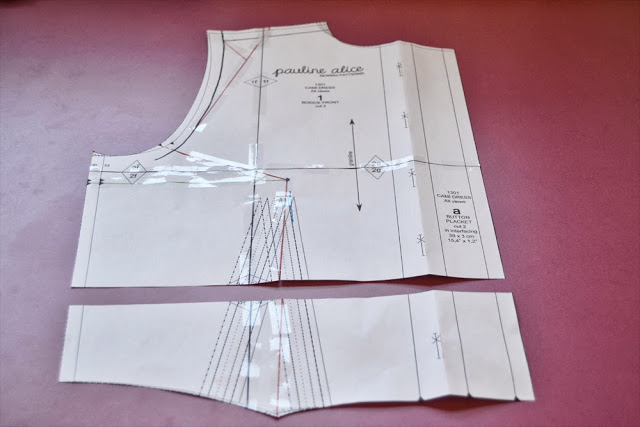 2.To lengthen the bodice, add the length you need and paste your pattern over a piece of paper, keeping the lines parallels.
 3.To shorten the bodice, bring the pieces over each other and paste.
4.Remember to report the change you made to the front bodice to the back pattern pice as well. The last button mark is going to move as well: move it up or down respecting the space between each button mark.
SHOULDER ADJUSTMENTS
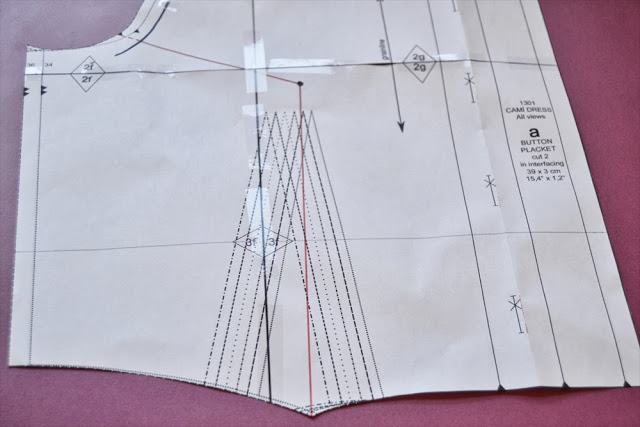
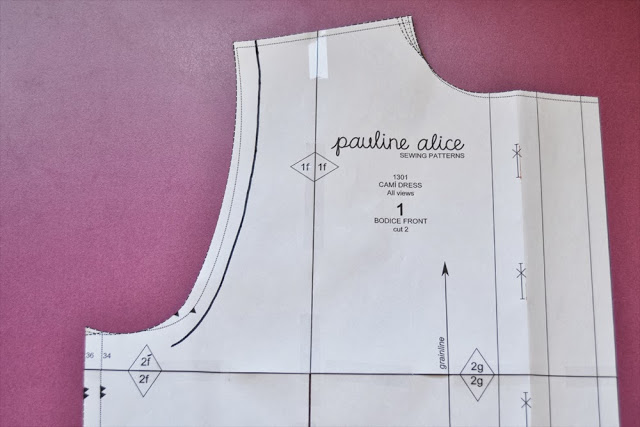 1.Draw the seam allowance line around the armhole (1,5 cm or 5/8″).
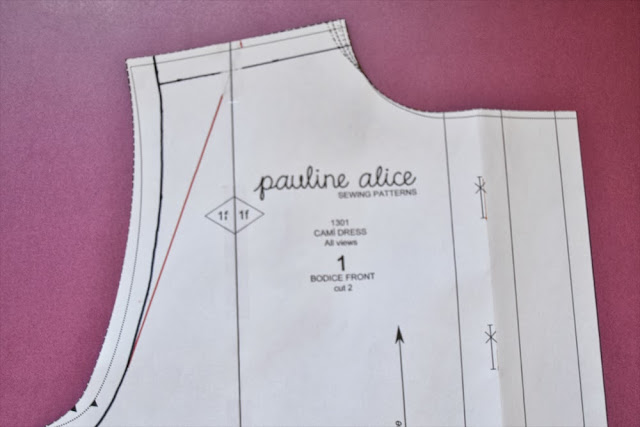 2.Draw the other seam allowance line at the shoulder (black). Join the shoulder center to the armhole line: red line.
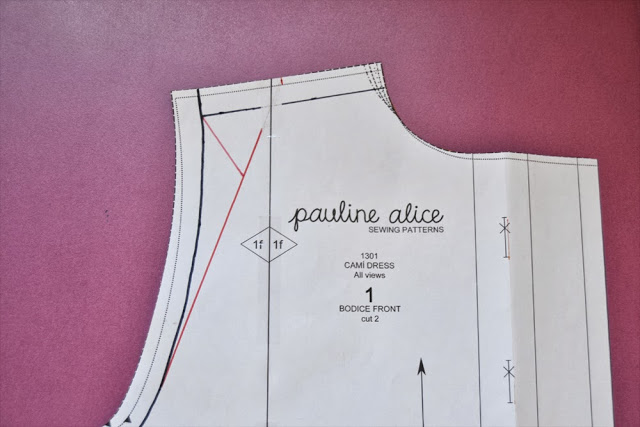 3.Draw a line from the shoulder angle to the red line.
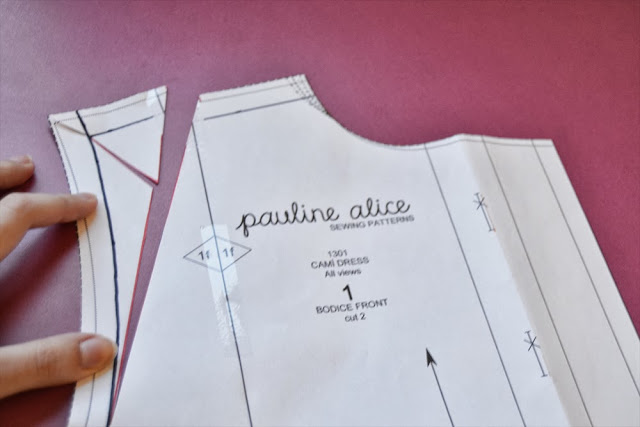 4.Cut the red lines making sure not to cut the black line. You now have a pivot point.
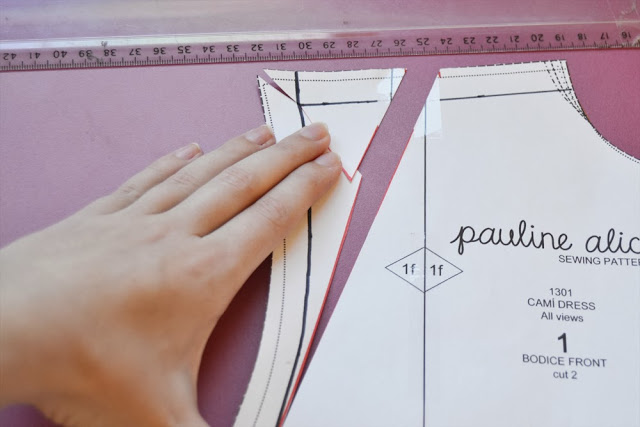
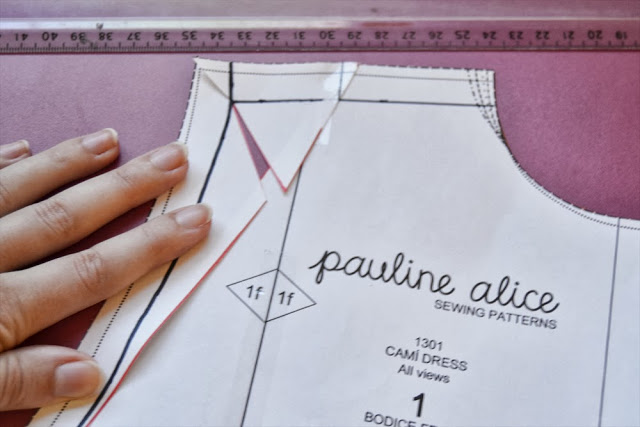 5.To widen the shoulder, add the desired ease and paste over a piece of paper. To narrow the shoulder, bring the pattern pieces over and paste. Report changes on the back pattern piece.
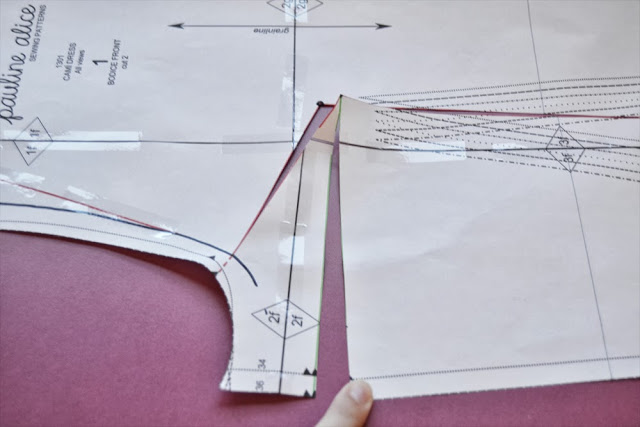
FULL / SMALL BUST ADJUSTMENT
 1.Draw the bust apex about 2 cm (0,8″) above the dart point.
 2.Draw 2 lines (in red) from the bust apex: one going to the middle of the dart legs and the other one going to the armhole (I joined mine to the triangle mark).
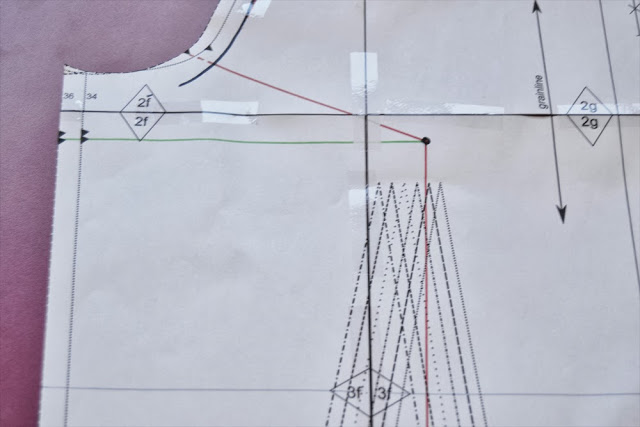 3.Draw a line (in green) parallel to the lengthen/shorten line if you have made it (if not, parallel to the 2f cutting line).
 4.Cut the red line up to the black armhole line.
 5.Cut the green line leaving it attached by 1 cm (3/8″) approx.
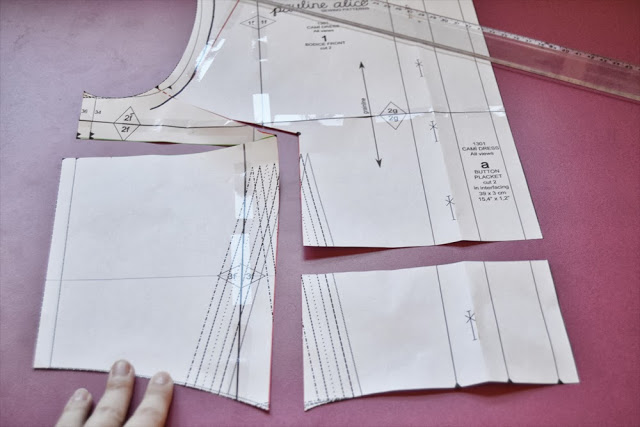
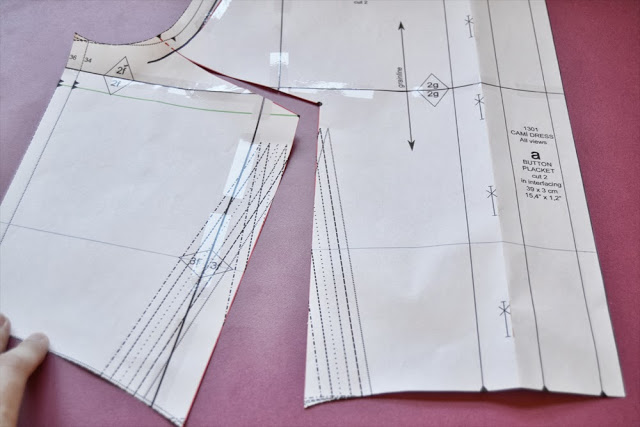
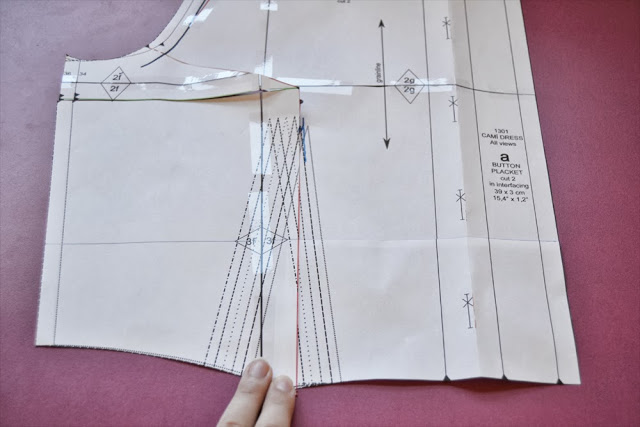 6.Cut along the lengthen/shorten line to the red line. To make a Full Bust Adjustment, add the desired ease and match the pattern pieces. Paste them on paper and redraw the lines.
To make a Small Bust Adjusment, remove the needed ease, paste together and redraw the lines.
Remember to apply the changes to the back pattern piece and move the last button mark.

23 comments
Pero que bien explicado pauline!!!
Besitos
Gracias Sonia!
merci Pauline !
superbe explication et quel soulagement de voir qu'on peut faire la toile juste avec le corsage et une manche ! Je n'y aurais jamais pensé… 🙂
Merci pour le français, même si je me force à le lire en anglais et en espagnol en premier 😉
Un endroit collectif où poster nos avancées?
Merci Charlotte! Et oui, comme la jupe est froncée, pas besoin de la faire en toile.Par contre, pour une jupe qui marque le contour des hanches, il vaut mieux en faire une 😉
Désolée, je n'ai pas pu organisé un compte flicker spécial, je vais essayer de faire ça ce week end. De toute façon, vos réalisations seront sur le blog pour cloturer le Sew-Along…
Ça y est Charlotte, c'est fait. Je vais publier le compte flicker où vous pouvez poster les photos de votre projet en cours: http://www.flickr.com/groups/2327849@N21/
Qué bien explicado, ¡muchas gracias! Lástima que yo no sepa cómo hacer todos estos ajustes. Creo que cortaré la tela y me lo iré probando. Guardaré este post entre los favoritos para recuperarlo cuando tenga un poquito más de idea.
Hola! Hazte una versión de prueba del corpiño sólo para comprobar que está bien y haz los ajustes en esta versión antes de cortar tu tela. Los ajustes de pecho son un poco más dificiles pero alargar el corpiño te puede venir muy bien si eres alta (y eso has visto, es solo cortar una línea).
Un besito.
Ayyyy todavia no tengo tela, pero puede que pruebe con un popelin que tengo en casa y así voy haciendo ajustes
¡Que no pasa nada si no tienes la tela Ana! Te queda un par de días… Yo hago las pruebas con trozos de telas que me quedan de otros proyectos, todo en lo que cabe una pieza de corpiño lo guardo por eso. Popelín está perfecto.
Toda una clase magistral.
¡Gracias guapa!
Pauline pasate por mi blog, a ver que te parece 😉
¡Me encanta Maidr! La tela está preciosa y le queda perfecta al estilo del patrón. Además vas guapísimas con estos colores 😉 ¡Bravo!
No me puedo perdonar no haber descubierto antes tu blog. ha sido hoy, a través de Masustak eguzkitan. Había visto acerca de tu Cami dress, pero no sabía quien eras. Llevo una hora viendo tus creaciones, me han encantado. Creo que hoy mismo te encargaré un patrón, porque me ha entrado la fiebre, e intentaré seguir el Sew Along. ¡Felicidades, me encanta tu trabajo!. A partir de hoy, seré una asidua seguidora. Besos.
¡Gracias Mari Carmen! Me alegro, así yo también voy descubriendo a nuevos blogs, como el tuyo. ¡Que cosas más bonitas haces! Espero verte en el Sew-Along… Un besito.
Tengo que apuntarme?? O lo puedo seguir por libre?. Ya me cuentas…
No tienes que apuntarte en ningún sitio, no te preocupes. El Sew-Along es libre, si tienes cualquier duda, vas preguntando aquí en los comentarios y te respondo yo o las otras chicas. Un besito.
Hello, I made my muslin after adjusting the length and managed to do that ok. However I found that the bust wasn't fitting correctly, and needs enlarging. Please could you tell me what measurements to take to ensure a good fit? Thanks.
Hi Elle. You might need to make a Full Bust Adjustment if you are a D or higher cup. But even a full C cup, you might find it more to your taste if you prefer to have a little bit of ease around the bust area. With your muslin on, cut a cross on the fabric at the bust apex and you will see how much ease you need to add to your pattern. Does that make sense?
Thanks, I will give this a try and let you know how I get on 🙂
Bonjour Pauline! Un grand bravo pour ce magnifique premier patron! Je suis en plein FBA et je bloque bêtement sur l'étape "reporter les modifications sur le buste dos": cela veut dire qu on reprend exactement les mêmes étapes? Et dans ce cas, la ligne d'ajustement passe par la marque 3D ? En tout cas, ce sew a Long est un vrai plaisir! Merci
Bonjour Anne Sarah. Pour le FBA, les changement à apporter au patron dos sont rallonger le corsage et changer la ligne d'emmanchure si elle a bougé. Tu peux utiliser la marque 3D ou alors mesurer le même écart entre le bas du patron devant et la ligne que tu as dessiné sur le corsage devant pour que ce soit exactement au même niveau.
N'hésite pas si tu as d'autres doutes. J'ai hâte de voir le résultat 😉
Pauline, la marque 3f est a quelle hauteur dans le patron papier?
Comments are closed.