I’m very happy to welcome the lovely girls behind Artesane today on the blog for a special post. In case you don’t know Artesane, it’s an online community platform with video classes and tutorials on sewing, knitting, crocheting, bag making, embrodery, pattern making… and many more to come. I am very greatfull to Artesane to have given me the opportunity to teach a sewing class for them on how to make a tailored jacket and I hope to repeat this amazing experience with them. Classes are only available in French for the moment but be sure to check their inspirational site just the same.
Thanks to Artesane for sharing here a great tutorial on how to alter a trousers pattern. That will be very useful for the Port trousers pattern! Let’s start!
……………………………………………………………………………………………………………………..
TROUSERS ALTERATIONS
If there’s one type of pattern that’s difficult to standarize, it has got to be trousers. Everybody has got different body types and it’s quite rare not to have to alter a trousers pattern. That’s why we often have a favorite store-bought trousers brand or model ! It’s not easy to find a ready-to-wear model that fits perfectly at first try.
The best thing would be to make a muslin for every model that you like and think could be a go-to pattern.
Once this pattern is altered and fitted, you’ll have a tailored trousers pattern and will be able to use it again and again !
1/ Before starting
Material needed :
- Your trousers pattern (front leg and back leg)
- Pattern paper or Kraft paper (cardboard)
- Pens in different colours
- tape
- scissors
How is made a pair of trousers ?
Trousers are made of two legs, a waistband and a type of closure (a fly for example).
Each leg is made of a front piece and a back piece. The back pieces is usually bigger than the front one. The back crotch is longer and curvier (that’s where our bum goes !).
Before starting any alteration, you need to add five reference lines on your pattern :
- waist line
- hip line (measure at the largest point)
- inseam line (it corresponds to the end of the seat)
- knee line
- hem line
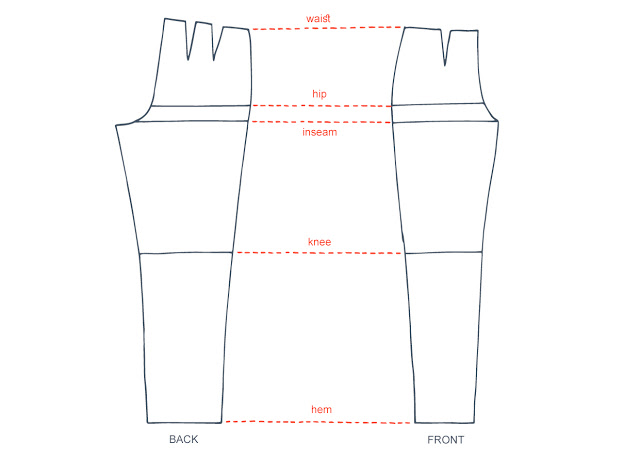
Once you’ve added these lines to your pattern, it’s time to alter the trousers leg (there’ll be a second post on how to alter the crotch as it’s a vast subject).
So apart from the crotch adjustment, once you’ve made your muslim, you can see various type of issues :
– your trousers are too long o too short ; you have thus to lengthen or shorten the trousers leg ;
– your trousers are too wide or too small around the waist ; you have to adjust the waist ;
– your trousers are too wide at the hips or on the contrary, they’re too tight and uncomfortable ; you need to alter the trousers at the hips ;
2/ Lengthen or shorten the trousers legs
The technics used to lengthen or shorten a pattern piece are the same for any kind of garments. But still, let’s have a little reminder.
HOW TO SHORTEN A PATTERN PIECE ?
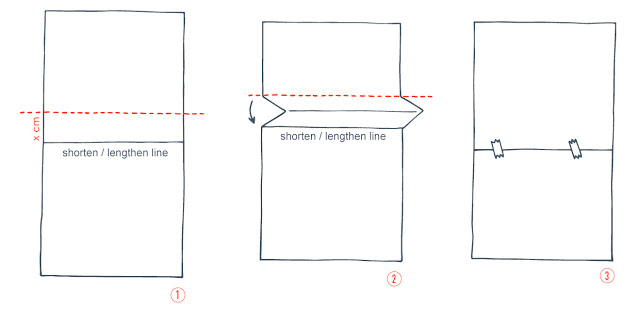
1/ You need to determinate how many cm you need to remove. Above the shorten/lengthen line on the pattern, trace a parallel line at X cm.
2/ Folding the pattern piece, overlap the two lines.
3/ Tape the fold close.
HOW TO LENGTHEN A PATTERN PIECE ?
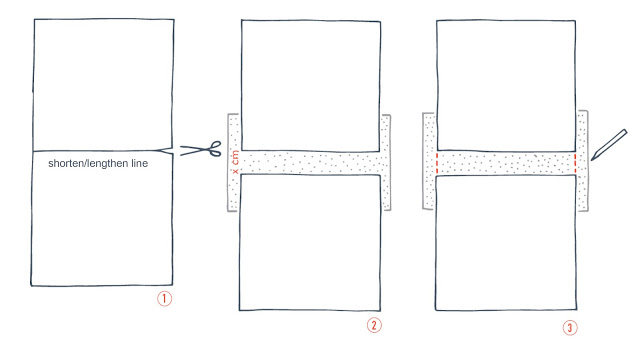
1/ Cut the pattern piece along the shorten/lengthen line.
2/ Place a new piece of paper below the two pattern pieces. Determinate how many cm you need to add and spread the two pieces apart X cm (make sure the lines stay parallel).
3/ Tape the two pieces to the paper and join the two pieces together.
WHERE TO PLACE THE SHORTEN/LENGTHEN LINES ON A TROUSERS LEG
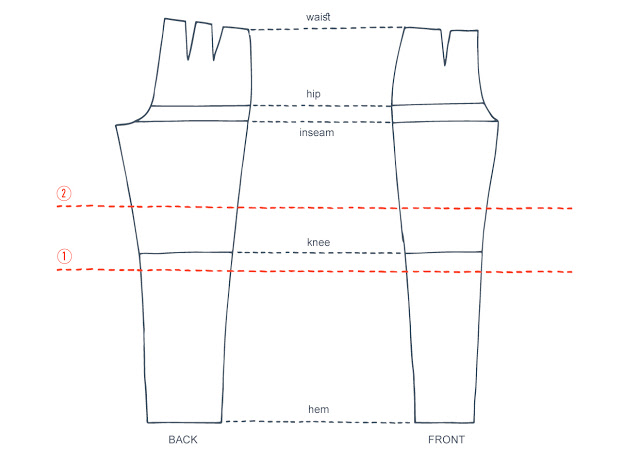
Now that we’ve seen the techniques, the important thing is to know where to apply them. Indeed, if you were to lengthen a trousers leg at the wrong place, there’s a good chance the general shape will get distorted.
1/ If the shortening/lengthening is small (up to 3 cm), the line has to be placed just above the knee (line 1).
2/ If the alteration is more important, it needs to be made in two places. Divide the length you have to add or remove from the leg in two. Then draw two adjustment lines above and below the knee (line 1 & 2).
If the alteration is minimal, you can do it at the hem line.
3/ Widen or tighten at waist
The secret of a great waist adjustment resides in distribution ! The more you distribute evenly the cm you have to add or remove, the less you’re going to change or distort the shape of the trousers. And this is even more true if the adjustment is important ! You’re going to add or remove the cm needed on both sides of each front and back leg, meaning at 8 different places !
HOW TO WIDEN THE WAIST ?
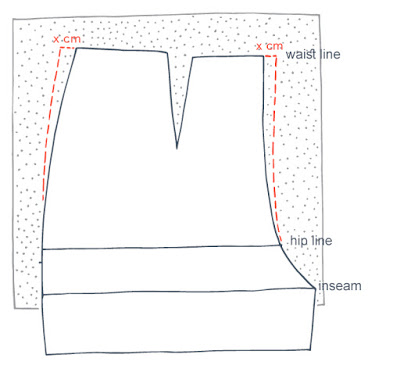
1/ You need to determinate how many cm you need to add at the waist.
2/ Divide by 8. The end result is X cm.
This adjustment applies to both the front and back pieces (make sure you don’t forget one of the two pieces!) :
3/ Place some paper below your pattern piece.
4/ Extend the waist line on both sides of the pattern piece. Add X cm to both sides (see diagram below).
5/ From these marks, trace the new stitching lines joining gradually the existing ones. The key is to draw progressively the new line so that we don’t get any « bump ».
HOW TO TIGHTEN THE WAIST ?
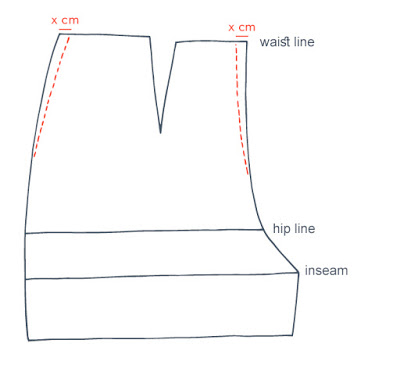
1/ You need to determinate how many cm you need to remove at the waist.
2/ Divide by 8. The end result is X cm.
This adjustment applies to both the front and back pieces (make sure you don’t forget one of the two pieces!) :
3/ At the waist line, remove X cm on both sides of the pattern piece (see diagram below).
4/ From these marks, trace the new stitching lines joining gradually the existing ones. The key is to draw progressively the new line so that we don’t get any « bump ».
4/ Widen or tighten at hips
Again, the secret of a great hip adjustment is in distribution ! The more you distribute evenly the cm you have to add or remove, the less you’re going to change or distort the general shape of the garment. And this is even more true if the adjustment is important ! You’re going to add or remove the cm needed on both sides of each front and back leg, meaning at 4 different places !
HOW TO WIDEN THE HIPS ?
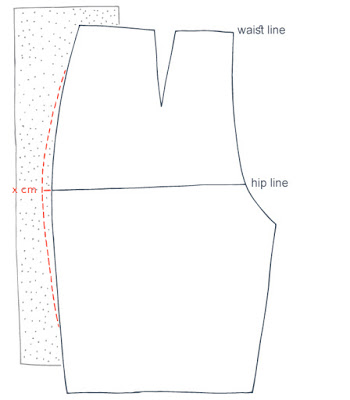
1/ You need to determinate how many cm you need to add at the hips.
2/ Divide by 4. The end result is X cm.
This adjustment applies to both the front and back pieces (make sure you don’t forget one of the two pieces!) :
3/ Place some paper below your pattern piece.
4/ On the exterior side of the leg, we’ll extend the hip line a few cm. Add X cm (see diagram above).
5/ From this mark, trace the new stitching line joining gradually the existing one from waist to hem. The key is to draw progressively the new line so that we don’t get any « bump ».
Be careful, if the trousers have a straight leg, you have to join the new hip line to the waist but you should extend the leg in a straight line to the hem, parallel to the previous stitching line.
HOW TO TIGHTEN THE HIPS ?
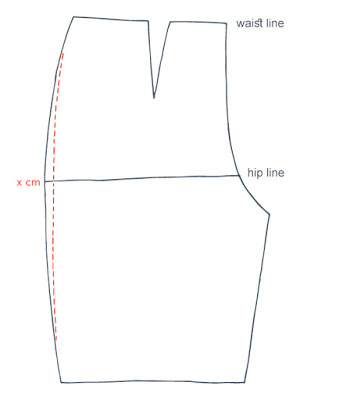
1/ You need to determinate how many cm you need to remove at the hips.
2/ Divide by 4. The end result is X cm.
This adjustment applies to both the front and back pieces (make sure you don’t forget one of the two pieces!) :
3/ On the exterior side of the leg, we’ll remove X cm to the hip line (see diagram above).
4/ From this mark, trace the new stitching line joining gradually the existing one from waist to hem. The key is to draw progressively the new line so that we don’t get any « bump ».
Be careful, if the trousers have a straight leg, you have to join the new hip line to the waist but you should extend the leg in a straight line to the hem, parallel to the previous stitching line.
With these techniques, you’ll be able to adjust the legs of your favourite trousers pattern (length, waist or hips) ! We’ll see how to adjust the inseam and the crotch as well as how to alter the seat very soon.
…………………………………………………………………………………………………
THANKS ARTESANE!
