Home Tags Posts tagged with "tutorial"
Tag:

tutorial

Are you ready for part 2 of the RIOLA skirt tutorial? After making the bound opening, sewing the front pleat, the pockets and the sides of the skirt, it’s time to make the waistband, complete with a clean and pretty seam allowances finish, and attach it to the skirt.

Grab your copy of the Riola skirt pattern here: RIOLA skirt.
0 comment
0 FacebookTwitterPinterestEmail
The Carme blouse pattern 2.0 is here! As it’s one of my first pattern, the sizing was not up to date, but I’m happy to tell you that you can now sew this blouse from size 34 to 52.
The pattern includes a print-at-home file as well as copyshop version. Get your copy here: Carme blouse pattern.
The pin tucks… they might seem difficult to make and get those nice and parallel little folds might seem tricky but it’s not!
When I was designing the Carme blouse, I wanted to incorporate pin tucks because I find they add a romantic detail without beeing to “frilly”. So I tried different approach to pleat the yoke and the one we’re using is by far the easiest I could find (if you have any other method, please let us know).
We’ll make the pin tucks on a big enough piece of fabric and then cut the yoke out of it. So if you’re not happy with your pin tucks, you can make more before cutting the final yoke.
And don’t worry, folding the pin tucks is not as time consuming as you think… just need a little bit of patience.


15 comments
0 FacebookTwitterPinterestEmail

We really like to share these video tutorials with you as we know you might need some visual help or a little motivation to sew the Mila jumpsuit & dress pattern. As usual, we’ll cover all the steps to make the Mila pattern, this time focusing on View B, the dress version. But the construction is almost identical for the jumpsuit!

Have fun watching it and let us know if you have any questions…

4 comments
1 FacebookTwitterPinterestEmail

The Serra jacket pattern was released last February. It’s a unisex and casual jacket with raglan sleeves, fully lined. The pattern includes 3 different versions: a parka with lots of pockets, a short athletic style jacket and a trench coat, all of them with hoods.

For the presentation pictures of View C, the trench coat, I wanted to use some checked or tartan fabric. I found the right one at The Sweet Mercerie and started to get overwhelmed by the matching it would require. But in the end, it wasn’t too bad!

I’ll show you how I did it. The most important steps are the preparation ones. Hopefully this will help you if you’re planning sewing a tartan Serra (or any jacket) for fall.

PATTERN PIECES THAT NEED TO MATCH 


HOOD

  • Back hood (11) 
  • Side hood (10) 
  • Front hood facing (14)
  • Back hood facing (15)

FRONT

  • Front (1)
  • Welt (36)
  • Welt facing (37)
  • Front facing (4)
  • Interior welt (39)
  • Gun flap (32)

BACK AND COLLAR

  • Back (2)
  • Storm shield (18) 
  • Collar stand (35)
  • Under collar (34)
  • Collar (33)

SLEEVE

  • Sleeve (3)


TRACE THE PATTERN PIECES

To trace the pattern, you’ll need : 

  • Pattern paper (or any transparent paper)
  • A ruler
  • A pencil, a thin black marker
  • An eraser
  • tape

Trace on pattern paper the pieces noted above, adding the following details: 

  • Seam allowances (1,5 cm or 5/8”) 
  • Center of the pieces that need to be doubled
  • Grainline
  • Notches and marking

You’ll need to double the pattern pieces that are placed on the fold of the fabric. It’s easier to match the pattern if you cut your pieces flat (on the fold, the fabric might move more easily).

TRACE THE PATTERN PIECES ON THE FABRIC

For that step, you’ll need : 

  • Your fabric
  • Traced pattern pieces
  • A ruler
  • Some colour marker

Before tracing the pattern on fabric, you’ll need to determine the dominant line of your fabric. This is the line that shows the more when you look at your fabric from far away. It miht be obvious but sometimes, you’ll need to choose one and stick with it. For example, my fabric has a beige background and some brown, green and yellow checks. For me, the dominant line was the yellow one.

Now let’s start the funny part…

If you have a huge table, use it. If not, the floor will be perfect. Spread the fabric on a large surface, as one open layer.

FRONT

GUN FLAP

FRONT FACING

BACK

STORM SHIELD

The storm shield is supposed to place on the fold. You’ll need to double it and trace the entire piece. 

COLLAR STAND

SLEEVE

Raglan sleeves are not easy to match. You’ll need to determine where you want the lines to match and where it’s ok if it doesn’t. For me, the most important place is the front, from shoulder to above the chest. 

POCKET


HOOD

The main pieces to match for the hood are the back hood and the front facing. Place the center of the back hood (11) on the grainline of the fabric, placing the center line between two dominant lines. 

Once these pieces have been traced and prepped with the dominant lines marked, you just need to place them on the fabric. Sometimes, you won’t be able to make all the lines match, make sure the most visible areas are matching, that’s the most important. For example, I want the front of the sleeve to match the front piece, even if the back will not match entirely (and the under sleeve will not match either but that’s ok as it’s not going to show).

If you want more help, you can watch Marie-Gabrielle’s lesson on pattern matching at Artesane (sorry, only in french – but for a similar class in English, you can try Bluprint’s Perfect pattern matching).


0 comment
0 FacebookTwitterPinterestEmail

Last summer, we released the Vera shirt pattern: a loose shirt with an asymmetrical hem. We’ve seen amazing versions on social media, and some of them modified as a dress. We loved the idea and decided to make a casual shirt dress for the summer. We have added a large pleat in the back, two big pleated pockets on the hips, longer sleeves and ties at the waist so it can be ajusted.

Fabrics: Blue and red stripes cotton poplin Lanterne & Céleste. / Cahier d’Écolier gauze. / images: Coralie marabelle. / Le Mont Saint Michel.

We wanted to work with various fabrics to give it a patchwork vibe and play with the grafic look of the shirt. We selected Amandine Cha’s organic fabrics (mainly cotton poplin and gauze) as they look and feel great.

HACK

1/ Lengthen the front and back pieces. Trace an horizontal line about 20 cm below the armscye on the front and back pieces. Cut along the line. On a piece of paper, place the top and bottom pieces 30 to 35 cm apart (make sure the centers match). Tape the pieces to the paper and draw a line to meet the top and bottom at the sides and centers.

2/ Lengthen the front facing to same way.


3/ Once the front, back and front facing pieces are lengthened, we will widen the back piece with an inverted pleat. Place the back piece on paper and trace a line parallel to the center back 2 to 4 cm away. Trace around the new back piece.

4/ Lengthen the sleeve. Trace a cutting line 10 cm above the hem. Cut and place on paper 10 cm apart. Tape and draw the new sides from the armscye to the hem.

5/ Draw the pleated pocket.

  • Pocket : on a piece of paper, trace a rectangle 22 cm wide and 16 cm high. Trace a vertical line at the center, this will be the center of the inverted pleat. On each side of the line, trace a fold line 2 cm away. Add 1,5 cm seam allowances around the pocket piece. You’ll need to cut 2.
  • Pocket facing : Trace a rectangle 18 cm wide and 8 cm high. Add 1,5 cm seam allowances around the facing. Cut 2.

6/ Make the waist ties. Trace a rectanle 8 cm high 1 m wide (if you want longer or shorter ties, feel free to change the length). Add 1,5 cm seam allowances around the ties. Cut 2.

7/ Place the pockets and ties placements on the front pieces as indicated.

CONSTRUCTION

BACK

  • Form the inverted pleat on the back neckline. Here’s a great post (in french) about that:

> Coudre des plis: plis plats, plits creux, plis ronds

POCKETS

  • Form the inverted pleat of the pocket.
  • With right sides together, stitch the pocket facing to the top edge of the pocket with 1,5 cm seam allowances. Press the seam allowances towards the facing and understitch.
  • Fold the top edge of the facing 1,5 cm wrong sides together. Press. With right sides together, fold the facing in two, stitch around the pocket, over the top fold. Trim the corners.
  • Turn the pocket right sides out. Fold the pockets seam allowances towards the wrong side, using the stitching as a guide. Edgestitch the facing.
  • Pin the pockets on the front pieces. Topstitch around the pockets.

TIES

  • With right sides together, fold the tie in two lengthwise. Stitch 1,5 cm from the edge, leaving one end open. Turn right side out and press. Baste the ties to the front pieces.

HEM

  • Finish the hem with bias binding (or you could use the original facing if you prefer, just remember to add the extra width from the back pleat).


0 comment
0 FacebookTwitterPinterestEmail

The Fashion Revolution movement is taking place this week, on the anniversary of the Rana Plaza factory collapse on 2013. Fashion Revolution believes in a fashion industry that values people, the environment and creativity. Feel free to check their webpage to know more about their mission and how you can participate too.

On our side, we want to take part in this revolution, even if it’s just with a little tutorial. We’ll show you a fun and creative way to use patchwork and upcycling to make new clothes. Why ? Because we buy way too many clothes (and fabric !). And to produce these fabrics, people and the environment suffer as a result of the way fashion is made, sourced and consumed. We thought it would be a great idea to use used clothes to make a new Denia blouse.:)

To make this sewing project, you’ll need the following:

  • Used shirts. It can be your husband’s (or brother, boyfriend or dad) old shirt or from a second hand shop. The bigger the better ! Choose them with similar weight and drape, it will be easier to sew. For mine, I choose 3 shirts with contrasting textures and similar tones (ochre, vanilla and cream). They come from a second hand shop and are very big (size XXXL! We could have fitted 3 Lucile inside!).
  • Thread. Matching colour or contrasting, that’s your choice.
  • Sewing machine and serger. If you don’t have a serger, no big deal. We haven’t use dit here, but it gives a nice finish to your garment’s seams.
  • The Denia blouse pattern or any simple pattern with few pieces. For those who don’t know the Denia pattern, it’s a simple and loose-fitted blouse. It has a round neckline, short sleeves with cuffs. It ties in the front and buttons in the back.

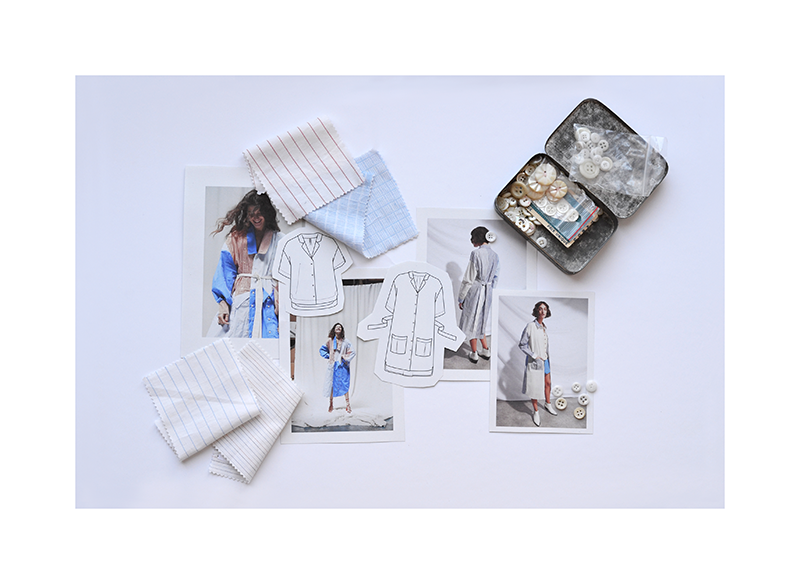
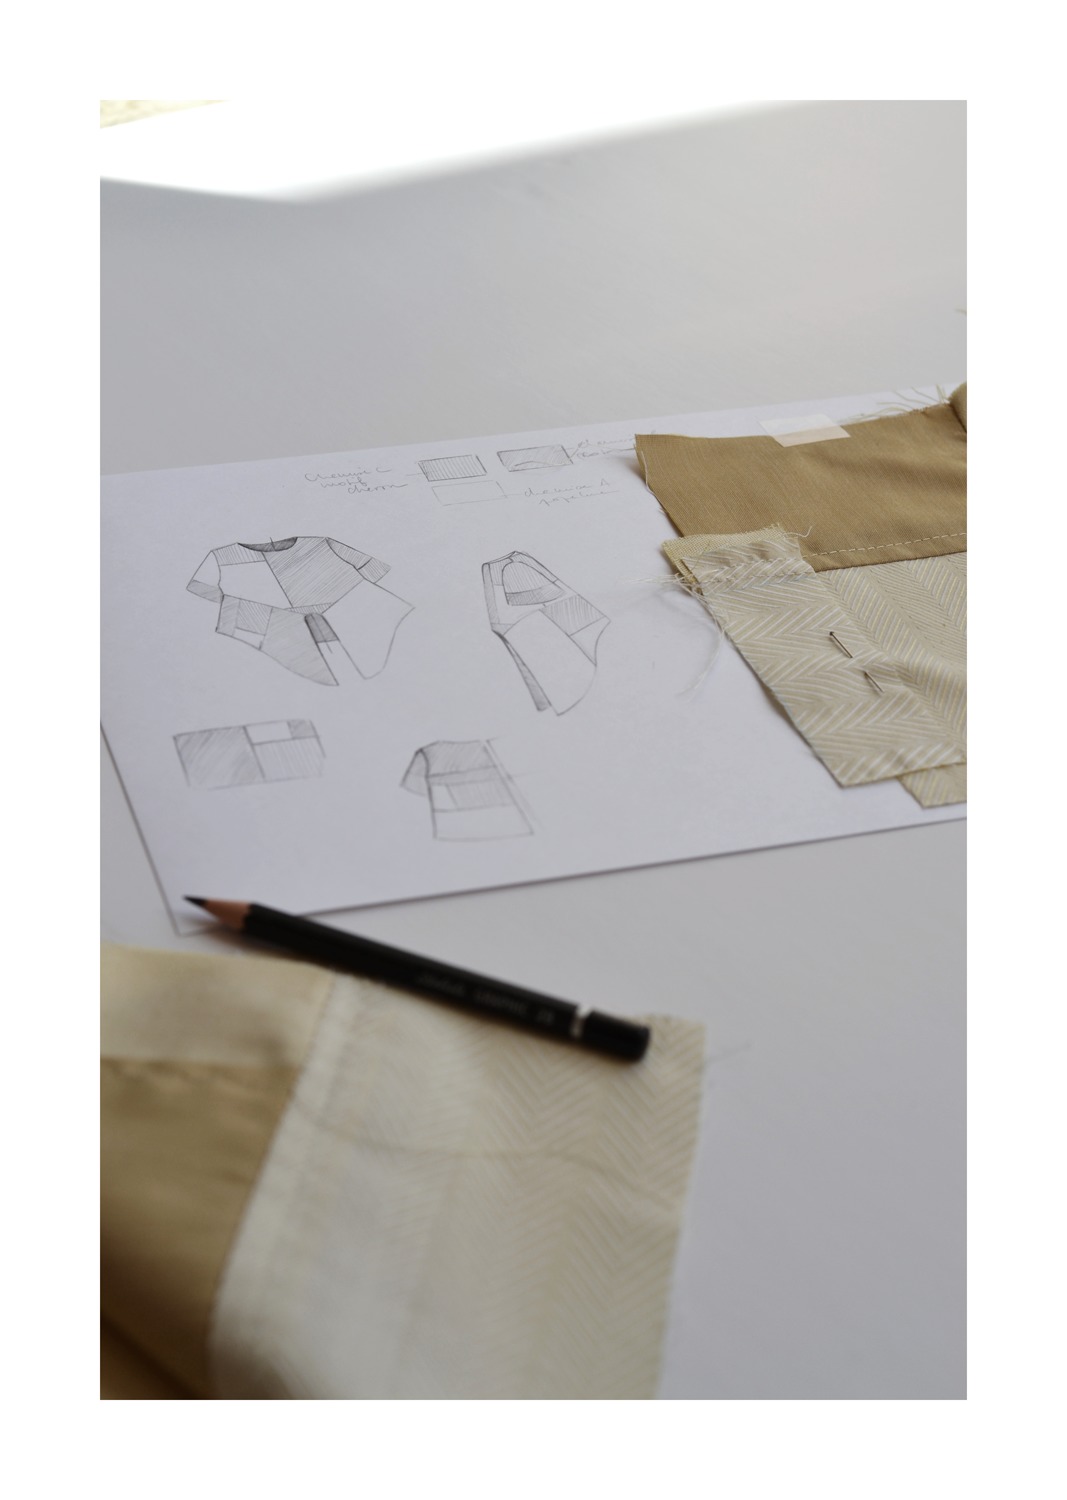
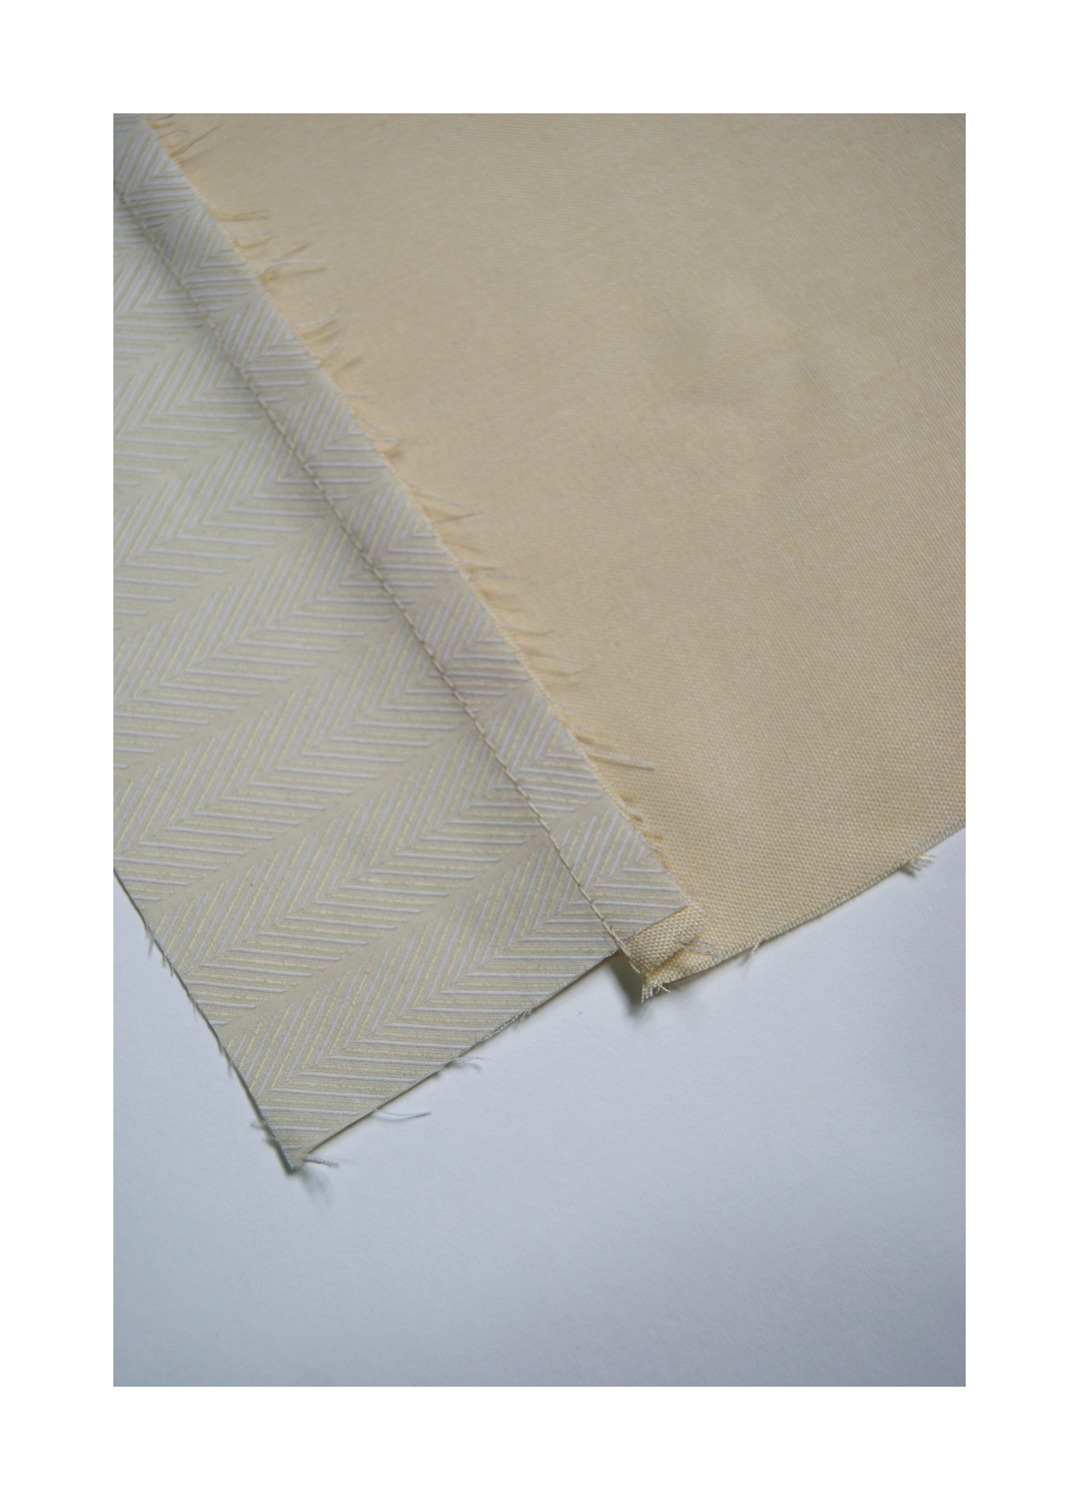
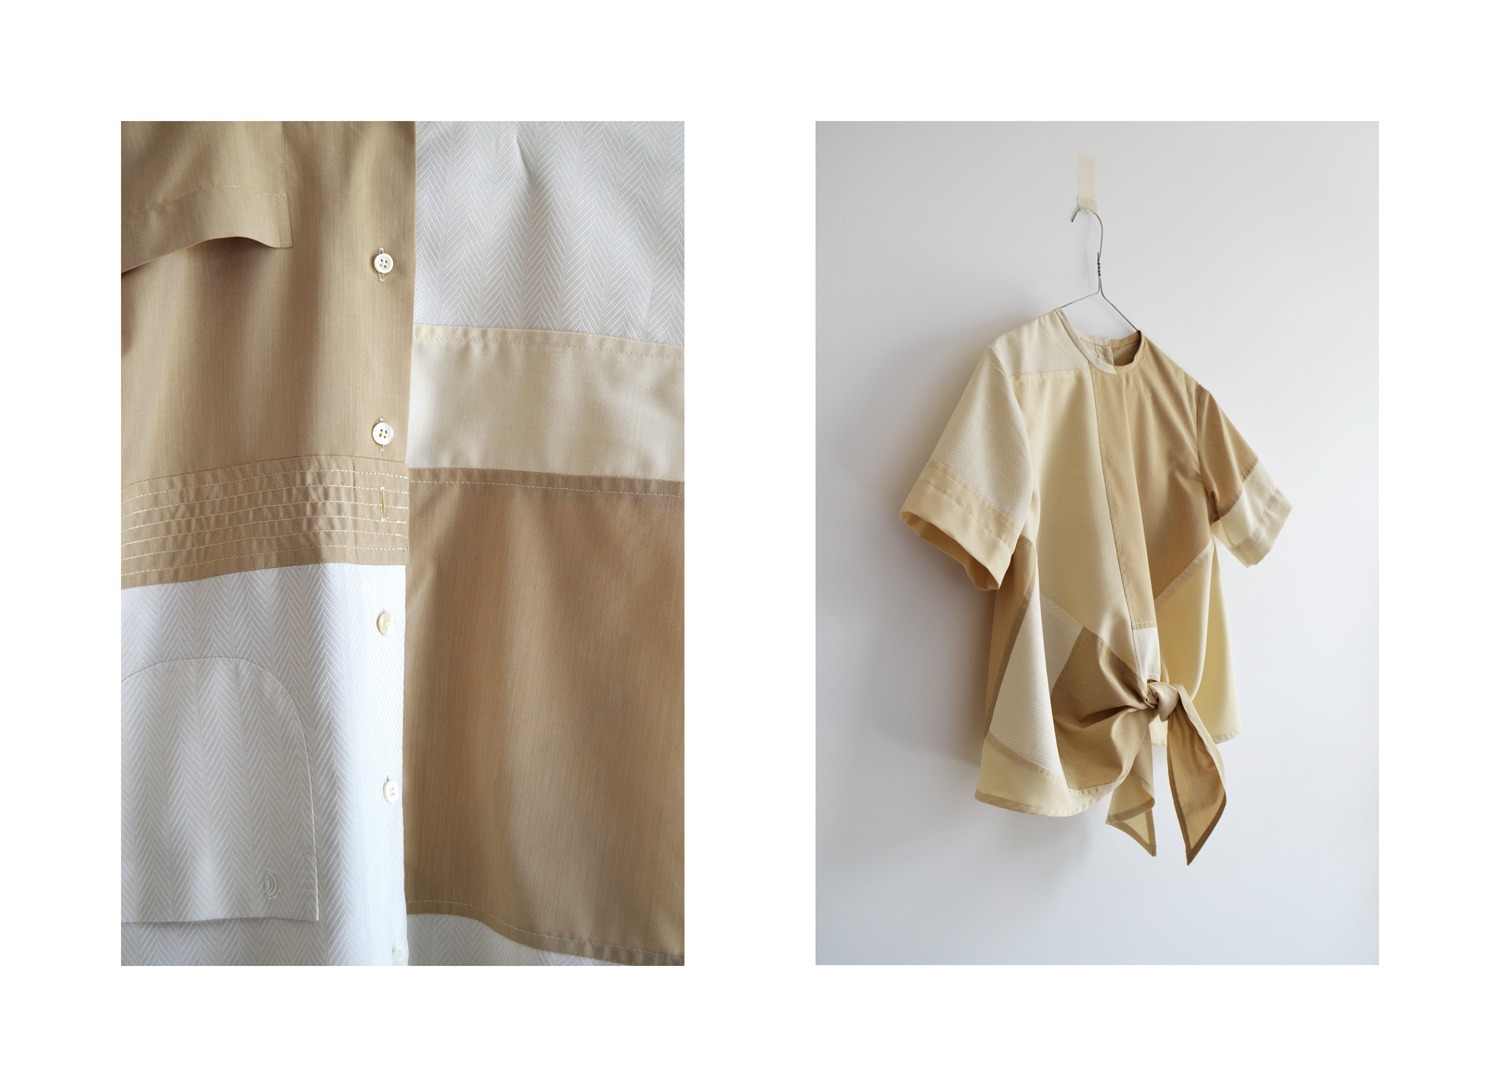
1/ Choose the shirts you’re going to use based on weight and drape, but also colour, texture and patterns. Select 3 to 6 different fabrics. Stripes, checks, florals, dots, plain colour… don’t be shy and experiment to create a unique patchwork.

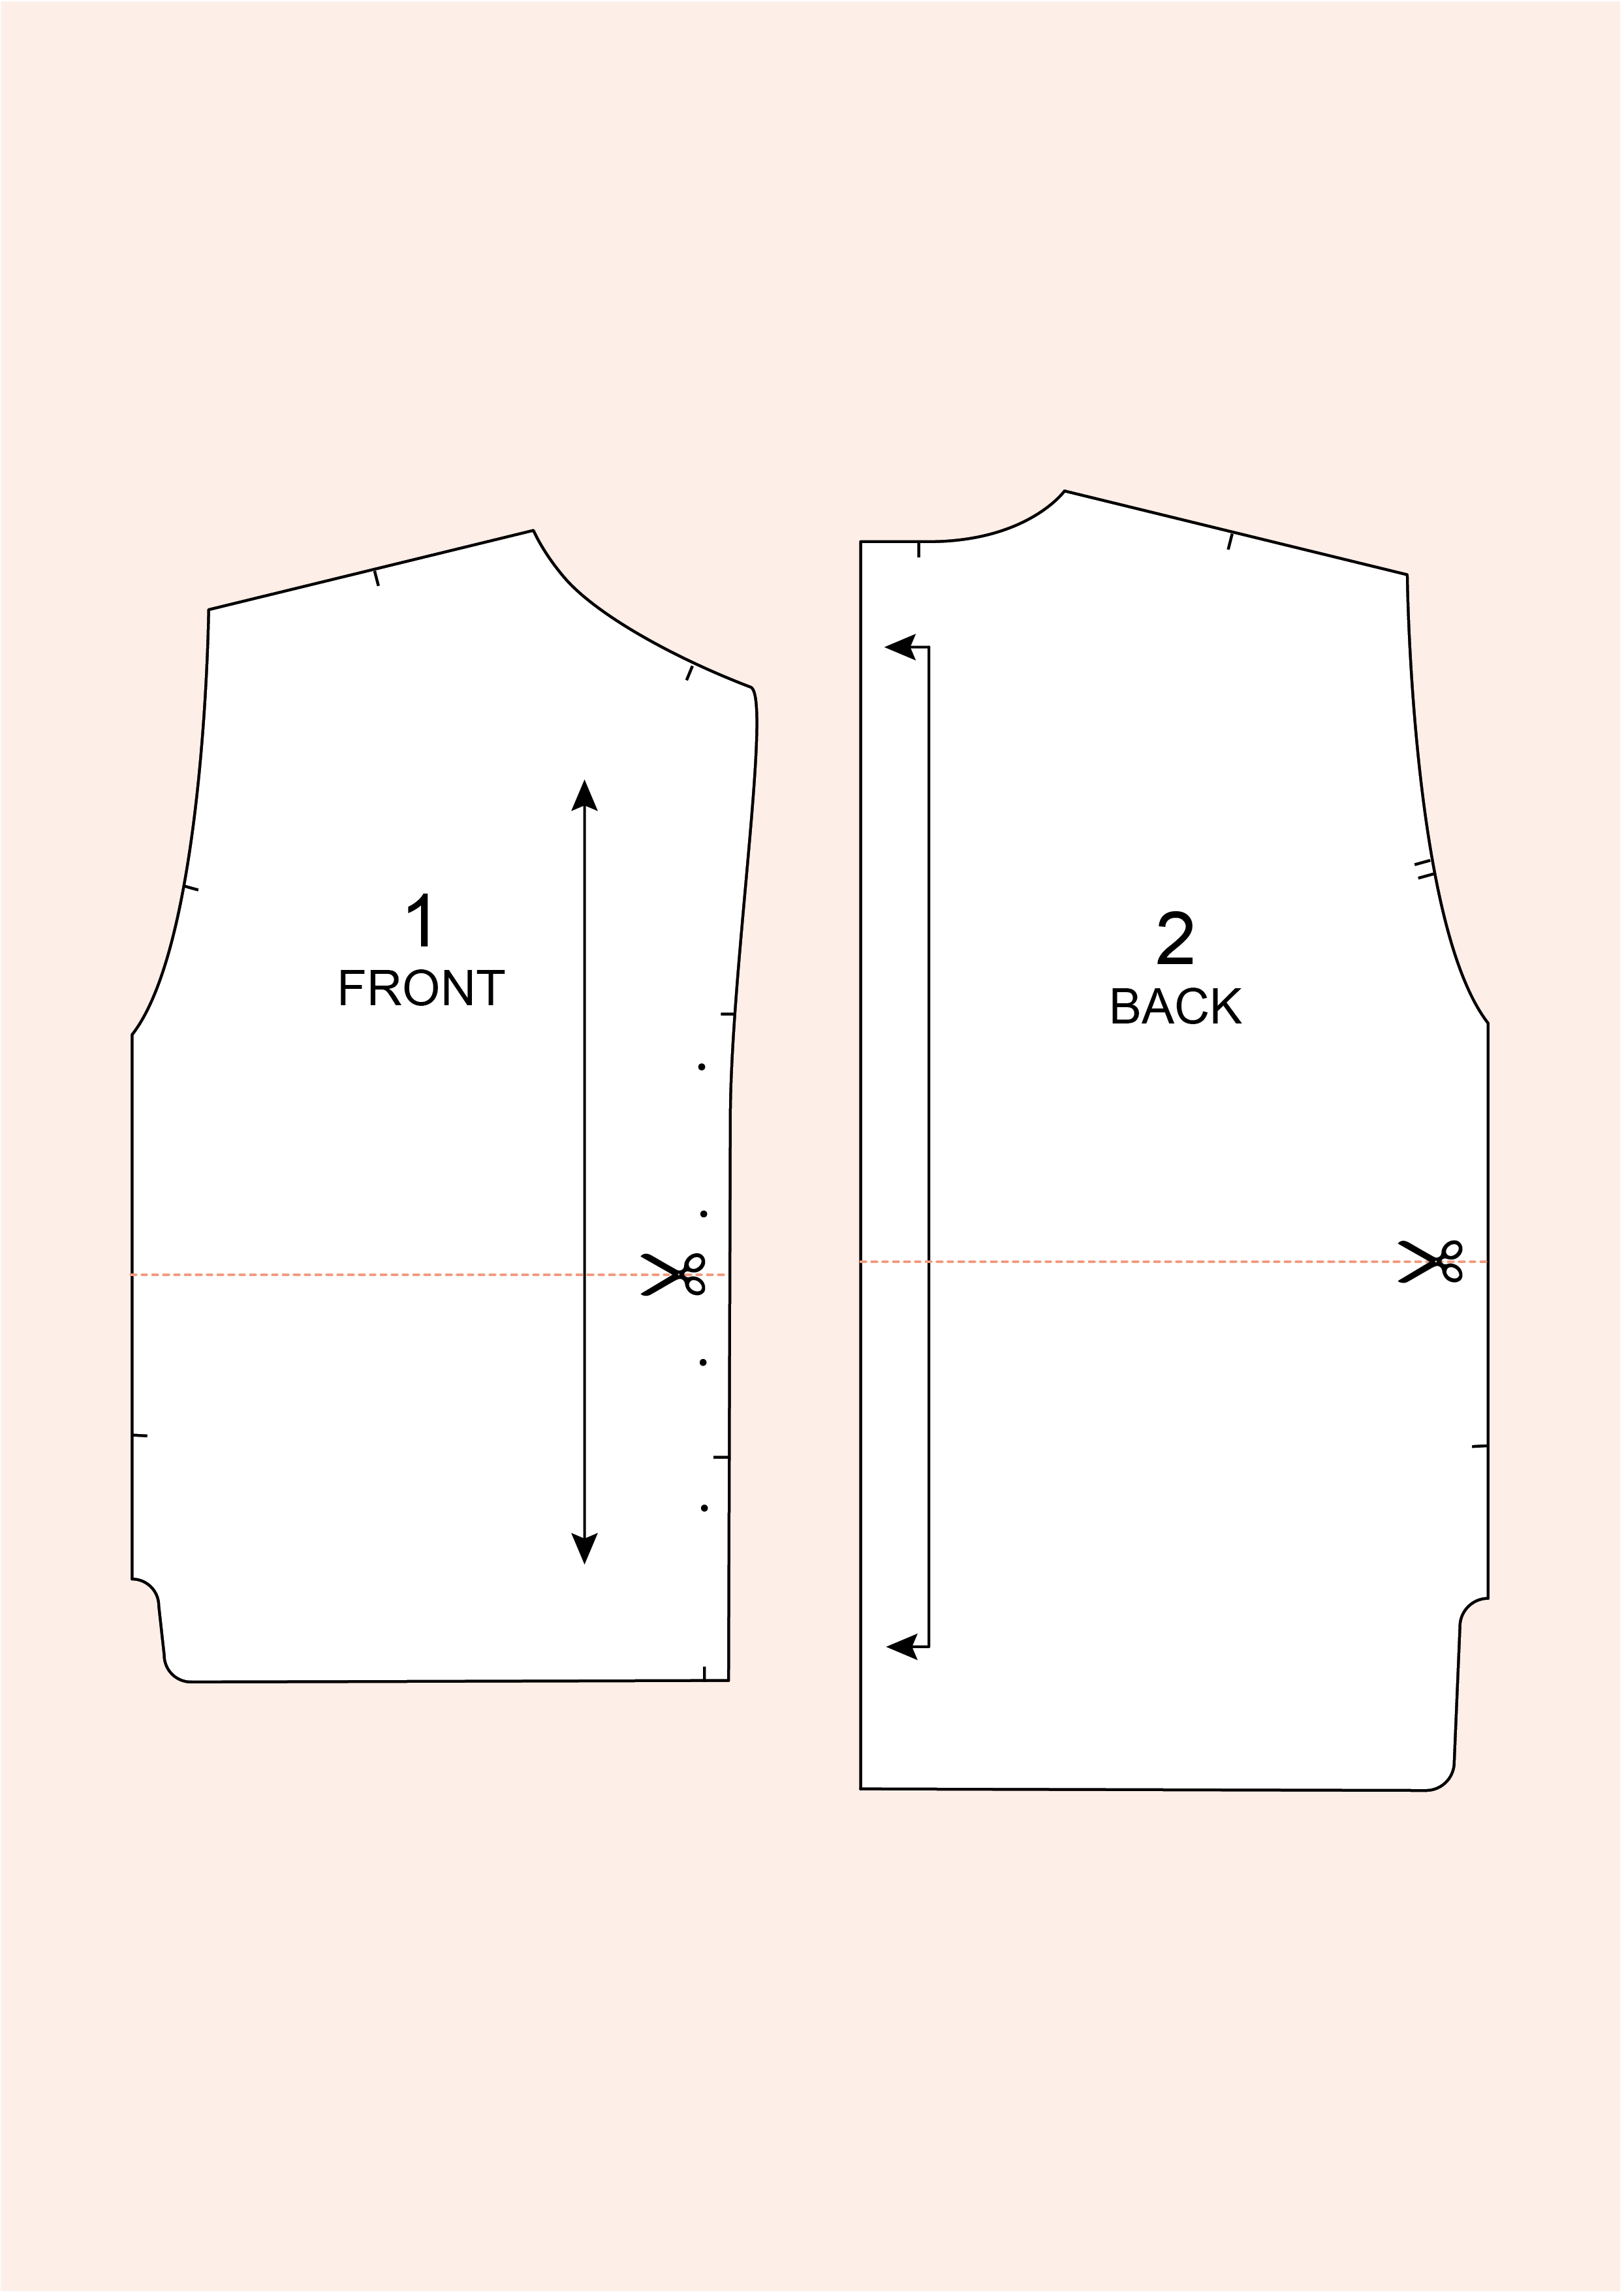
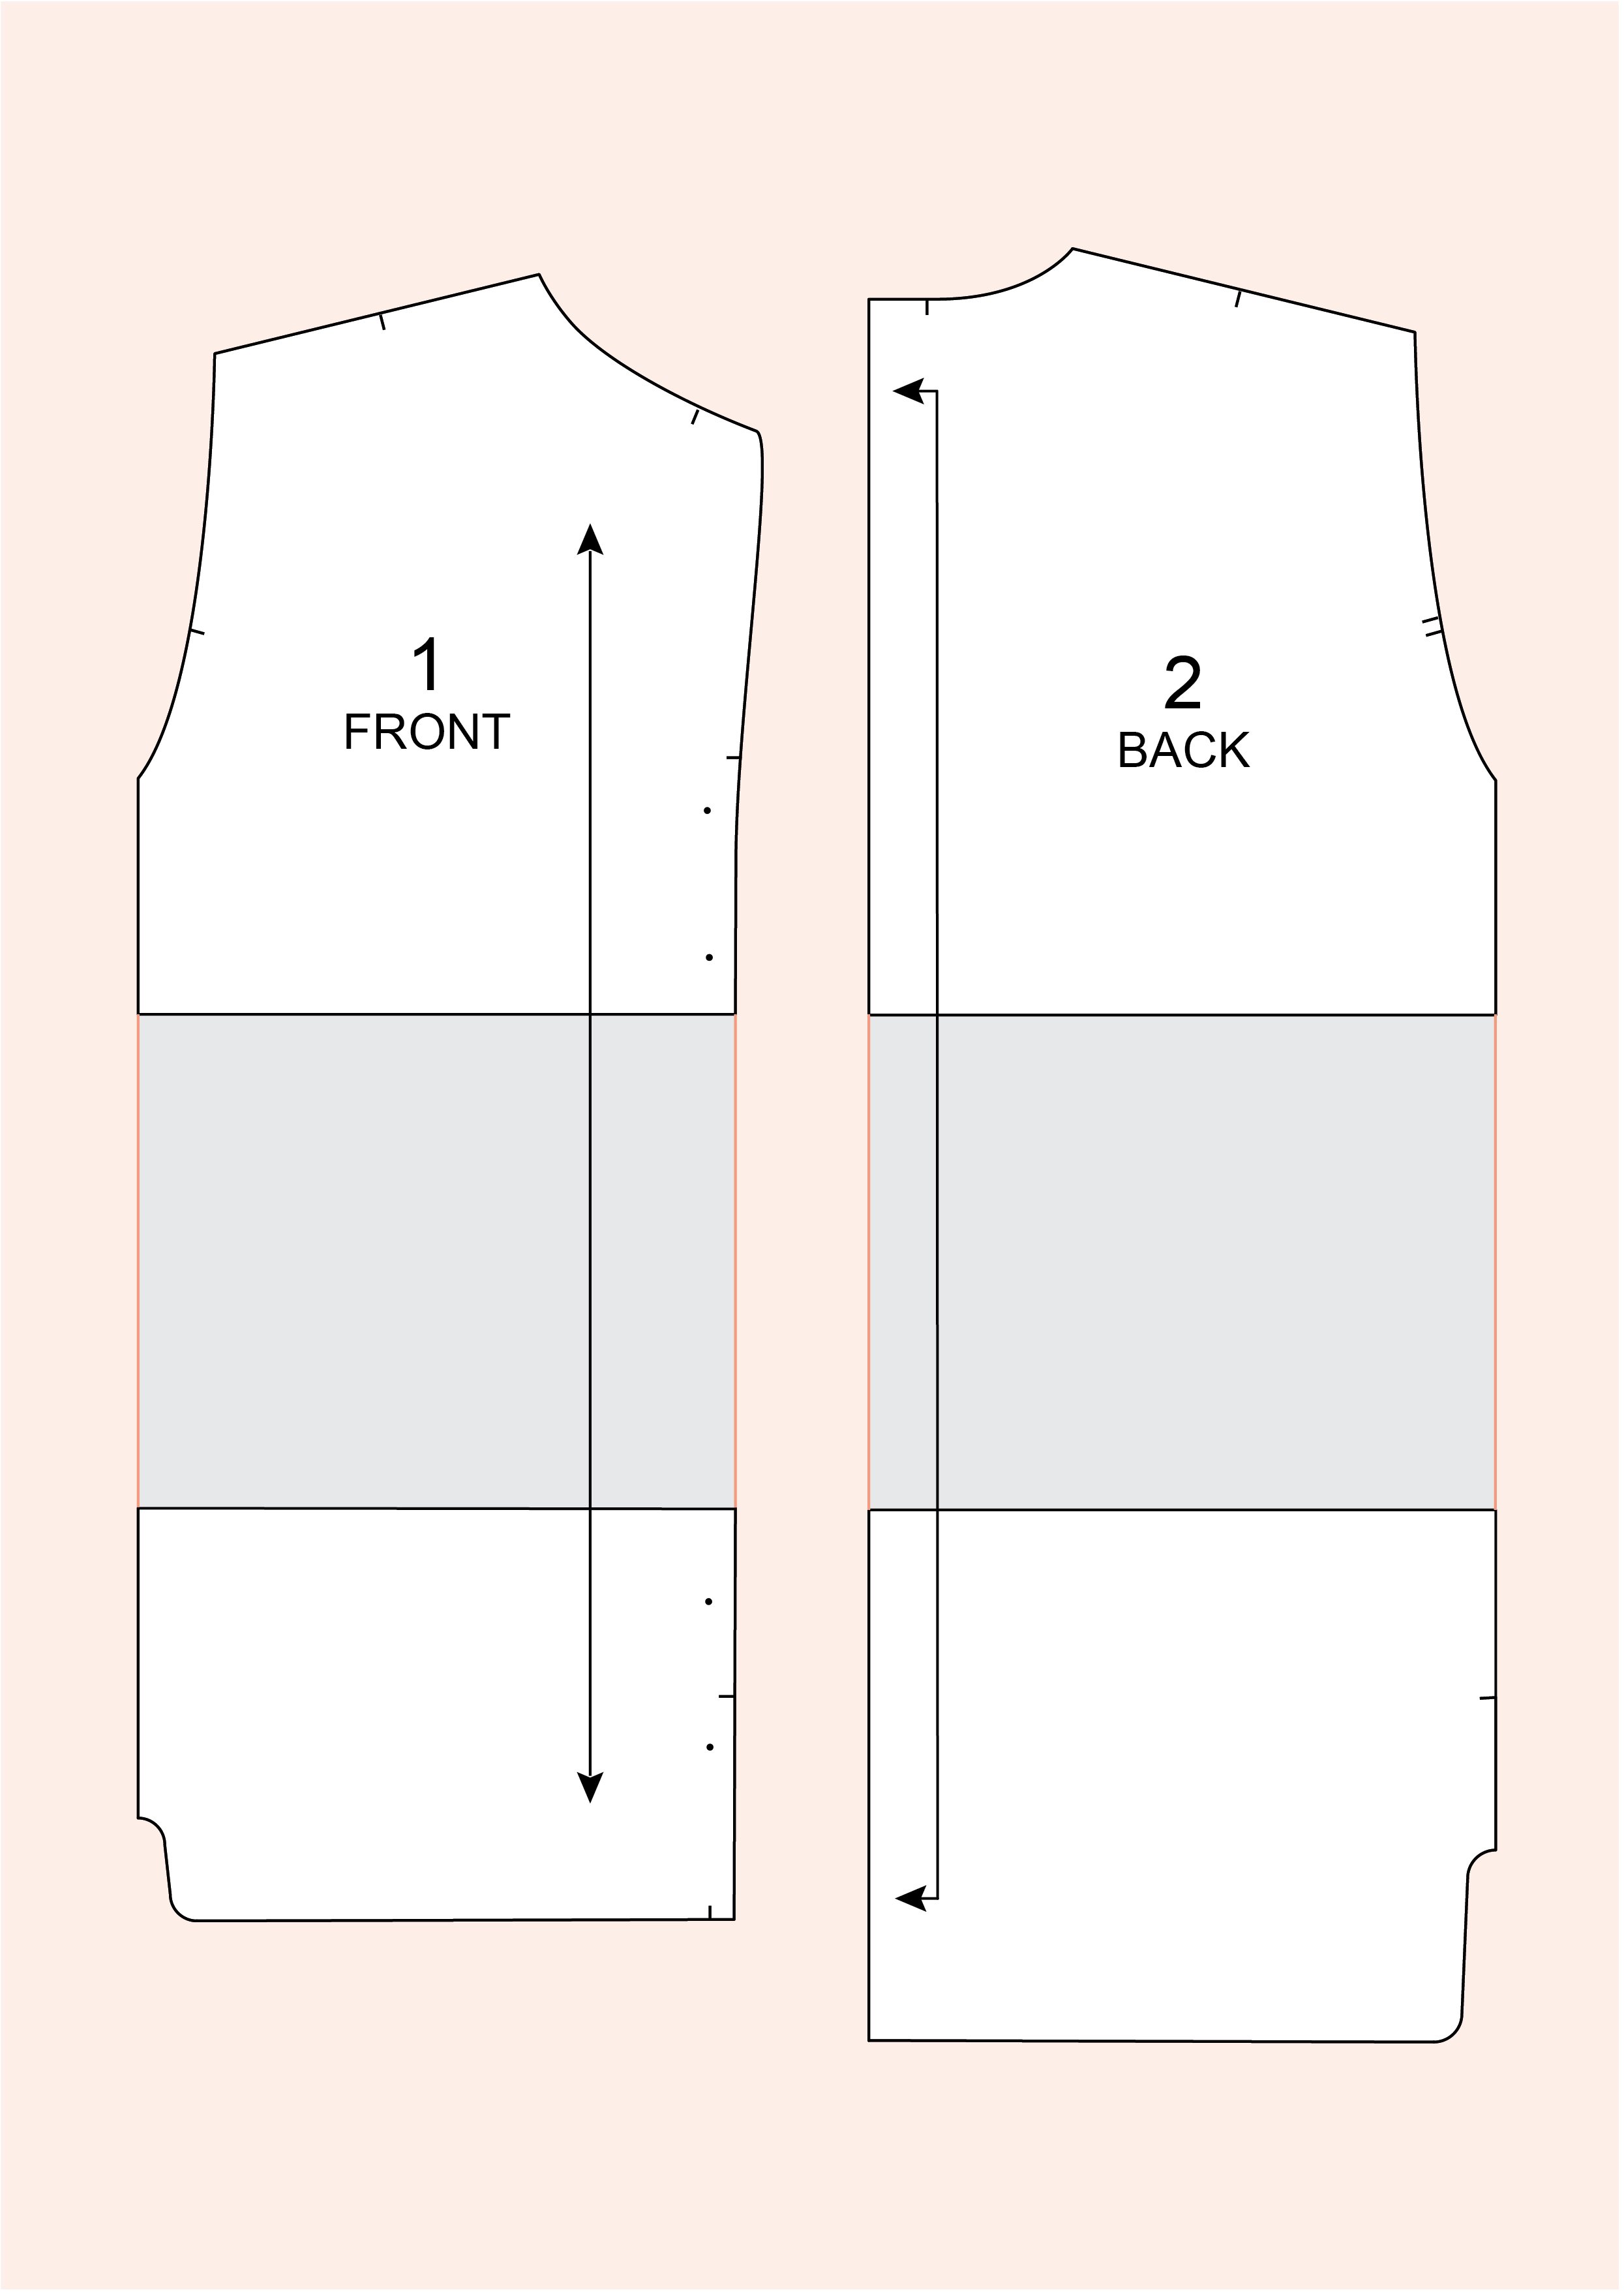
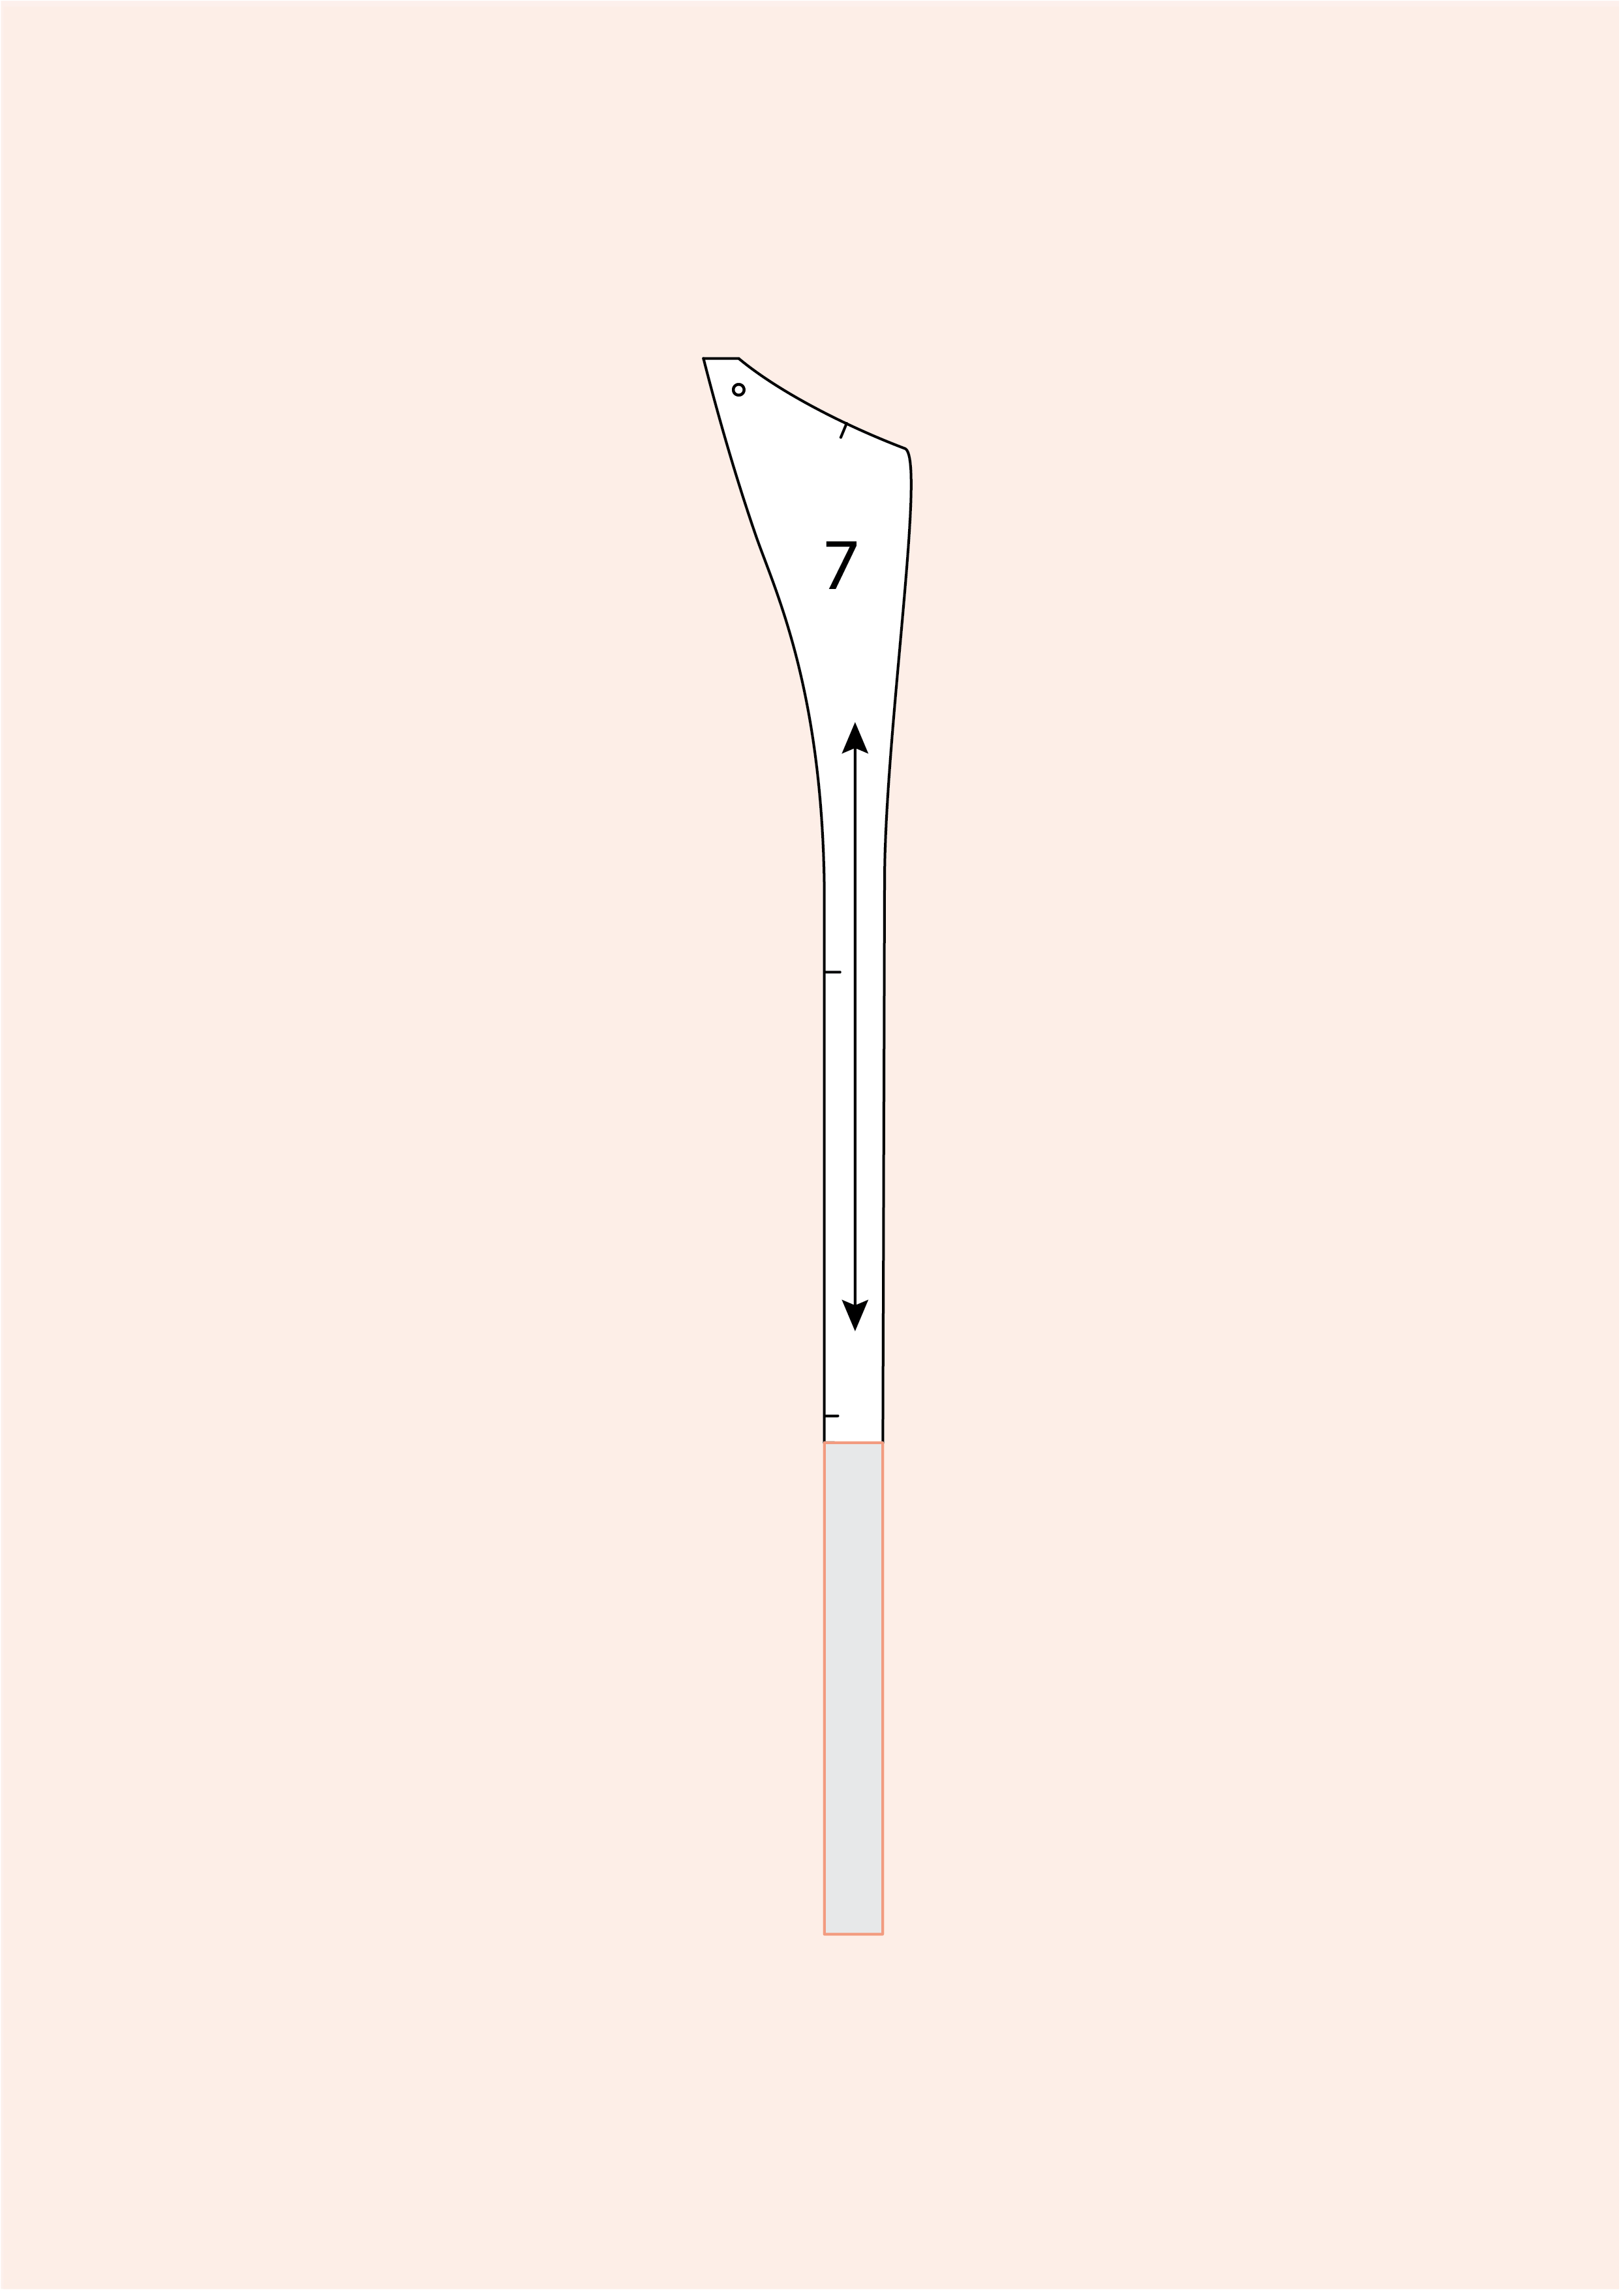
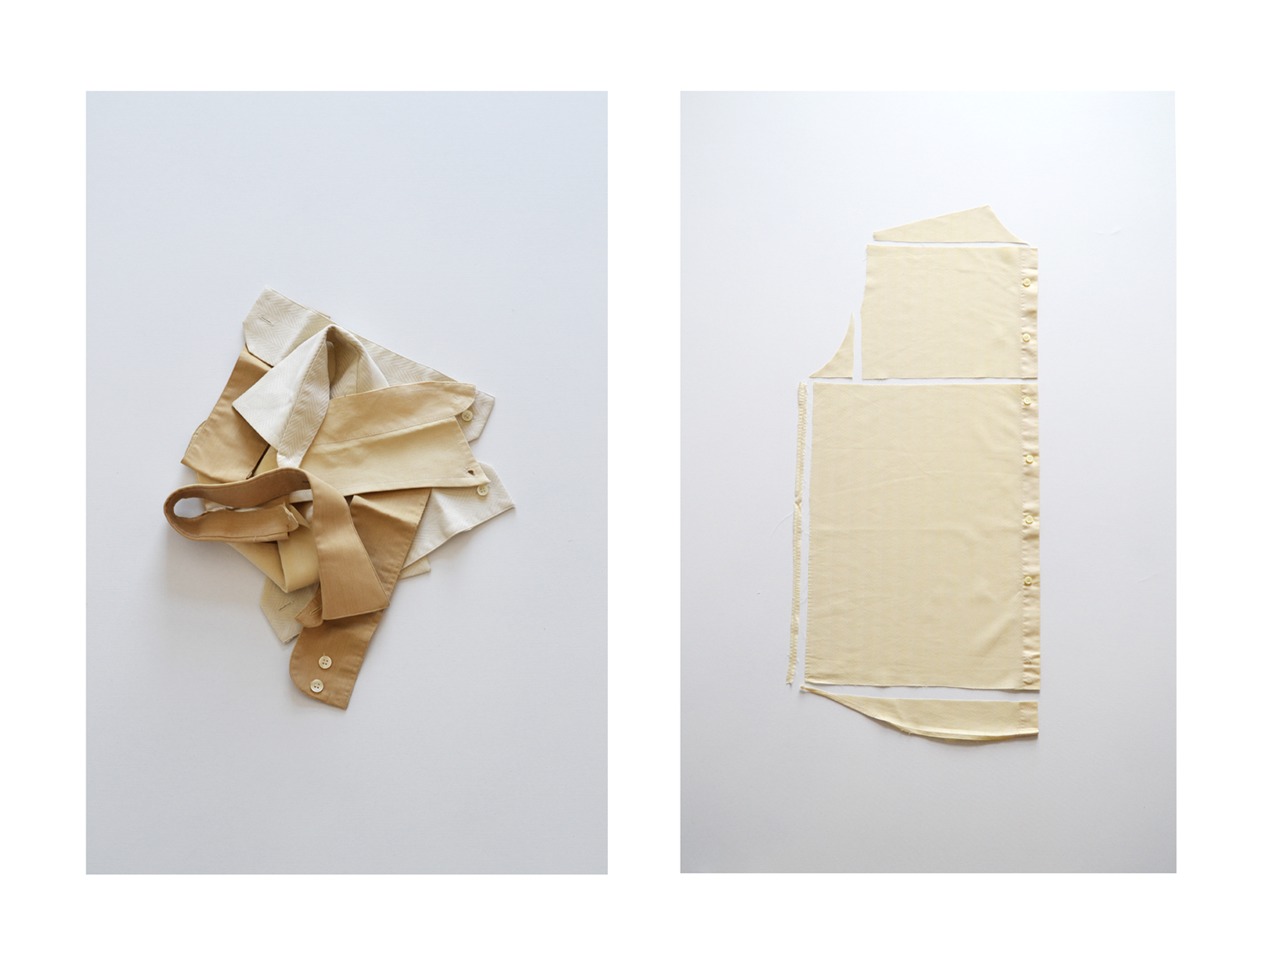
2/ Cut the shirts along the seams and keep the big pieces : front, back and sleeves. You can keep the yoke, collar, cuffs and pocket if you want to add cool details or for another project. Make sure the fabrics are pressed before cutting. Cut the principal pieces into rectangles as big as possible.

3/ Prepare the patchwork. Play with the different fabics: take the rectangles and place them together to see what combination you like best. It can take some time to find a balance between the fabrics: drawing a sketch can help you with the composition as well as making samples of the patchwork.

4/ Sew the patchwork. With right sides together, sew the smallest pieces together 1 cm from the edge. Press the seam allowances to one side and topstitch them. Continue sewing this block to the next fabric rectangle until you have pieces big enough to fit the pattern pieces.

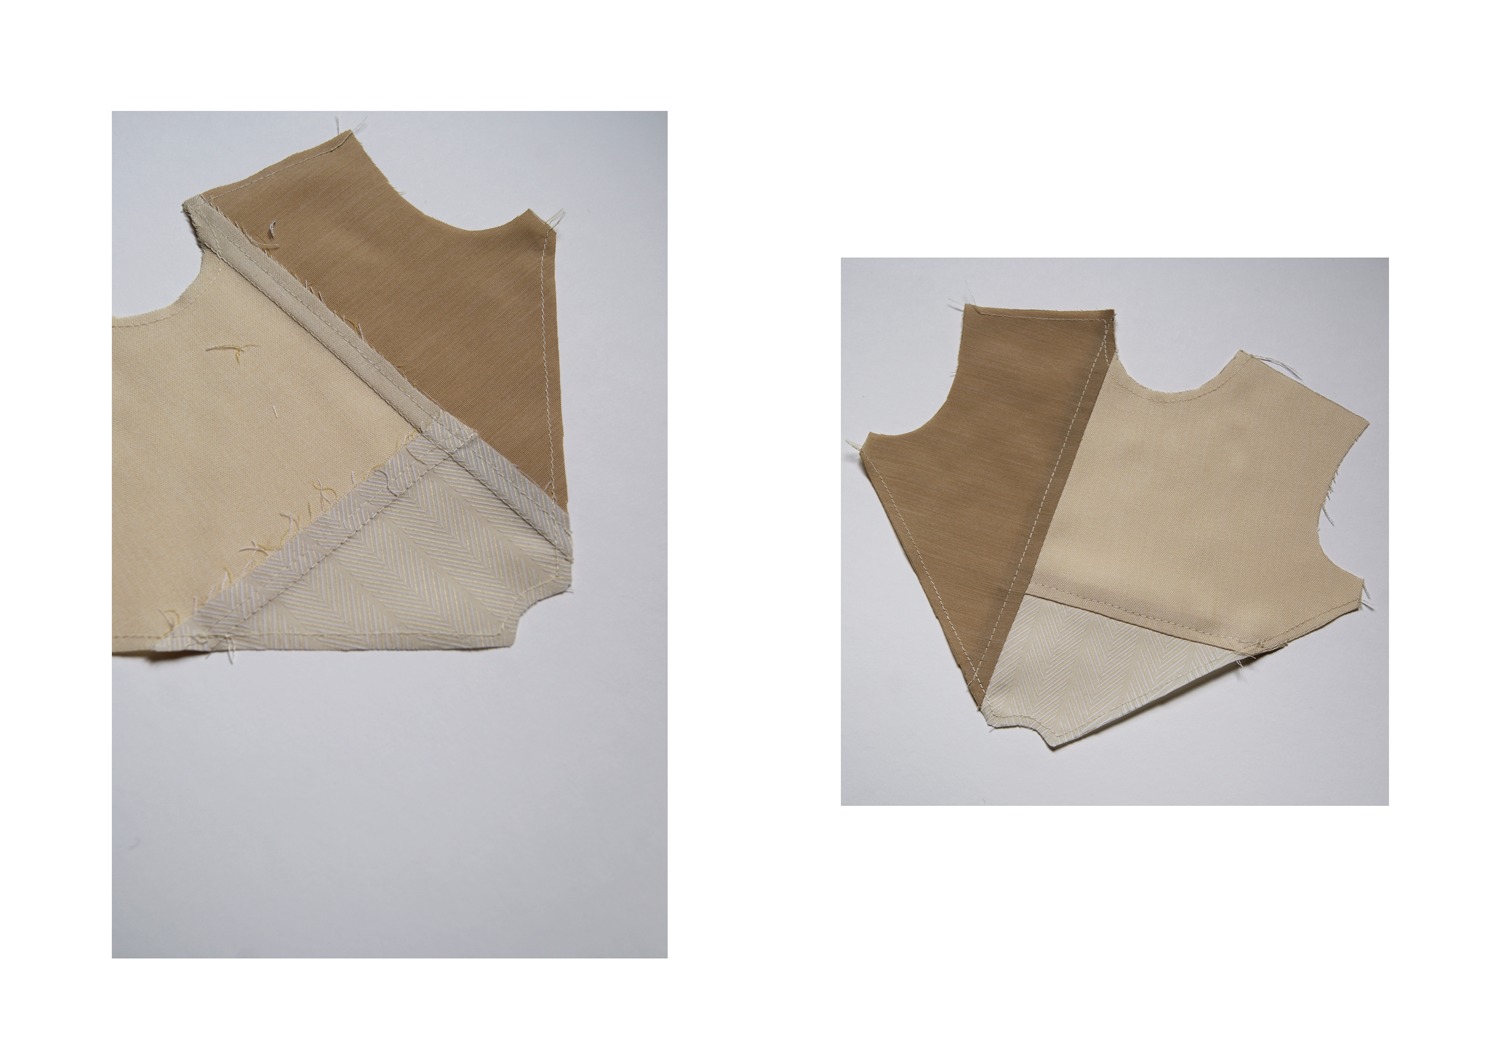
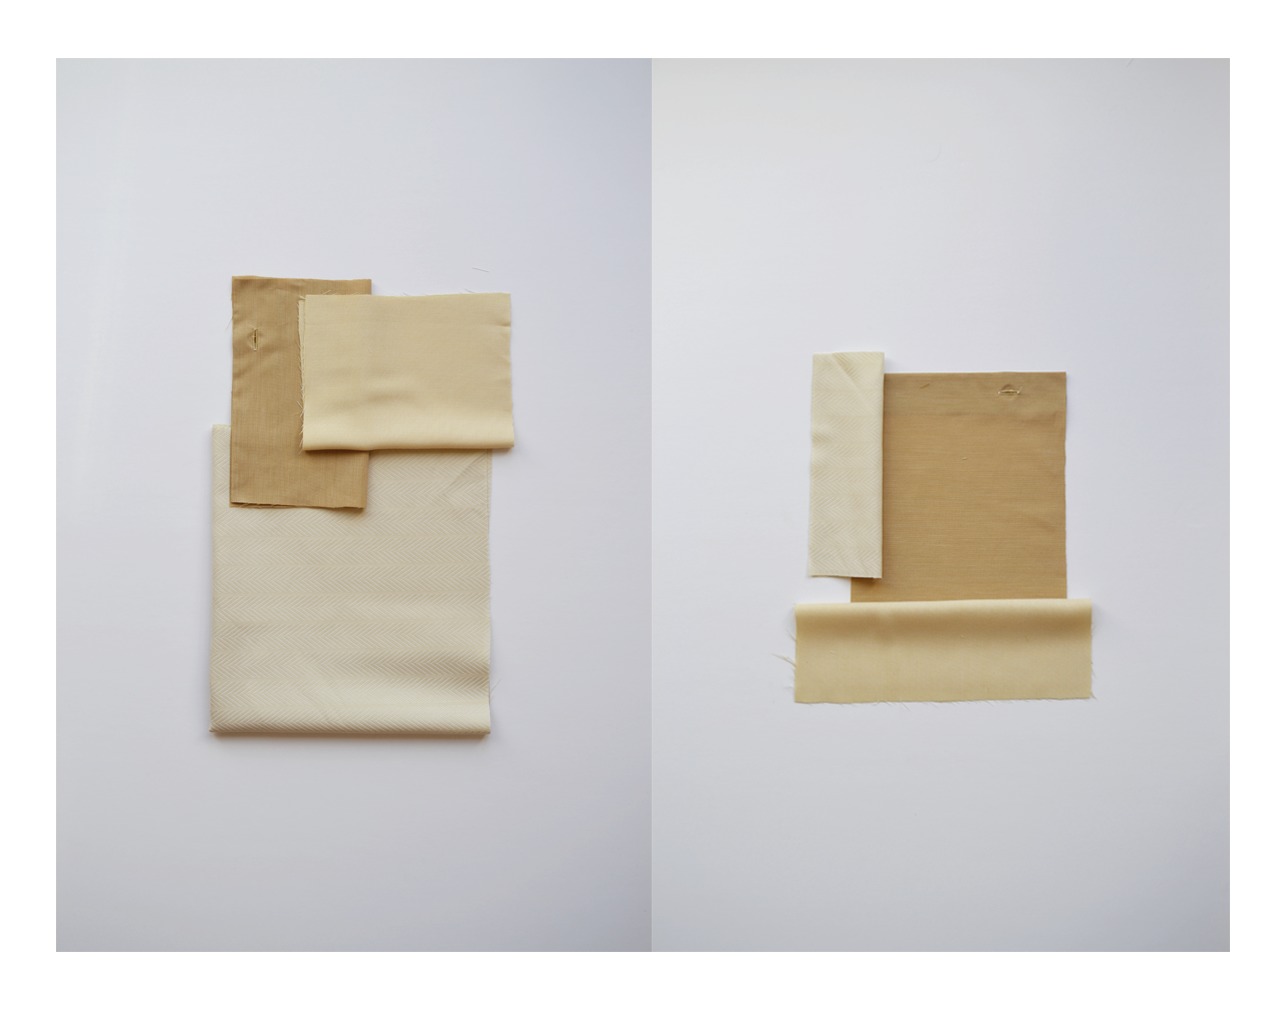
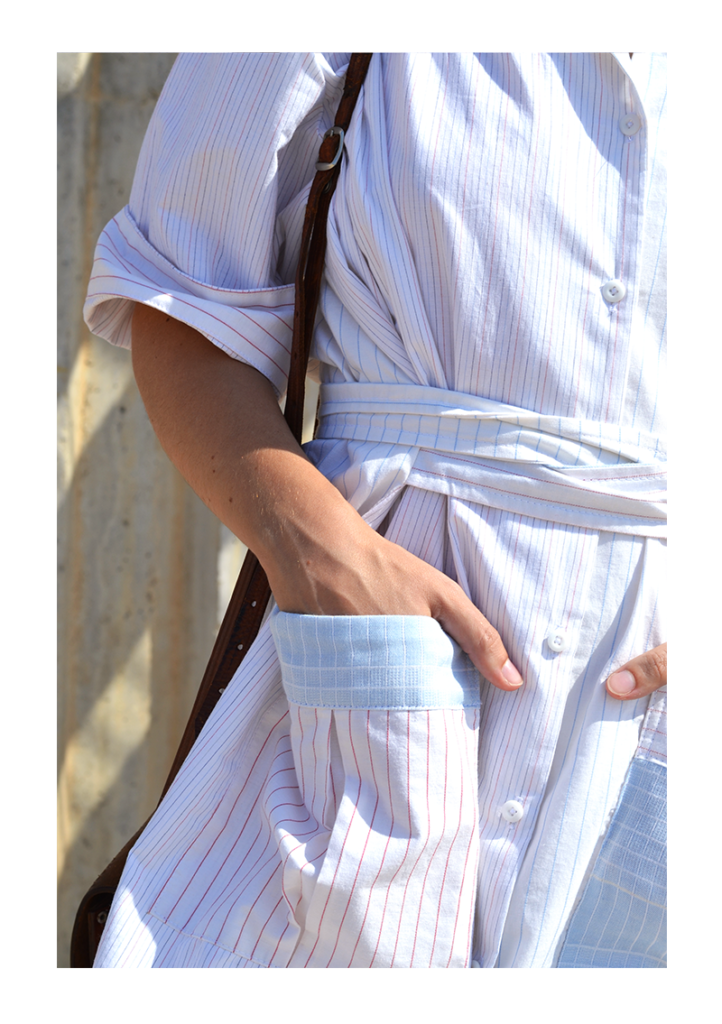
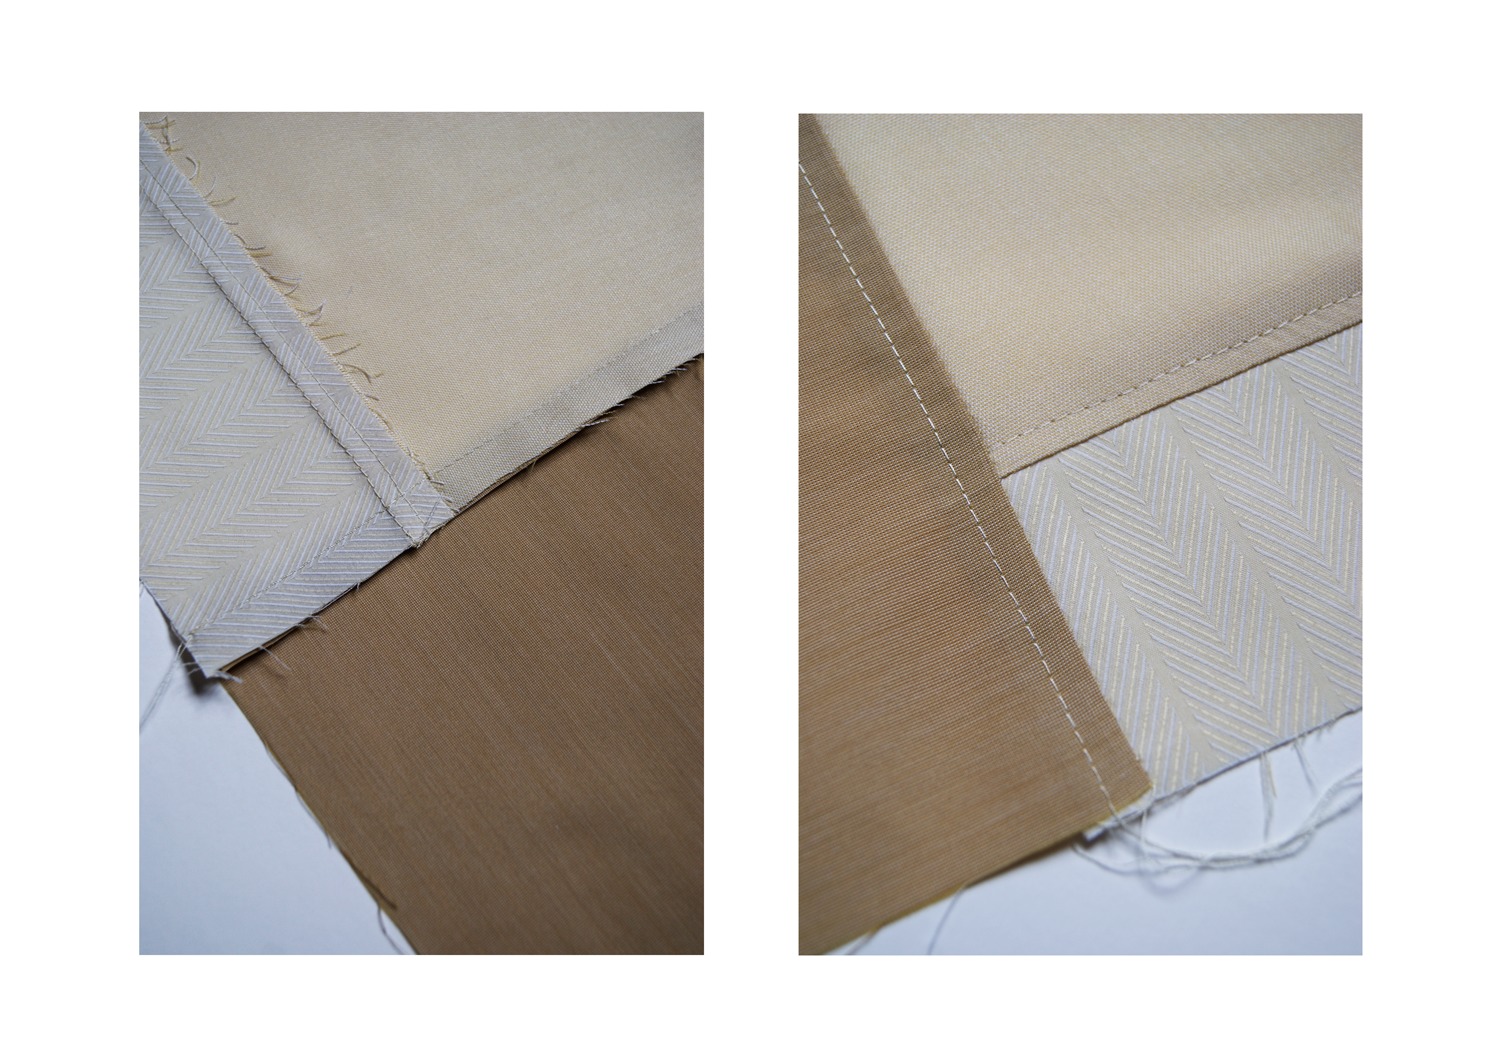
If you have a serger, use it to finish the seam allowances. You could also use a zigzag stitch or bind the seam allowances. I have left the seams raw but the topstitching will prevent them to fray too much.

5/ Place the pattern pieces on your blocks and trace them. Once the pieces are cut, you can staystitch around them to make sure the patchwork seam allowances stay in place. Then, you just need to follow the instructions to sew the Denia blouse.

Do you repurpose fabric or old clothes to sew new garments?

1 comment
2 FacebookTwitterPinterestEmail

We are very excited to share this video tutorial with you today! While working on the Lliria dress pattern, we thought it would be such a great idea to offer a more visual help for all of you who don’t feel secure enough to try this project. Sometimes, we just need a little bit of extra help to tackle a new challenge.

So get your Lliria dress pattern, your fabric and your sewing machine and enjoy watching our video tutorial!

If you have any question, feel free to ask in the comment section or send us an email at info@paulinealicepatterns.com, we’ll be happy to help. And don’t hesitate to share your Lliria dress with us on social media with the hashtag #LliriaDress.

2 comments
9 FacebookTwitterPinterestEmail
pattern port trousers alter the crotch 2

Once again, the wonderful team of Artesane share the second part of the trousers adjustments with us! Thanks so much!

…………………………………………………………………………………………………………………..

Now that you can alter the legs of a trousers pattern in your sleep, let’s focus on altering a more difficult area : the crotch.

1/ BEFORE STARTING

MATERIAL

Material needed :

  • Your trousers pattern (front leg and back leg)
  • Pattern paper or Kraft paper (cardboard)
  • Pens in different colours
  • tape
  • scissors

HOW IS MADE THE CROTCH OF A PAIR OF TROUSERS ?

pattern port trousers alter the crotch

The crotch of a pair of trousers is the curved seam that goes from the waistband center front to the waistband center back. It is made of two parts : the rise (the less curved part) and the curve.

You can alter the rise or the curve, or both at the same time. However, we recommend starting by altering only the rise of the crotch as it’s easier to adjust and most of the time, it’s enough to modify the few issue you might have with the inseam, seat or waist area.

WHICH SOLUTION FOR WHICH PROBLEM ?

pattern port trousers alter the crotch 2

The crotch line will determine the fit of a pair of trousers. And a crotch line not adapted to your body specificities might create some issues in the following areas : seat, waist and inseam.
But don’t worry ! To each problem there’s a solution.
 
THE SEAT
 
1/ Your behind is very round (it’s too tight) : you need to widen the curve of the crotch in the back. Moreover,  if the waist tends to go down when you sit, you need to add length to the crotch at the back.
2/ Your behind is flat (there are some lines under the bottom) : you need to shorten the crotch length at the back.
 
THE WAIST
 
3/ Your belly is round (there are some lines around the belly) : you need to lengthen the rise of the crotch at the front.
4/ Your waist is very small (there are some lines just below the waist in the back) : you need to shorten the rise at the back.
 
THE INSEAM
 
6/ The inseam is too tight (There are horizontal lines) : you need to widen the curve at the front.
7/ The inseam is extremely tight (it cuts the legs and the waist) : you need to lengthen the crotch at the front and the back.
8/ The inseam is too wide (it’s too loose) : you need to shorten the crotch line at the front and at the back.
 
THE CASE OF THE ARCHED BACK
 
5/ If your back is really arched, there’s a chance your trousers waist will gape at the back. You need to shorten the crotch line at the back in a specific way that we’ll explain at the end of this post.
2/ LENGTHEN OR SHORTEN THE RISE OF THE CROTCH LINE (front and back at the same time)
 
Some of the issues (nº7 and nº8) need to alter the crotch length a few cm at the front and the back. In theses cases, you’ll apply the following method (that you need to apply on the front piece and the back piece).
LENGTHEN THE RISE
pattern port trousers alter the crotch 3
1/ Cut your pattern piece along the hip line.
2/ Place a piece of paper below the pattern pieces. Determine how many cm you need to add and add them between the two pattern pieces (make sure the pieces stay parallels).
3/ Tape the pieces to the paper and redraw the curves of the crotch and the side.
SHORTEN THE RISE
pattern port trousers alter the crotch 4
1/ Cut your pattern piece along the hip line.
2/ Determine how many cm you need to remove and overlap the two patten pieces (make sure the pieces stay parallels).
3/ Tape the pieces to the paper and redraw the curves of the crotch and the side.
 
3 / LENGTHEN OR SHORTEN THE RISE OF THE CROTCH LINE (only at the back or the front)
 
Some of the issues (nº3 and nº4) need to alter the crotch length a few cm only at the front or the back. In theses cases, you’ll apply the following method to the front piece or the back piece.
LENGTHEN THE RISE
pattern port trousers alter the crotch 5
1/ Draw a line perpendicular to the grainline at the point of the dart. Cut along the line starting from the crotch but stoping before the end. 
2/ Determine how many cm you need to add and spread the pieces according to the cm needed.
3/ Tape the pieces and redraw the crotch line.
 
SHORTEN THE RISE
pattern port trousers alter the crotch 6
1/ Draw a line perpendicular to the grainline at the point of the dart. Cut along the line starting from the crotch but stoping before the end.
2/ Determine how many cm you need to remove and overlap the two patten pieces
3/ Tape the pieces and redraw the crotch line.
4/ WIDEN OR SHORTEN THE CROTCH CURVE
WIDEN THE CURVE
pattern port trousers alter the crotch 7
1/ Trace a line parallel to the grainline at the deepest of the curve. Cut along this line. 
2 / Place paper under the pattern pieces and spread the pieces apart according to the cm you need to add.
3/ Tape the pieces and redraw the crotch line.
 
SHORTEN THE CURVE
pattern port trousers alter the crotch 8
1/ Trace a line parallel to the grainline at the deepest of the curve. Cut along this line.
2/ Determine how many cm you need to remove and overlap the two patten pieces at the crotch.
3/ Tape the pieces and redraw the crotch line.
 
5/ THE CASE OF THE ARCHED BACK
pattern port trousers alter the crotch 9
If you have an arched back and your trousers gape at the back waist, you need to alter the length of the crotch. But we’ll modify it directly from the waist.
1/ Determine how many cm you need to remove (maximum 2 cm). 
2/ Lower the waist line on the crotch side.
3/ Redraw the waist line with a lsightly curved line instead of a straight one.
Now hopefully, you’ll be able to alter the legs or crocth of any trousers pattern to fit you perfectly ! 
signature1_editado-1
16 comments
15 FacebookTwitterPinterestEmail
pattern Port Trousers

I’m very happy to welcome the lovely girls behind Artesane today on the blog for a special post. In case you don’t know Artesane, it’s an online community platform with video classes and tutorials on sewing, knitting, crocheting, bag making, embrodery, pattern making… and many more to come. I am very greatfull to Artesane to have given me the opportunity to teach a sewing class for them on how to make a tailored jacket and I hope to repeat this amazing experience with them. Classes are only available in French for the moment but be sure to check their inspirational site just the same.

Thanks to Artesane for sharing here a great tutorial on how to alter a trousers pattern. That will be very useful for the Port trousers pattern! Let’s start!

……………………………………………………………………………………………………………………..

TROUSERS ALTERATIONS

If there’s one type of pattern that’s difficult to standarize, it has got to be trousers. Everybody has got different body types and it’s quite rare not to have to alter a trousers pattern. That’s why we often have a favorite store-bought trousers brand or model ! It’s not easy to find a ready-to-wear model that fits perfectly at first try.

The best thing would be to make a muslin for every model that you like and think could be a go-to pattern.

Once this pattern is altered and fitted, you’ll have a tailored trousers pattern and will be able to use it again and again !

1/ Before starting

Material needed :

  • Your trousers pattern (front leg and back leg)
  • Pattern paper or Kraft paper (cardboard)
  • Pens in different colours
  • tape
  • scissors

How is made a pair of trousers ?

Trousers are made of two legs, a waistband and a type of closure (a fly for example).

Each leg is made of a front piece and a back piece. The back pieces is usually bigger than the front one. The back crotch is longer and curvier (that’s where our bum goes !).

Before starting any alteration, you need to add five reference lines on your pattern :

  •  waist line
  •  hip line (measure at the largest point)
  •  inseam line (it corresponds to the end of the seat)
  •  knee line
  •  hem line

ENSchemas1

Once you’ve added these lines to your pattern, it’s time to alter the trousers leg (there’ll be a second post on how to alter the crotch as it’s a vast subject).

So apart from the crotch adjustment, once you’ve made your muslim, you can see various type of issues :

– your trousers are too long o too short ; you have thus to lengthen or shorten the trousers leg ;

– your trousers are too wide or too small around the waist ; you have to adjust the waist ;

– your trousers are too wide at the hips or on the contrary, they’re too tight and uncomfortable ; you need to alter the trousers at the hips ;

2/ Lengthen or shorten the trousers legs

The technics used to lengthen or shorten a pattern piece are the same for any kind of garments. But still, let’s have a little reminder.

HOW TO SHORTEN A PATTERN PIECE ?

ENSchemas3

1/ You need to determinate how many cm you need to remove. Above the shorten/lengthen line on the pattern, trace a parallel line at X cm.

2/ Folding the pattern piece, overlap the two lines.

3/ Tape the fold close.

HOW TO LENGTHEN A PATTERN PIECE ?

ENSchemas4

1/ Cut the pattern piece along the shorten/lengthen line.

2/ Place a new piece of paper below the two pattern pieces. Determinate how many cm you need to add and spread the two pieces apart X cm (make sure the lines stay parallel).

3/ Tape the two pieces to the paper and join the two pieces together.

WHERE TO PLACE THE SHORTEN/LENGTHEN LINES ON A TROUSERS LEG
pattern Port Trousers 4

Now that we’ve seen the techniques, the important thing is to know where to apply them. Indeed, if you were to lengthen a trousers leg at the wrong place, there’s a good chance the general shape will get distorted.

1/ If the shortening/lengthening is small (up to 3 cm), the line has to be placed just above the knee (line 1).

2/ If the alteration is more important, it needs to be made in two places. Divide the length you have to add or remove from the leg in two. Then draw two adjustment lines above and below the knee (line 1 & 2).

If the alteration is minimal, you can do it at the hem line.

3/ Widen or tighten at waist

The secret of a great waist adjustment resides in distribution ! The more you distribute evenly the cm you have to add or remove, the less you’re going to change or distort the shape of the trousers. And this is even more true if the adjustment is important ! You’re going to add or remove the cm needed on both sides of each front and back leg, meaning at 8 different places !

HOW TO WIDEN THE WAIST ?

pattern Port Trousers 5

1/ You need to determinate how many cm you need to add at the waist.

2/ Divide by 8. The end result is X cm.

This adjustment applies to both the front and back pieces (make sure you don’t forget one of the two pieces!) :

3/ Place some paper below your pattern piece.

4/ Extend the waist line on both sides of the pattern piece. Add X cm to both sides (see diagram below).

5/ From these marks, trace the new stitching lines joining gradually the existing ones. The key is to draw progressively the new line so that we don’t get any « bump ».

HOW TO TIGHTEN THE WAIST ?

pattern Port Trousers 5

1/ You need to determinate how many cm you need to remove at the waist.

2/ Divide by 8. The end result is X cm.

This adjustment applies to both the front and back pieces (make sure you don’t forget one of the two pieces!) :

3/ At the waist line, remove X cm on both sides of the pattern piece (see diagram below).

4/ From these marks, trace the new stitching lines joining gradually the existing ones. The key is to draw progressively the new line so that we don’t get any « bump ».

4/ Widen or tighten at hips

Again, the secret of a great hip adjustment is in distribution ! The more you distribute evenly the cm you have to add or remove, the less you’re going to change or distort the general shape of the garment. And this is even more true if the adjustment is important ! You’re going to add or remove the cm needed on both sides of each front and back leg, meaning at 4 different places !

HOW TO WIDEN THE HIPS ?

pattern Port Trousers 6

1/ You need to determinate how many cm you need to add at the hips.

2/ Divide by 4. The end result is X cm.

This adjustment applies to both the front and back pieces (make sure you don’t forget one of the two pieces!) :

3/ Place some paper below your pattern piece.

4/ On the exterior side of the leg, we’ll extend the hip line a few cm. Add X cm (see diagram above).

5/ From this mark, trace the new stitching line joining gradually the existing one from waist to hem. The key is to draw progressively the new line so that we don’t get any « bump ».

Be careful, if the trousers have a straight leg, you have to join the new hip line to the waist but you should extend the leg in a straight line to the hem, parallel to the previous stitching line.

HOW TO TIGHTEN THE HIPS ?

pattern Port Trousers 7

1/ You need to determinate how many cm you need to remove at the hips.

2/ Divide by 4. The end result is X cm.

This adjustment applies to both the front and back pieces (make sure you don’t forget one of the two pieces!) :

3/ On the exterior side of the leg, we’ll remove X cm to the hip line (see diagram above).

4/ From this mark, trace the new stitching line joining gradually the existing one from waist to hem. The key is to draw progressively the new line so that we don’t get any « bump ».

Be careful, if the trousers have a straight leg, you have to join the new hip line to the waist but you should extend the leg in a straight line to the hem, parallel to the previous stitching line.

With these techniques, you’ll be able to adjust the legs of your favourite trousers pattern (length, waist or hips) ! We’ll see how to adjust the inseam and the crotch as well as how to alter the seat very soon.

…………………………………………………………………………………………………

THANKS ARTESANE!

signature1_editado-1

0 comment
4 FacebookTwitterPinterestEmail

Today, let’s learn how to sew a fly front zipper on your Port trousers. Sewing the zippers on trousers is often one of the most feared step but it really shouldn’t. With this step-by-step photo tutorial, you’ll see it’s actually quite easy!


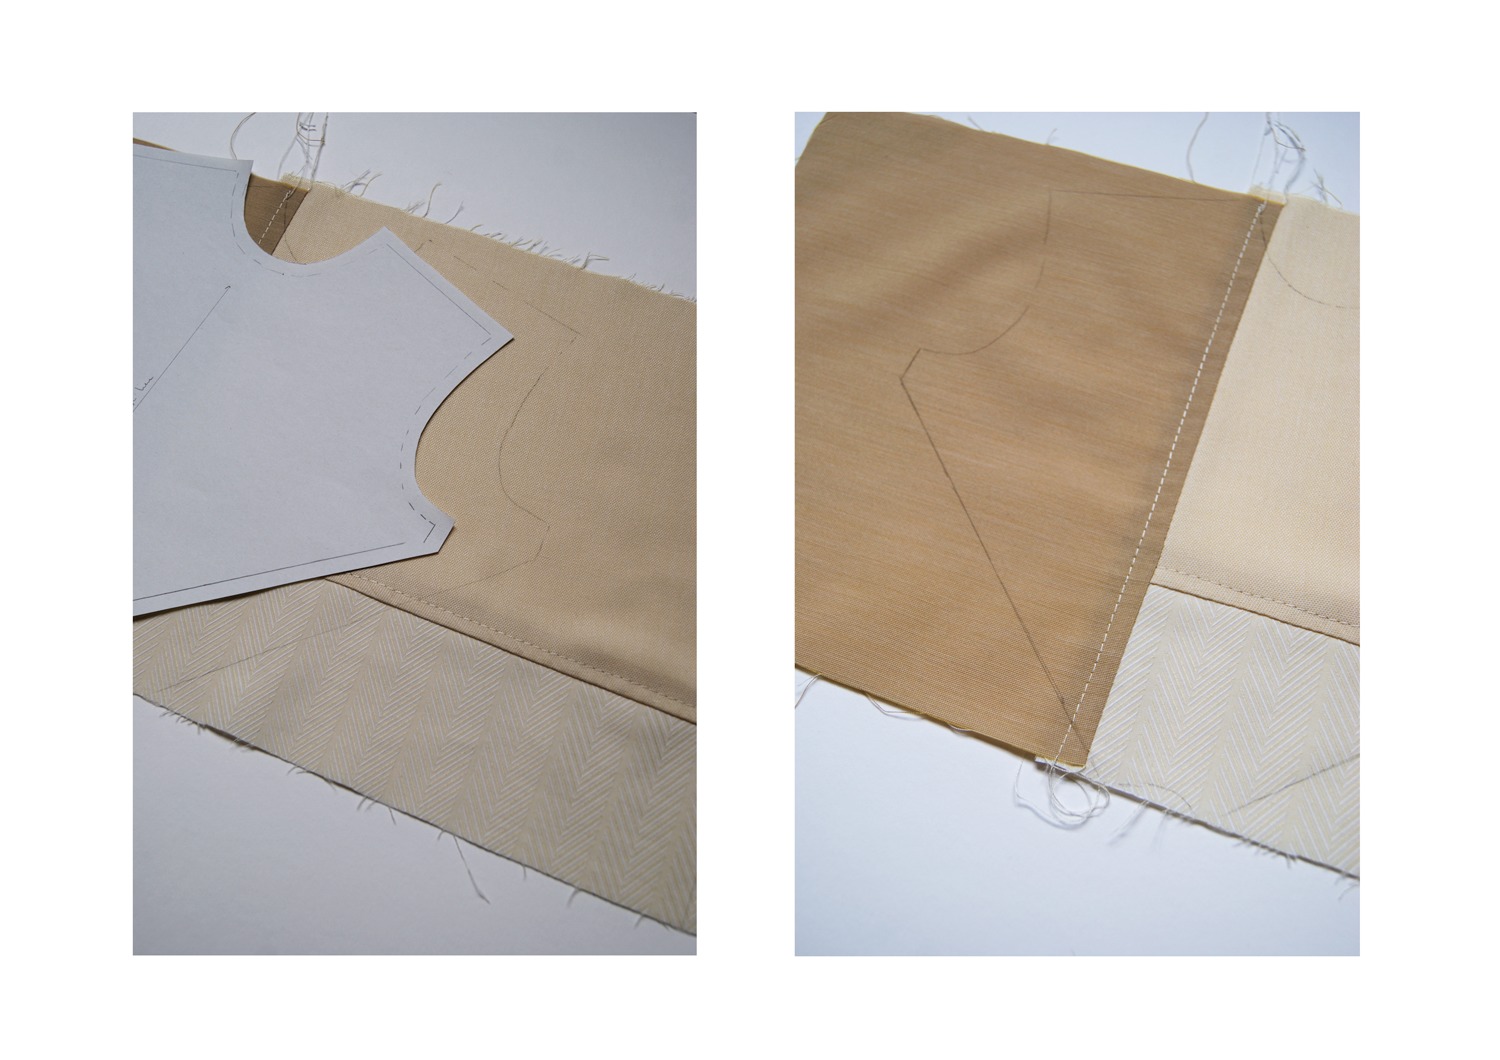
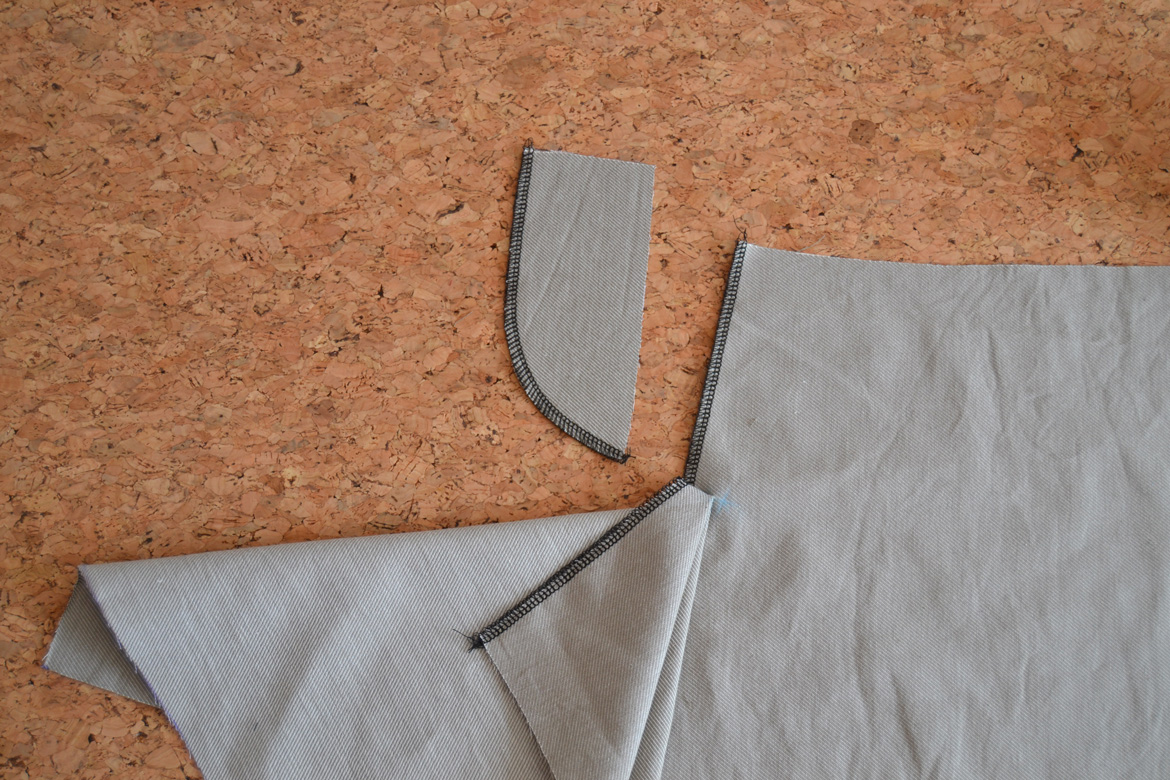
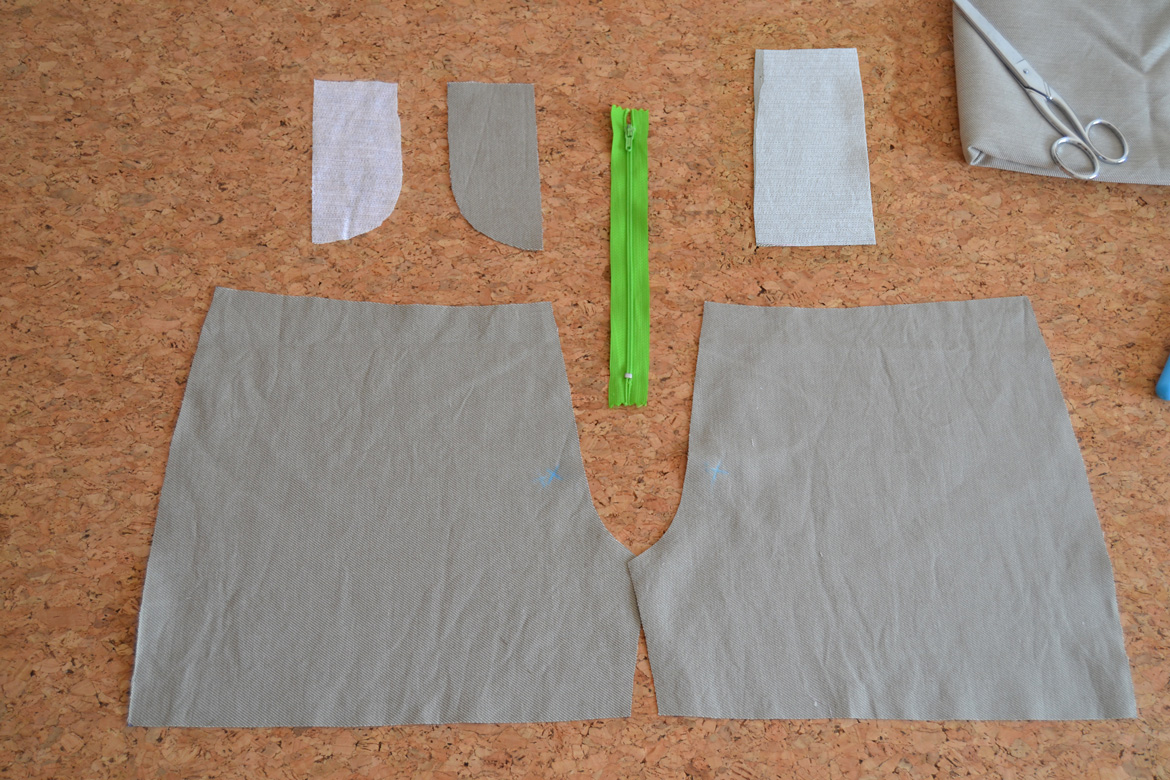
1. These are the pieces you’ll need to install the zipper:
-Fronts x 2 in main fabric
-Fly facings x 1 in main fabric and interfacing (some patterns have the fly facing included in the front piece, like the Sorell trousers for example, and this tutorial is going to be easier to apply in this case).
-Fly shield x 1 in main fabric and interfacing
-Zipper 15 cm (6″) long (it can be longer as in this tutorial)


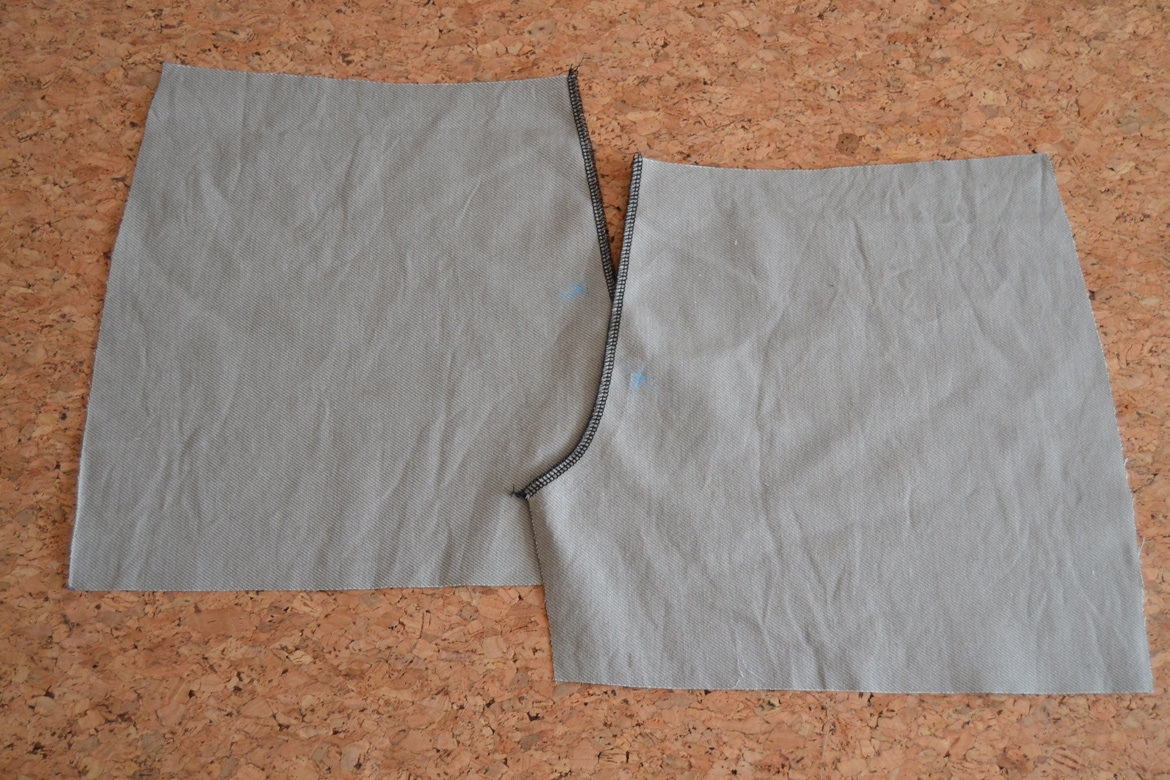
2. Finish the center front seam of the front pieces with serger or zigzag stitch. Repport your marks on the front pieces.


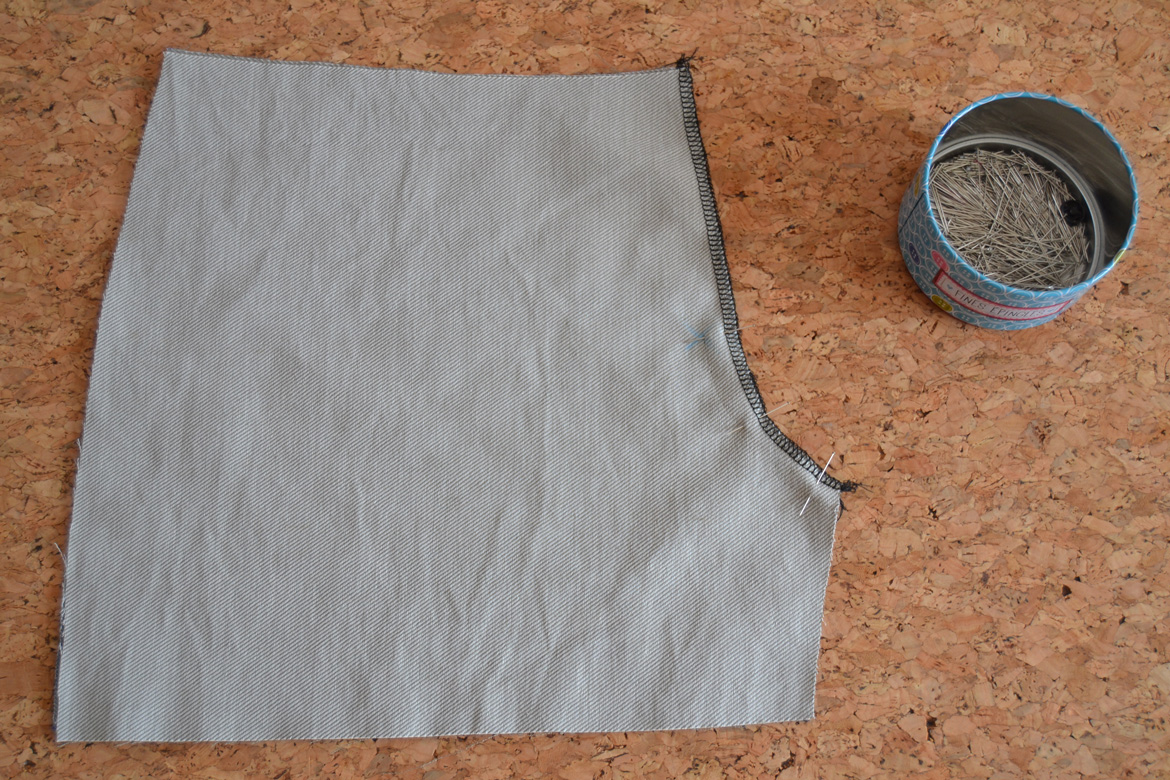
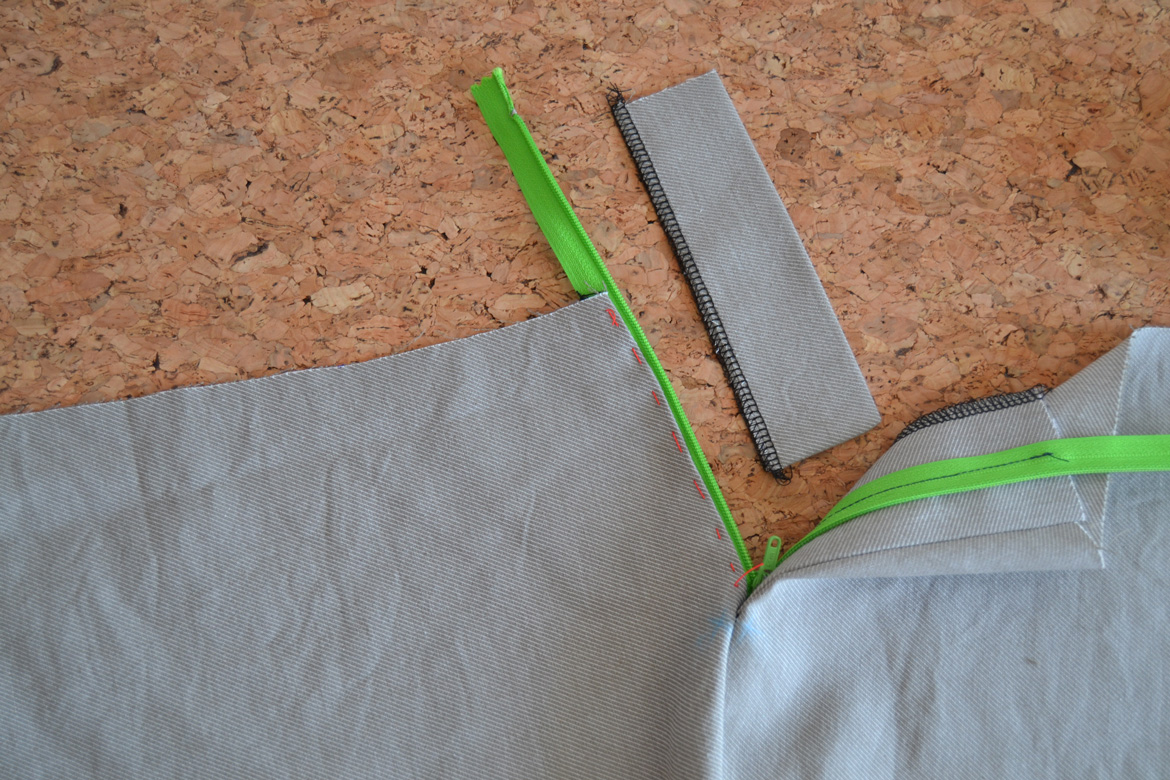
3. With right sides together, pin the front pieces together at the center front seam.
4. Stitch from the inseam to the dot mark with a 1,5 cm (5/8″) seam allowance.


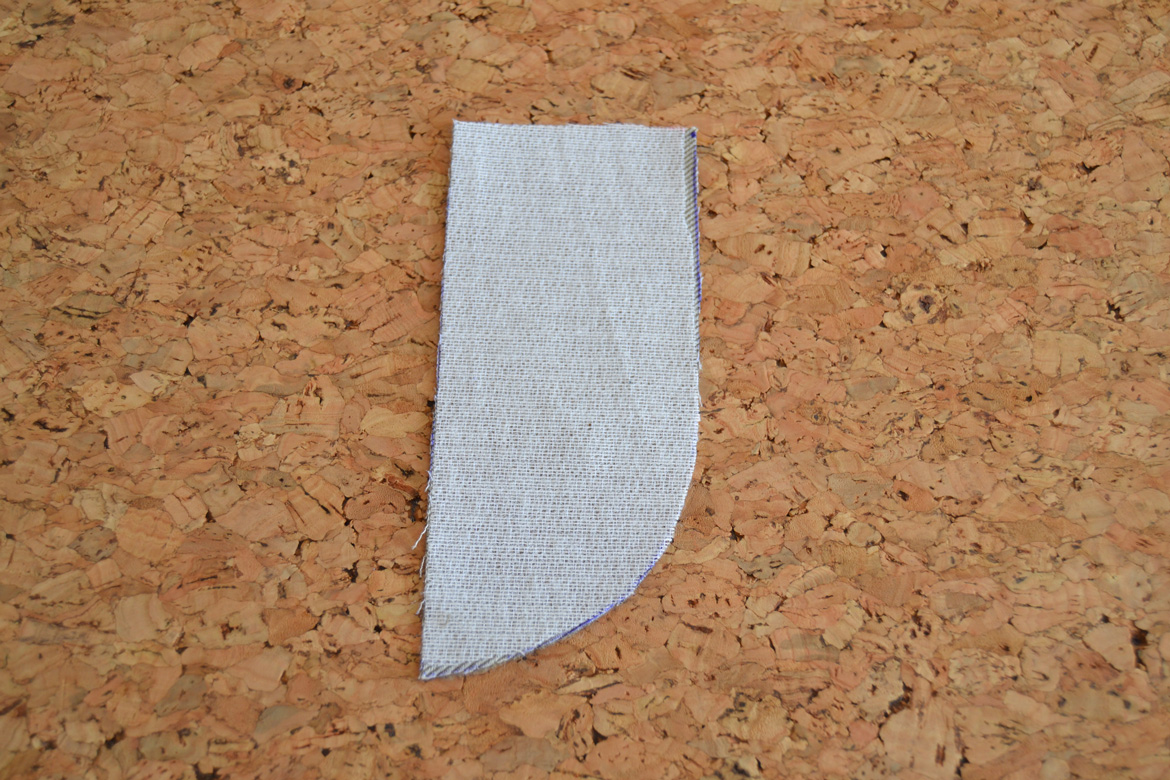
5. Interface the fly facing piece.
6. Finish the curved seam.


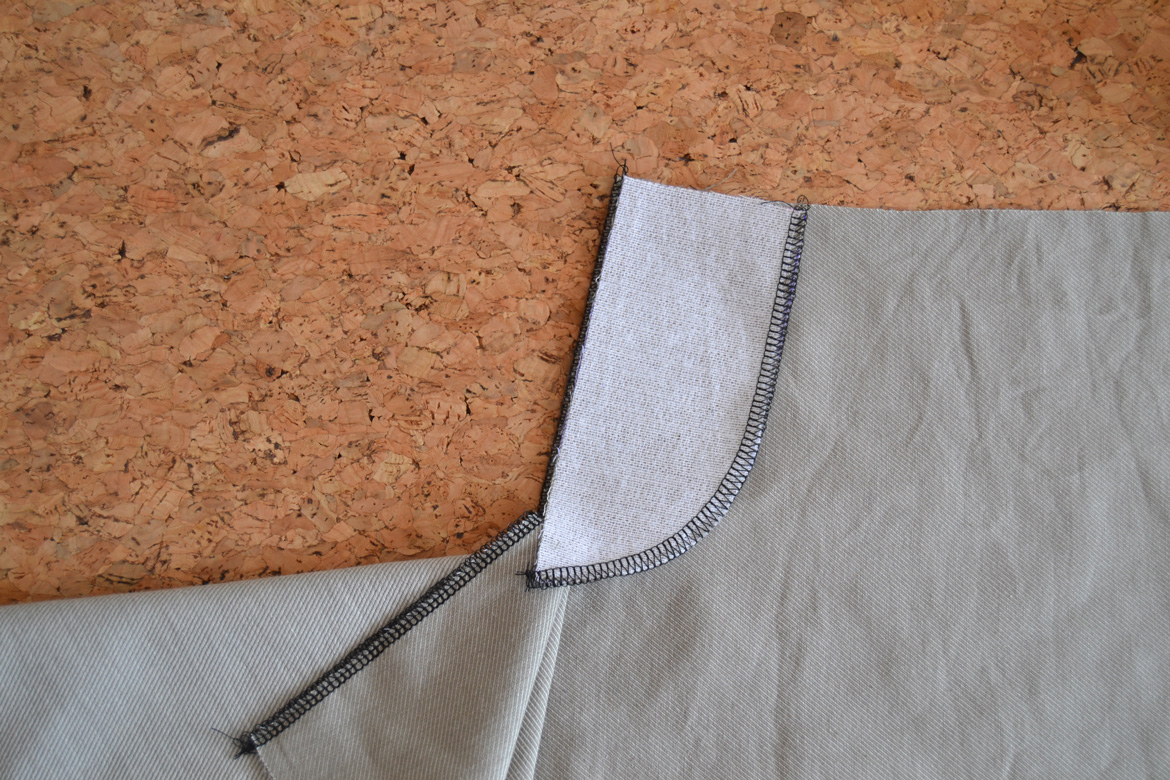
7. Pin the fly facing to the left side front piece (when you wear the trousers) with right sides together.
8. Stitch together from the top edge to the dot mark with a 1,5 cm (5/8″) seam allowance.


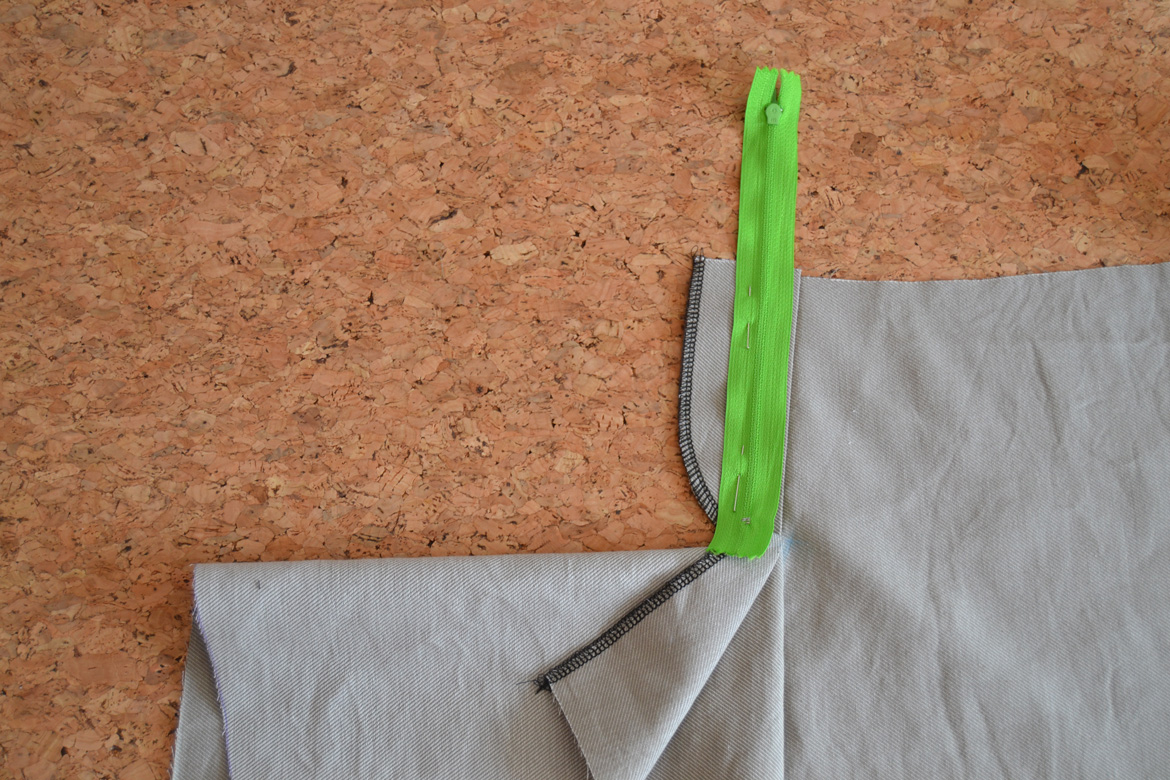
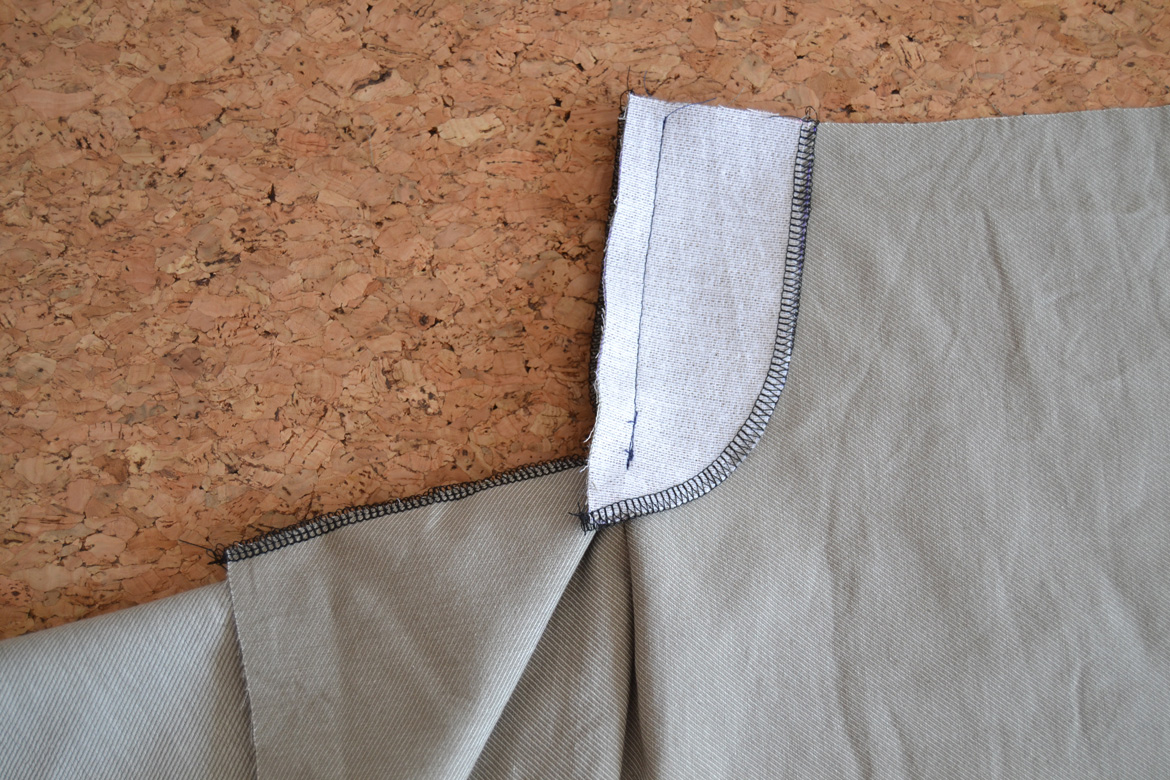
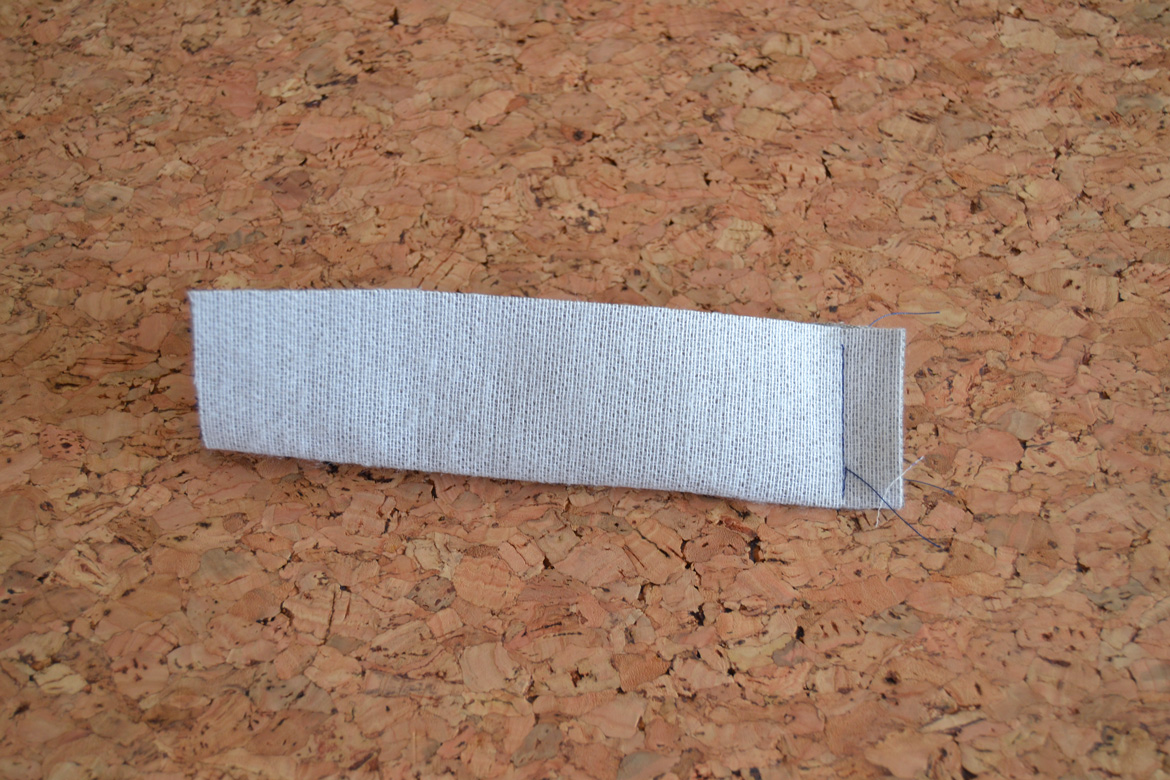
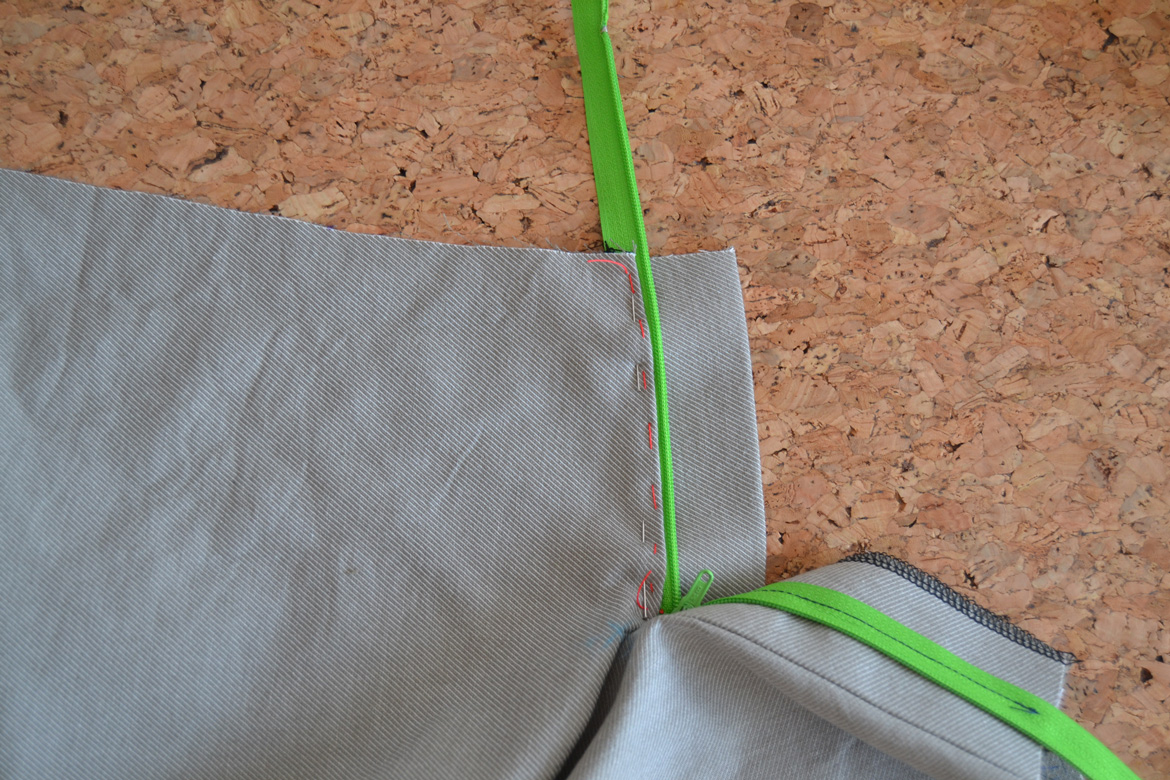
9. Open the fly facing. Trim and press the seam allowances toward the front.
Place the zipper face down (with the teeth toward the fabric) over the zipper facing, with the zipper ribbon touching the front seam. The zipper end should arrive just above the dot mark.
10. Stitch the left side of the zipper ribbon to the fly facing. Turn the facing in and press lightly.


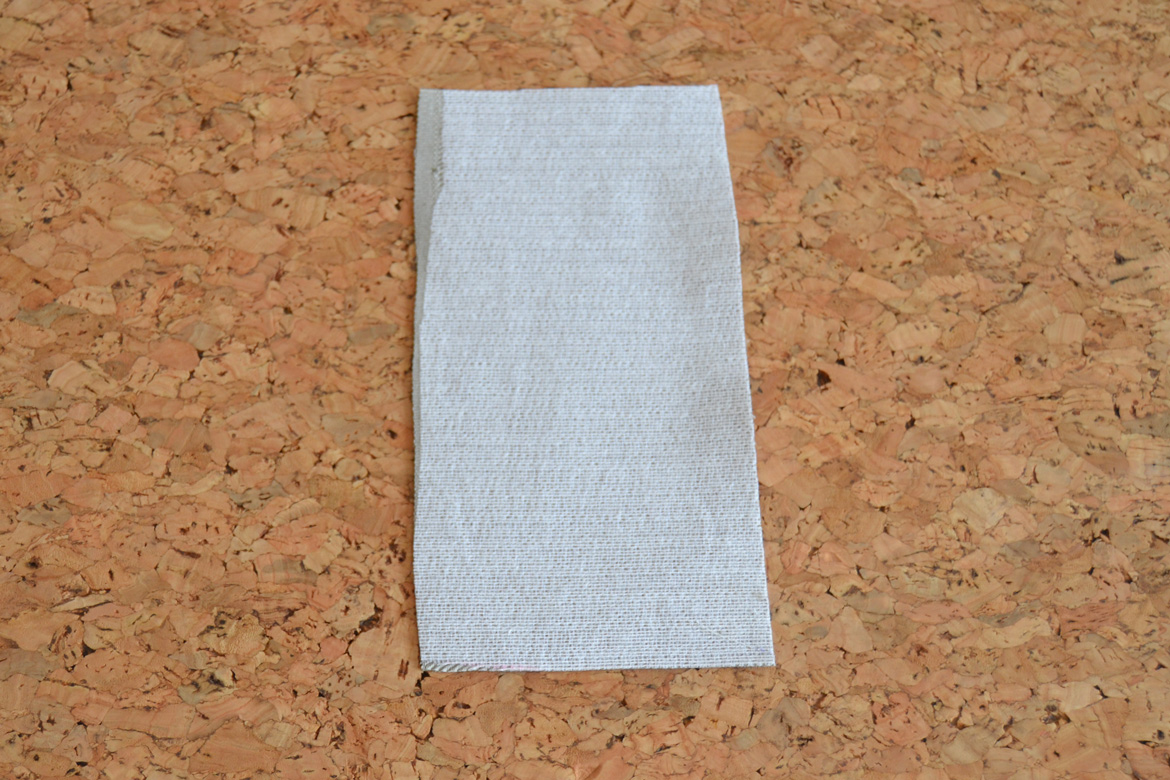
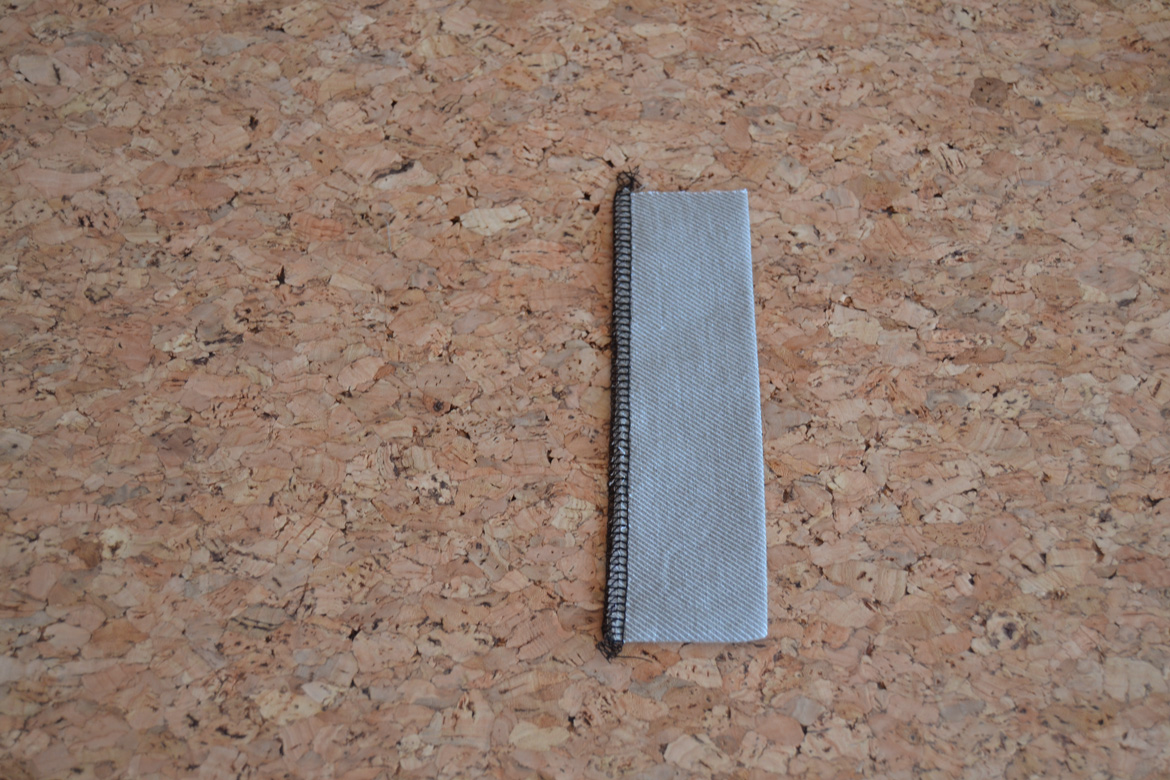
11. Interface the fly shield piece.
12. Fold it in half lengthwise and stitch the bottom edge with a 1,5 cm (5/8″) seam allowance.
13. Turn the fly shield inside out, press and finish the edge with a serger or zigzag stitch.


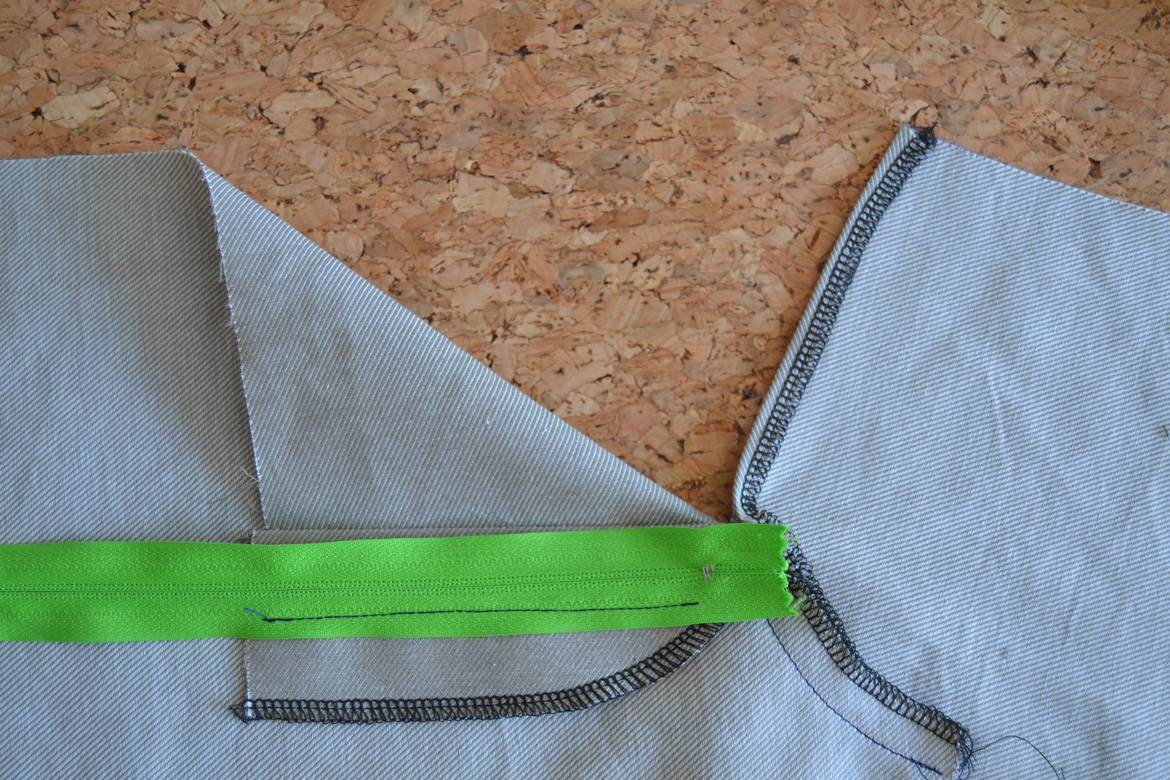
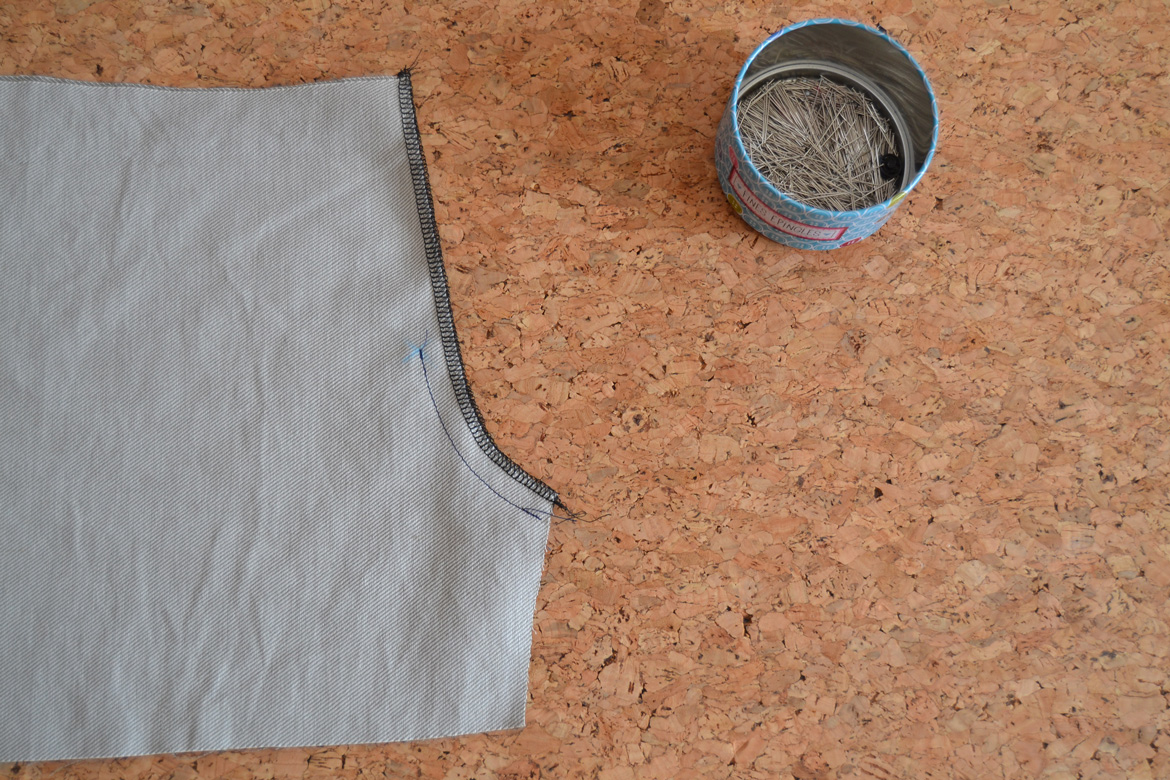
14. Press the right side front piece (when you wear the trousers) 0,5 cm (1/4″) toward the inside.
15. Baste or pin the zipper to the folded edge.
16. Baste or pin the fly shield to the zipper.
17. Stitch very close to the folded edge throught all layers (front, zipper and fly shield) from the top edge to the dot mark.

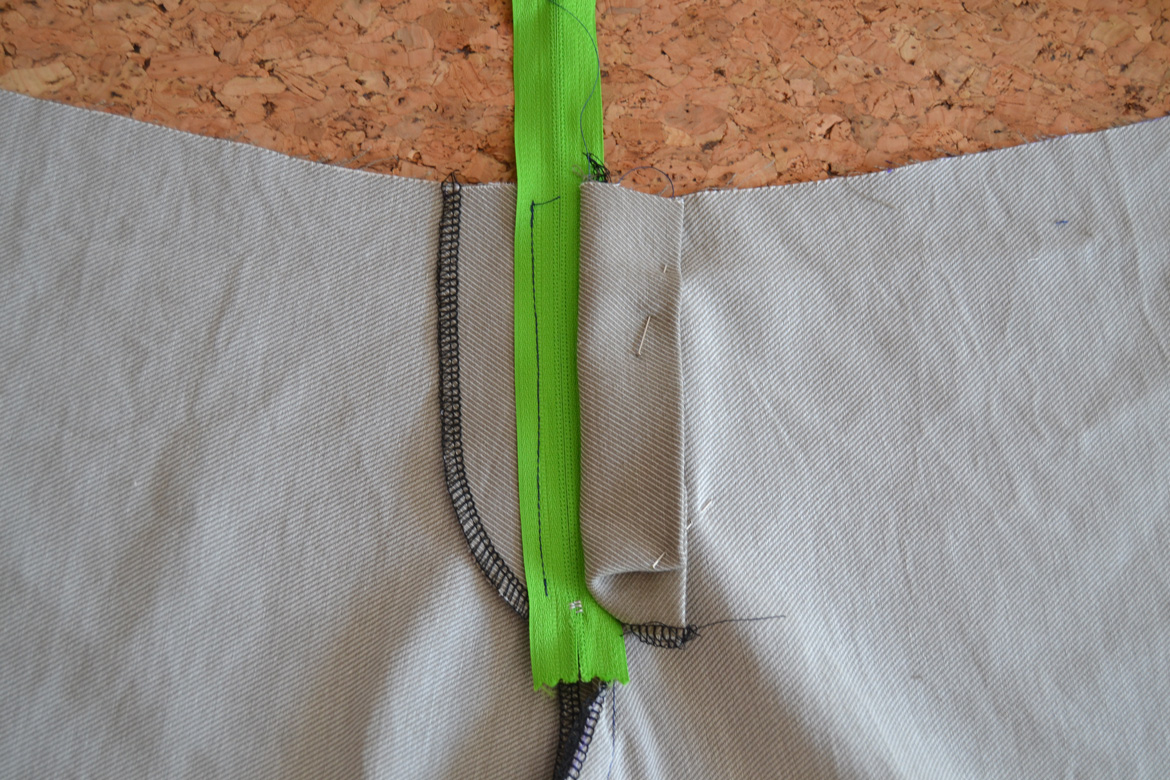
18. Pin the fly shield out of the way so that it won’t get caught when we sew the fly topstitch.


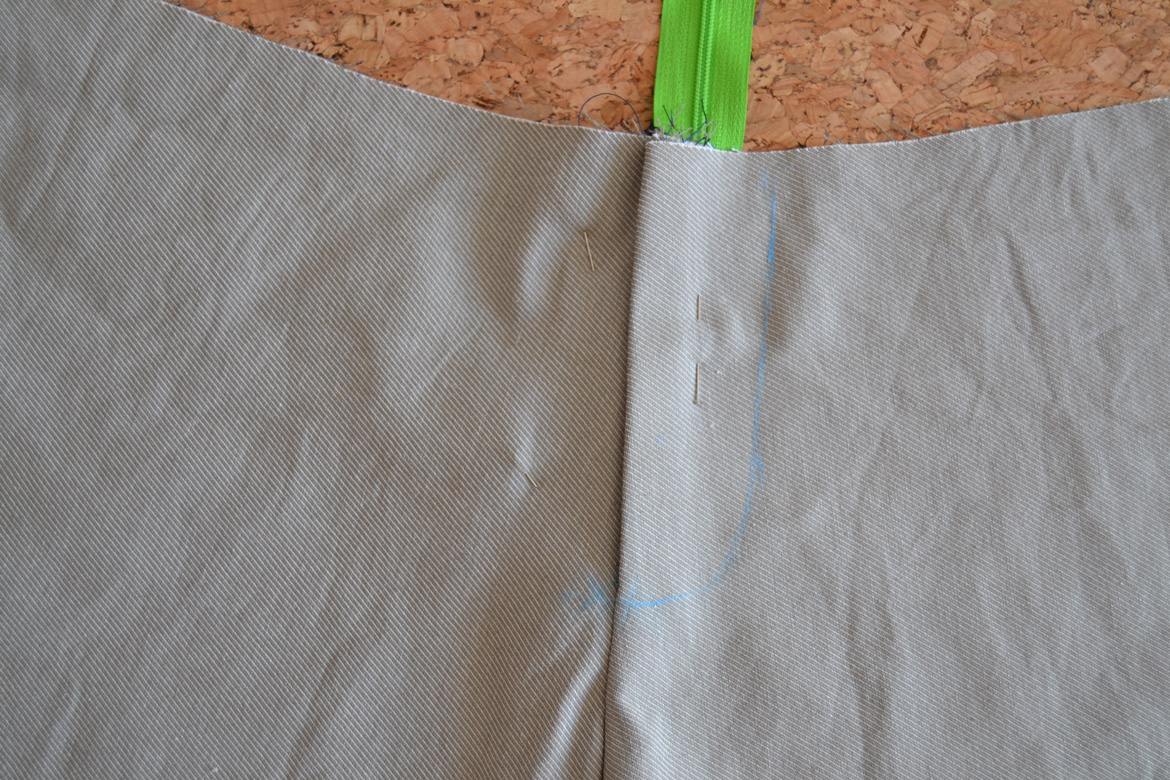
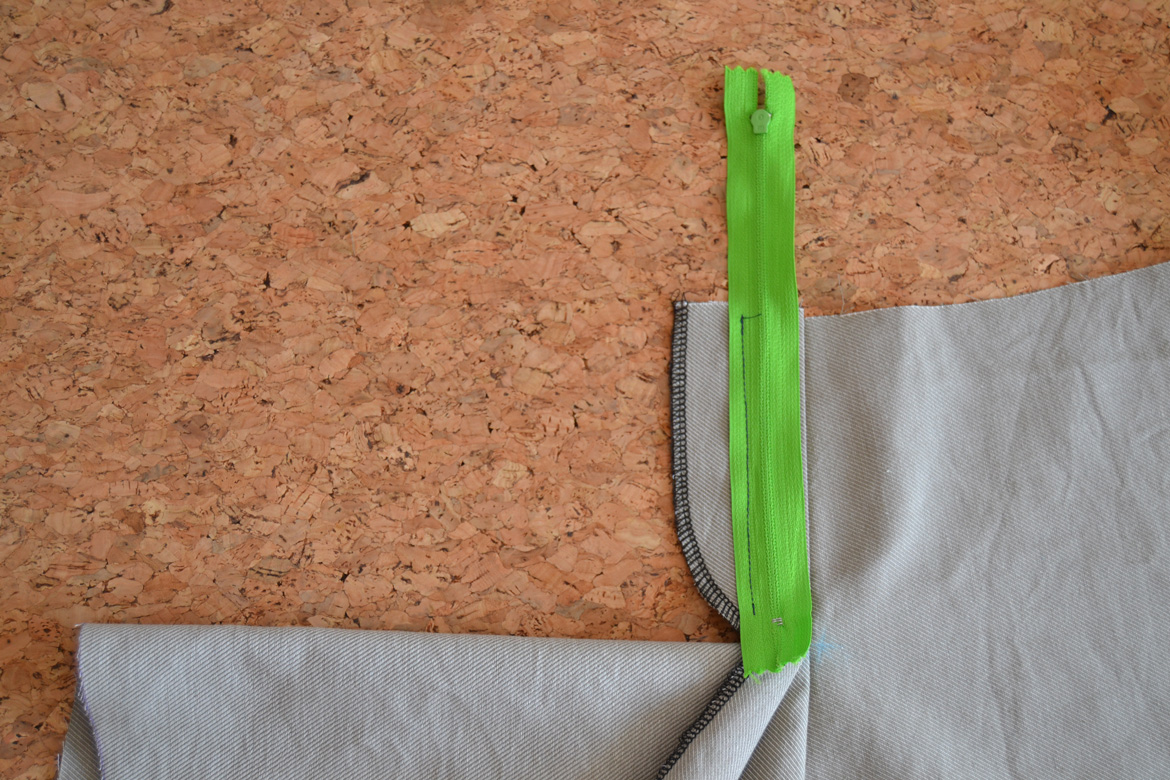
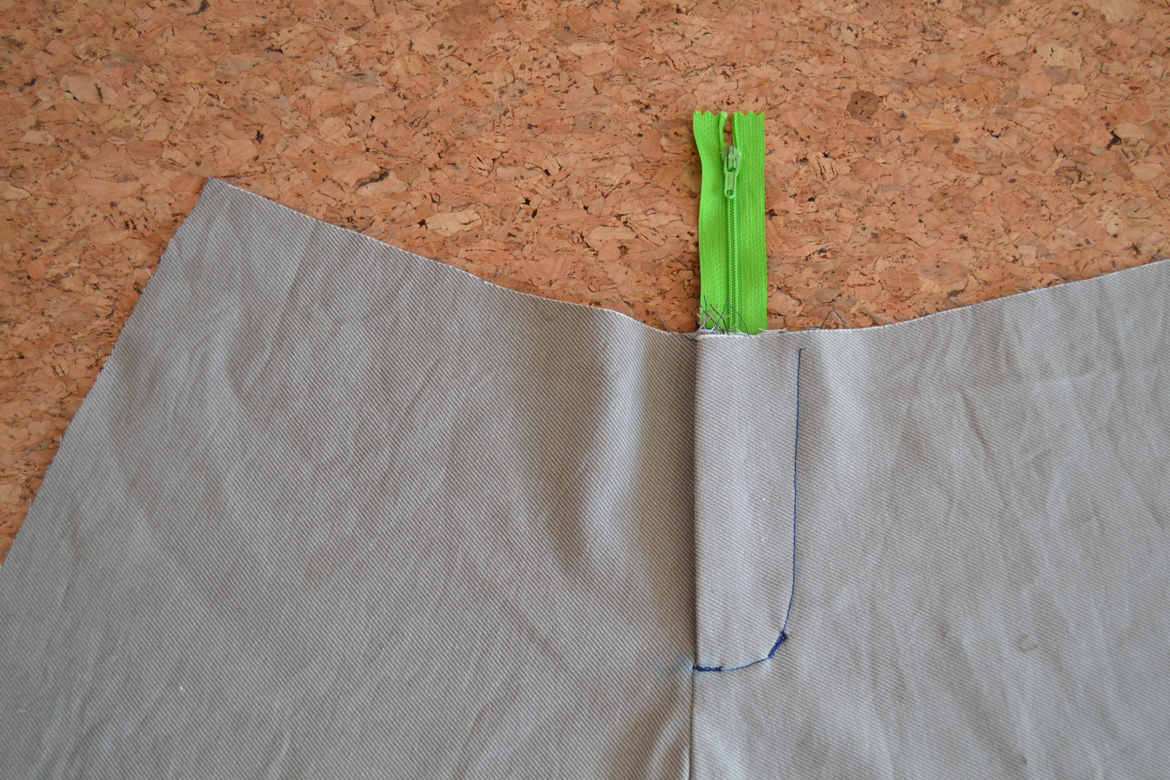
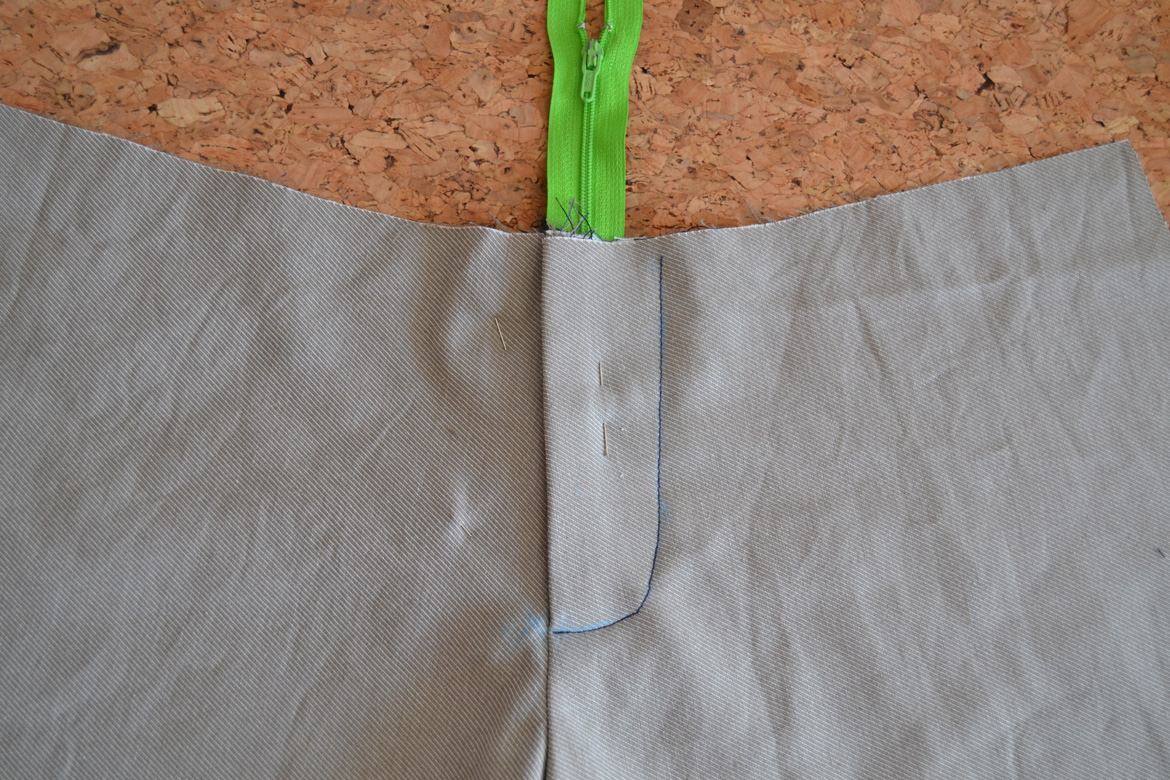
19. Close the zipper (but don’t cut it yet). Place the trousers front correctly and draw the topstitching line (you can use the front pattern piece or the fly facing as guide).
20. Stitch the fly topstitching throught both layers (front and fly facing).


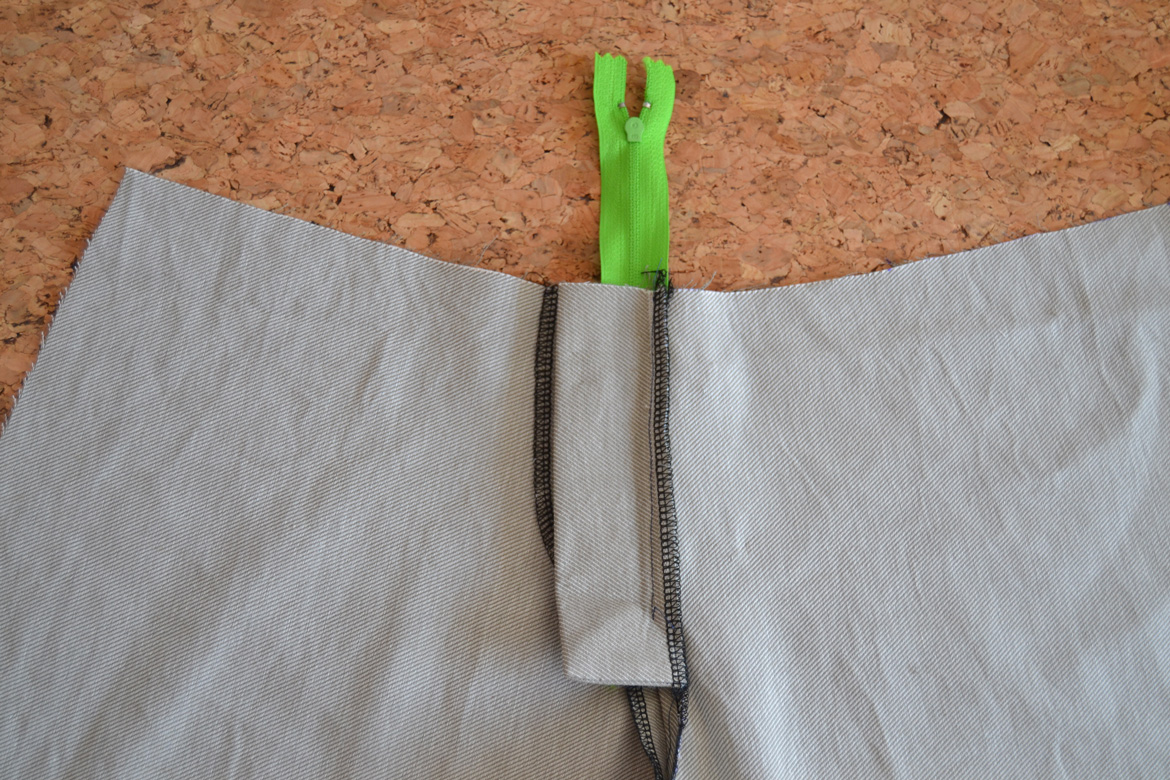
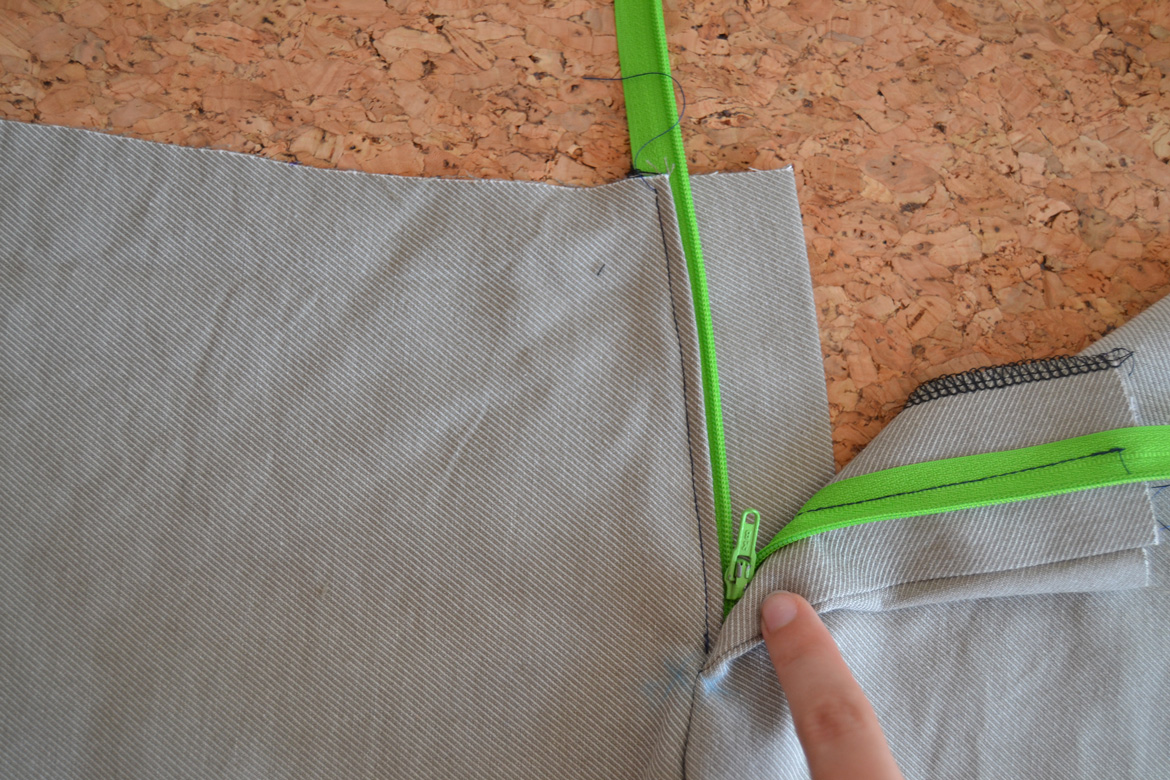
21. Unpin the fly shield and place it over the zipper. Pin in place again.
22. Make bar tacks to reinforce the fly: one at the bottom of the topstitching line and one at the curve. This time make sure you stitch through the fly shield as well.


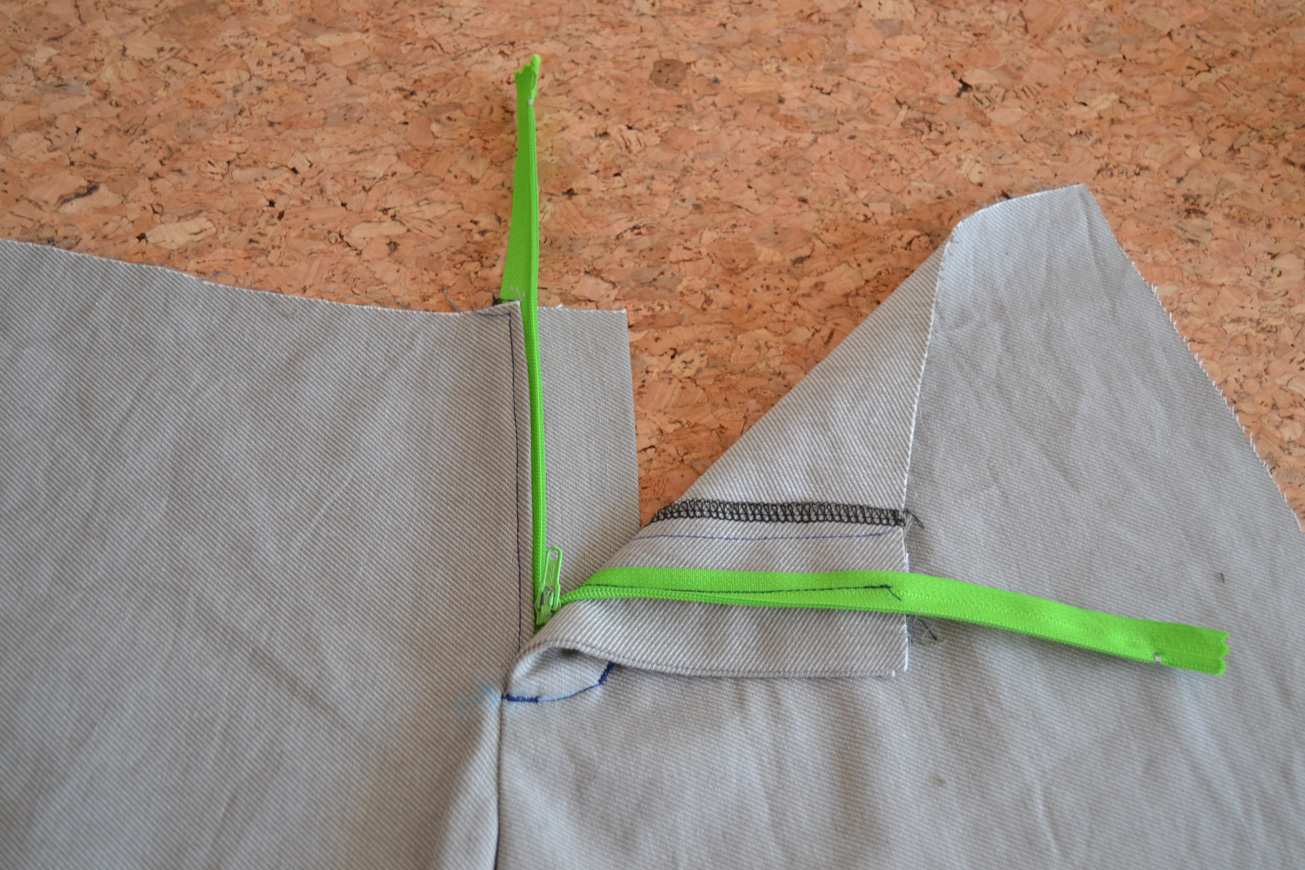
23. There you go, an easy way to insert a fly front zipper!
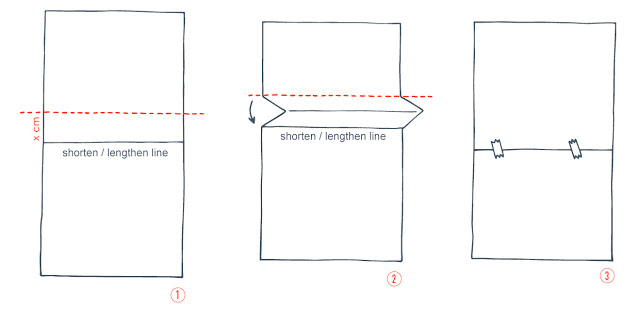
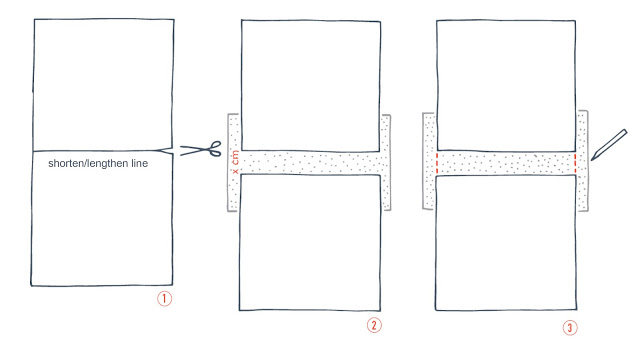
Tip: wait until you attach the waistband to cut the zipper!

25 comments
20 FacebookTwitterPinterestEmail
Today we’ll see how to adjust sleeve width.
I received some emails recently about how to increase the width of the Xerea dress sleeves and I thought it would be nice to prepare a tutorial. This is something you can apply to every “one piece” sleeves.
tuto sleeveMethod 1.
Trace two perpendicular lines accross the sleeve: one from armhole bas to armhole base and the other from the sleeve cap to the hem (in red here).
Cut along these lines and spread the sides apart, making sure the bases are still touching at the extremities. Add the cm you need in the center and tape together your new sleeve piece. The good thing about this method is that the sleeve armhole is not modified.Method 2.
On one side of the sleeve, trace a line perpendicular to the grainline starting from the armhole base and about 4-5 cm long (about 2″). From this point, draw a perpendicular line to the hem. Repeat on the other side.
Cut along the lines you just traced and slash the piece away from the sleeve the extra cm you need. Tape together and redraw the sleeve curve if needed. With this method, you’ll add width to the sleeve as well as to the sleeve armhole. You’ll need to ease the sleeve more.I hope that was helpful. Let me know if you have any questions.
PS: by the way, the sleeve width on the larger sizes of the Xerea dress has been increased for the PDF pattern.

signature1_editado-1

1 comment
1 FacebookTwitterPinterestEmail