Home Tags Posts tagged with "pauline alice patterns"
Tag:

pauline alice patterns

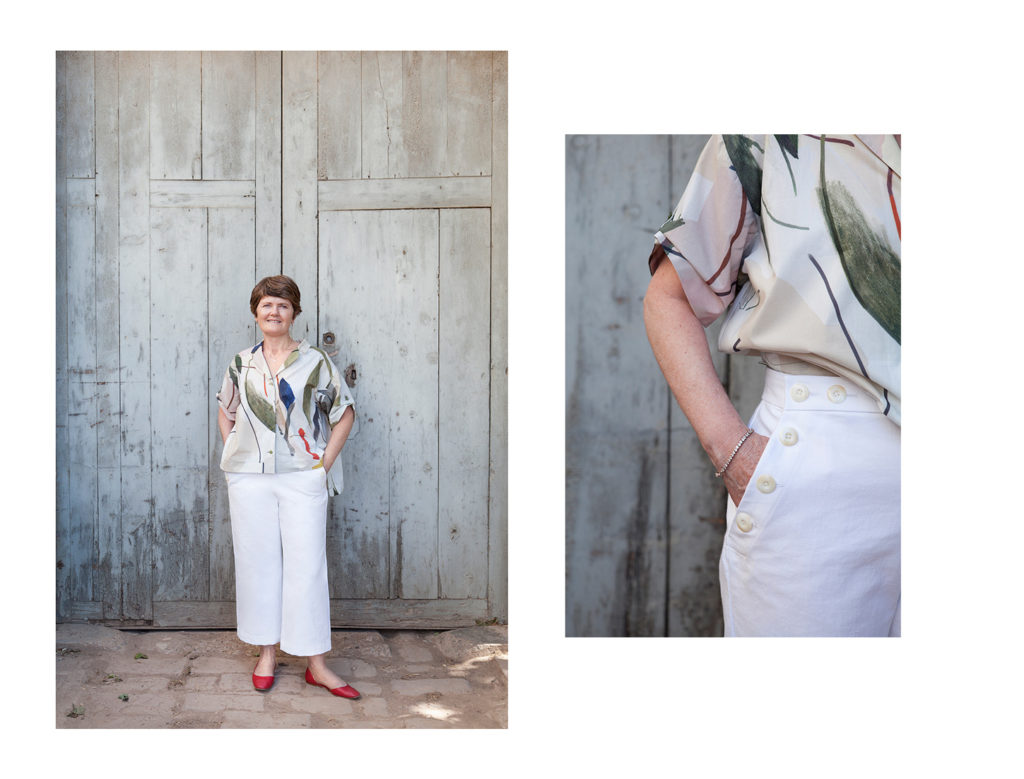
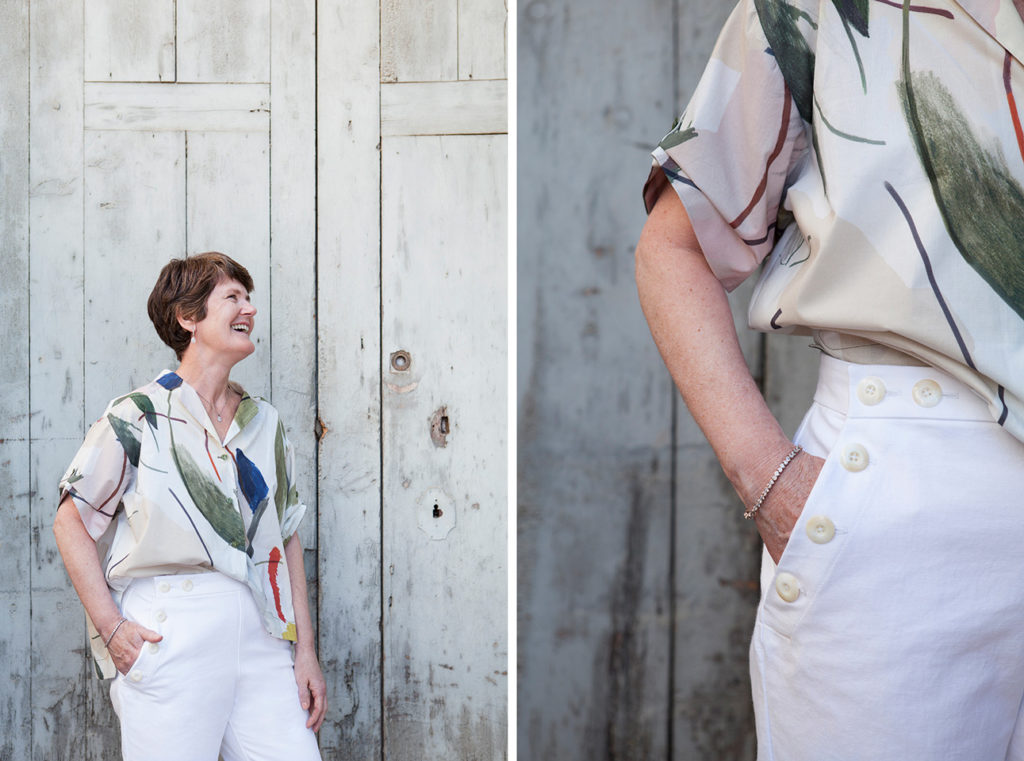
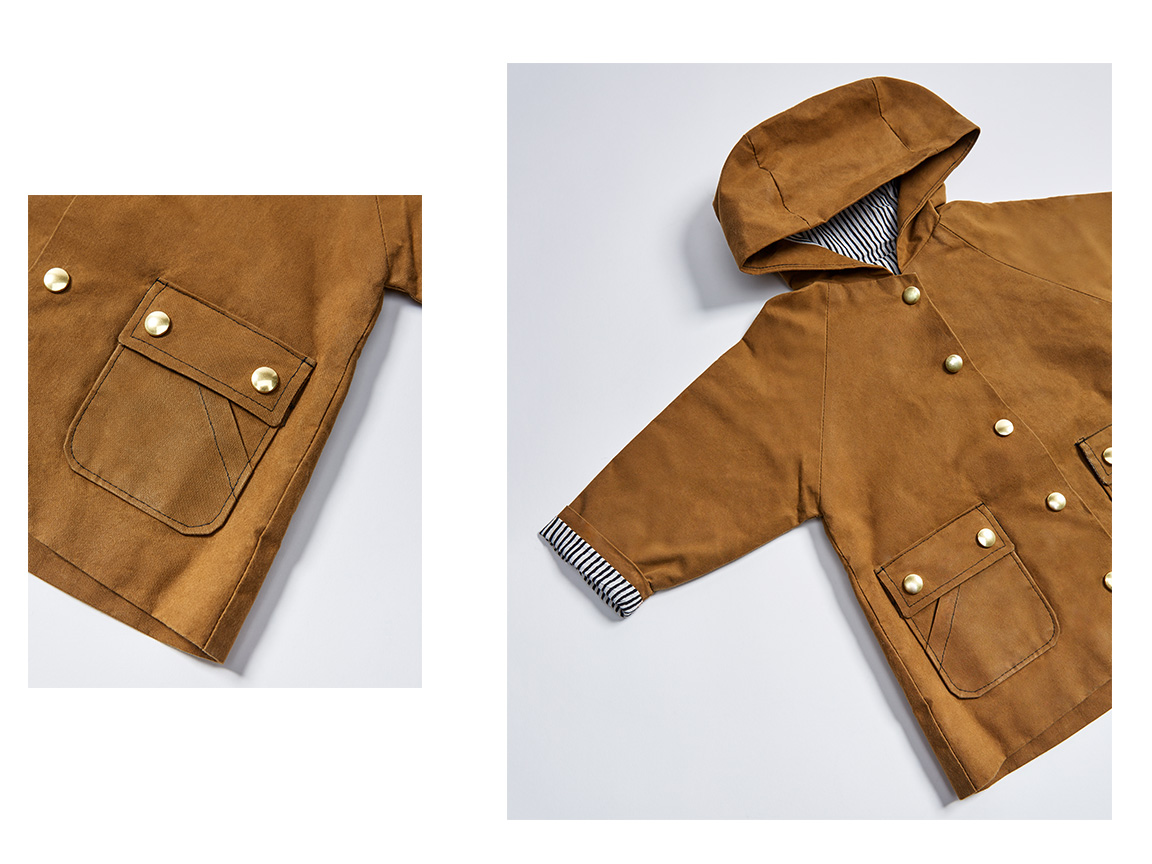
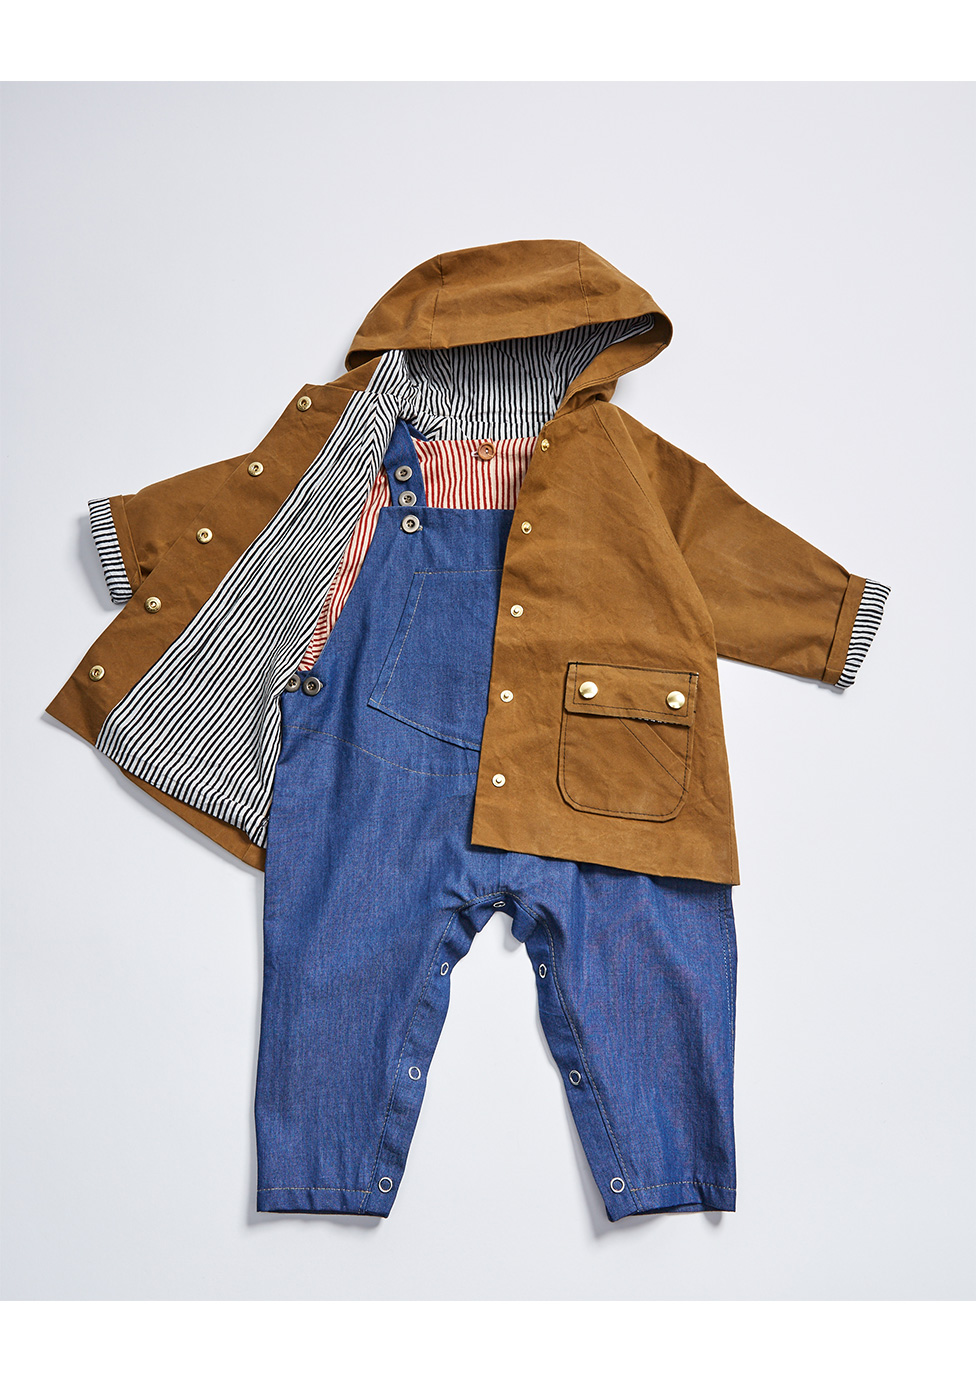
In order to help you sew your Romero trousers, we have prepared a special video tutorial how to sew the pockets and button opening for this pattern.

This step-by-step video will give you tips and advices to make what can be considered the most difficult part of the pattern… and you’ll see that it’s definitely not that difficult!

If you have doubts or you’re not sure how to follow one step, feel free to contact us any way you want: leave us a comment or send us an email at info@paulinealicepatterns.com, we’ll be more than happy to help you.

Don’t forget to share your projects on social media with the hashtag #RomeroTrousers.

5 comments
2 FacebookTwitterPinterestEmail

Vera is the kind of shirt designed for those days when you want to feel stylish and comfortable at the same time. When I design new patterns, that’s my major goal. 

The Vera shirt has all the details of a classic shirt with its small notched collar and front button closure. But we wanted to give it more lightness and feminity by choosing a loose shape, dropped shoulders and round edges. 

The small gathers at the back of the neckline highlight the notched collar and give volume to the shirt. With the asymmetrical hem, you can choose to wear Vera over a pair of trousers or shorts for a casual look or gathered inside a high waist skirt for a more retro look. 

The rounded hem and the sleeves are finished with facings. We have also added buttontabs to the sleeves in order to roll them up easily. 

We recommend you to use light weight fabrics to make Vera. Depending on the style you want, you might choose fabric with drape for a very light and airy look or fabric with body to highlight the volume of the shirt. We used cotton poplin for both version here. You can also use cotton lawn, linen, rayon, tencel, cupro, gaze, chambray or silk… 

– You can find the Vera shirt pattern in our shop in printed copy of PDF downloadable. –


Fabric credits: off-white batiste from Julián López – graphic batiste from Fil’Etik

0 comment
0 FacebookTwitterPinterestEmail

I’ve been dreaming of a pair of sailor trousers for quite some time now. I even made one of few years ago, using a pattern from Burda, and I really liked it. But some details were bugging me: there was a zipper behind the button closure and the pockets were closed by the buttons and therefore not usable.  The first thing I did when I started to design this pattern was to find a way to have only button closures and to have fully functional pockets. With Lucile, we tried different techniques and finally, we were quite happy with this result: 

Romero is a pair of sailor trousers, with a high waistline, fitted from the waist to the hips. There are two different lenghts: a short version for summer and cropped ankle length. This is THE trousers length this year and I have to say that I really love it: this is a great way to show pretty shoes and I find it very elegant and flattering. 

Romero is closed by buttons on the sides and waitband. We have made a video tutorial to walk you through the pockets/buttonband construction. The pockets are fully functional and nicely finished with french seams. 

In terms of fabric, we recommend you to use medium weight fabrics with some body such as denim, linen, gabardine, cotton twill, woolens or corduroy for a winter version. You’ll also need lining for the pockets (a great way to use scraps from leftover cotton for example) and some interfacing for the waistband and buttonbands. 

Don’t hesitate to choose pretty buttons for Romero. In matching colours or contarsting ones, they will be your trousers’ focus point! 

– You can find the Romero trousers pattern in our shop in printed copy or PDF downloadable. –


Fabric credits: ochre linen from Cousette – white gabardine from les Trouvailles d’Amandine

6 comments
3 FacebookTwitterPinterestEmail

At last, the new patterns are here! It took time but I am so happy to share these two designs with you:

THE ROMERO TROUSERS

These are sailor trousers with button close on the sides. They are high-waisted, fitted at the waist and hips and then flare at the leg. Elegant but practical as well, they have pockets hidden inside the button closure. You can choose between two lengths: cropped ankle length for View A or shorts for View B.

THE VERA SHIRT

Vera Will be your summer’s best friend with its loose shape and laid-back style.  The classical notched collar is coupled with an asymmetrical hem, longer in the back, and rounded edges to give Vera a modern vibe. The back neckline is softly gathered and the short sleeves can be worn rolled-up thanks to the button tabs.

– You can find the Romero trousers and the Vera shirt in the shop in both printed and PDF versions. –

I’ll come back tomorrow with more details on each pattern…

1 comment
4 FacebookTwitterPinterestEmail

The Lliria dress is one of the two dresses I designed for the book  « Robes » des éditions Mango, made in collaboration with Charlotte Auzou, Coralie Bijasson et Orageuse. It´s a dress with front button closure and knotted straps perfect for summer. The princess cut bodice fits nicely at the waist and finish with V shape on the front. It´s attached to a gathered skirt.

I’ve seen many summer dress with the same kind of bodice lately and I wanted to try to make one with this pattern as base. Here´s a tutorial on how to do to modify the Llilas dress pattern easily:


Copy the following pieces from the pattern sheet: bodice front, bodice side front, bodice back, bodice side back and front and back facings.  

Once they are copied, you just need to lengthen the side lines from the waist notches. If I remember correctly, I added 65 cm from the waist. You can open the sides more or less depending on the width you want for your dress. Remember to add the necessary length to the front facing as well. 

For the straps, I wanted simple ones so instead of 4 bias straps of fabric, I cut only 2 (here they are 37 cm long but you should measure before for yourself). I kept the same space between the buttons as the original dress, in total I have 13 buttons.  

Remember that contrary to the Pauline Alice patterns, seam allowances are not included in the book. You’ll need to add them to the pattern pieces as well as hems (here 4 cm). 


In the end, I am so happy with this modification: it’s a prettyunfussy and feminine summer dress. I used a soft chambray from Les Trouvailles d’Amandine and engraved wood boutons from Textile garden (check them out, they have amazing buttons!).  

See you next week with the new patterns ! 

0 comment
1 FacebookTwitterPinterestEmail


————


In our new post, we’ll tell you how you too are supporting the #FashionRevolution.


————


The social media is starting to talk again about the Fashion Revolution, but do you know you too are helping to produce clothes in a consciously and sustainable way and maybe you don’t know it?

Making your own clothes, you do not only get creative, you make an exclusive garment and with a unique story, you are also offering an alternative to the fast fashion, giving a sentimental value and a strength that are lacking in large textile industry companies.

From Pauline Alice, we are proud to assist in this creative and conscious process, and for this reason we created Pauline Alice and U 3 years ago, a space where you could share the clothes you make with our patterns. As the answer has been so great and many of you have shown proudly your work, we thought it was time to create the Pauline Alice Community on Facebook. In addition of sharing the Pauline Alice garments you made, you can also get closer with us and with other people with our same concerns through the story behind every design, behind each fabric you chose to use… and knit an atmosphere to know each other better, to put a face to stories we will be delighted to hear and where advising, valuing works, love and respect which are done our clothes. The story of every Pauline Alice patterns starts in our studio and ends when you wear your dress, your jacket or your shirt and feel great about its uniqueness.

To show our support to the Fashion Revolution during this week, we propose you to post, through Instagram, one or several pictures of the garment/s you have made with our patterns, showing the label, with the hastags #fashionrevolution #imademyclothes #paulicealicepatterns and tell us the story behind that garment.

If you want to share experiences or some particular anecdote with our patterns, you can do it through the Pauline Alice Community. 

Thank you for believing that another kind of fashion is possible and necessary.

0 comment
2 FacebookTwitterPinterestEmail

This new pattern release is a little bit special: these are not the usual women patterns but a special collection for kids! This is a first for Pauline Alice! I’ve been wanting to design a small collection of kids patterns when I was pregnant. I was already imagining my baby in comfortable and easy pieces. With Lucile, we’ve been thinking about how to design a collection of three patterns that could be worn as a whole outfit or separately. We also wanted unisex pieces that would work for a variety of colours, fabrics and prints. That’s how the Mini collection was born. Let’s see the three patterns of the collection:

THE TUNIC

First, we’ve got a tunic. Inspired by the “vareuse” (the traditional shirt worn by breton sea men), its volume, cut and yoke make it a pattern easy to make and to modify. I love the small gathers and the pockets! It buttons in the back and has kimono sleeves, that’s so easy to wear. For a little boy, I see it perfectly in chambray or linen, and for a girl, why not use  a liberty print or swiss dot fabric?

THE OVERALL

After Turia for the grown-ups, welcome to the kids overall! Again, we’ve chosen a loose fit with cool details: multiple buttons on the straps, buttons on the side and at the inseam for practicality. Perfect for every season: cotton or linen for summer, denim or corduroy for winter.

THE COAT

Finally, to complete the outfit, there’s only a coat missing! Like a classic rain coat, it has a hood, a back flap, double pockets and raglan sleeves. Lined, it’s neatly finished inside and out. Here we have made a mid-season version in coated cotton but it would look just as good in wool or gabardine.

All three patterns have an intermediate level. Nonetheless, we will share some tutorials over the next few weeks.


– You can find the patterns as a printed pack or as a PDF pack with the three pieces. The printed pack comes with instructions in french only, make sure you select the language to receive the downloadable instructions in english. –

I hope you’ll love them! Let me know if you have any question.


Photography: Lidiet

Fabric credit: Merchant and Mills


12 comments
5 FacebookTwitterPinterestEmail

I LOOOOVE coats! I might have said it a few times now but it’s true. And nothing pains me more than leaving in a city where coat wearing is almost optional (it’s compulsory for a few weeks in January only). But I won’t complain about sun and warmth…

Anyway, I love coats and a new coat pattern is always a great excuse to make at least a couple of prototypes and wearable muslins. For the Hemisfèric coat pattern, I wanted to offer a mix between classic and modern: a classic fit and flare shape that goes over a dress or a pair of denims allied to some modern details like the raglan sleeves and zipper closure. I hope you’ll like the design! Here are some styling and fabric inspiration for you:

, , 3, 4

A coat is a piece you’ll be likely to wear everyday for a couple of months so choosing a neutral fabric is always a good idea. Grey, navy, black, camel… these will go with everything and are perfect for a chic and timeless outerwear.

And you can always choose a bright lining, topstitching or a contrasting facing to bring a little fun to your coat.


1 , 2 , 3 , 4

Another option is to go for a colourful fabric to brighten up any dark winter day! Nothing better to cheer you up than a bubblegum pink or pastel blue coat, am I right?

Personally, that’s how I like my outerwear: with a pop of colour! You can also play with the style lines and choose a colorblock look (one neutral fabric and another one more saturated).


1 , 2 , 3 , 4

For the ones who love a one-of-a-kind look, why not choose a graphic fabric? Polka dots or animal prints will be easy to match, whereas a plaid will be more difficult but oh-so-pretty. You could also use trimmings on the collar, sleeves, zipper placket or hems or a brocade fabric for a party version.

Which style is your favourite? Neutral, colourful or prints? Let me know what kind of fabric you’ll use for your Hemisfèric coat…

2 comments
6 FacebookTwitterPinterestEmail

Designing coats may be my favorite activity. I mean I love a great dress but nothing like a coat gives me so much excitement and joy. Three years after releasing a coat pattern, I was itching to do design a new outerwear piece. And it’s with mix of happiness and thrill that I’m presenting the Hemisfèric Coat pattern!

In the Hemisfèric coat pattern, you’ll find a classic fit and flare silhouette mixed with very contemporary details such as the two-piece raglan sleeves or hidden front zipper closure.


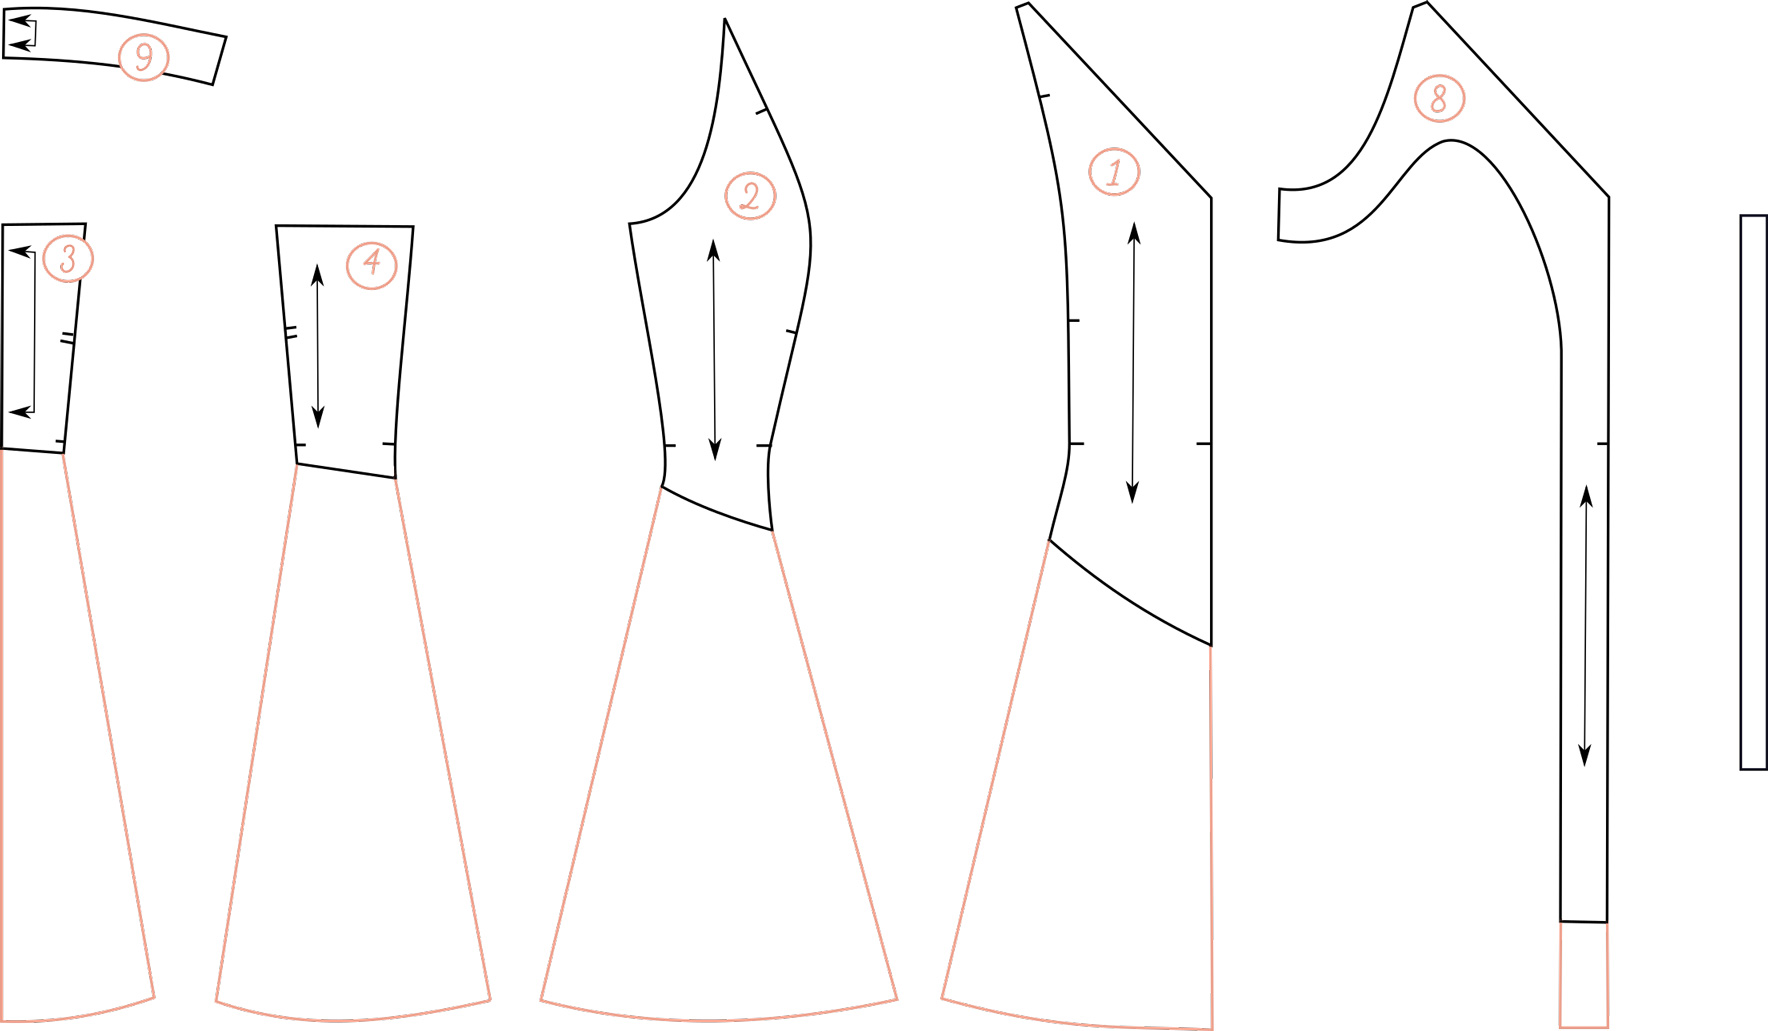
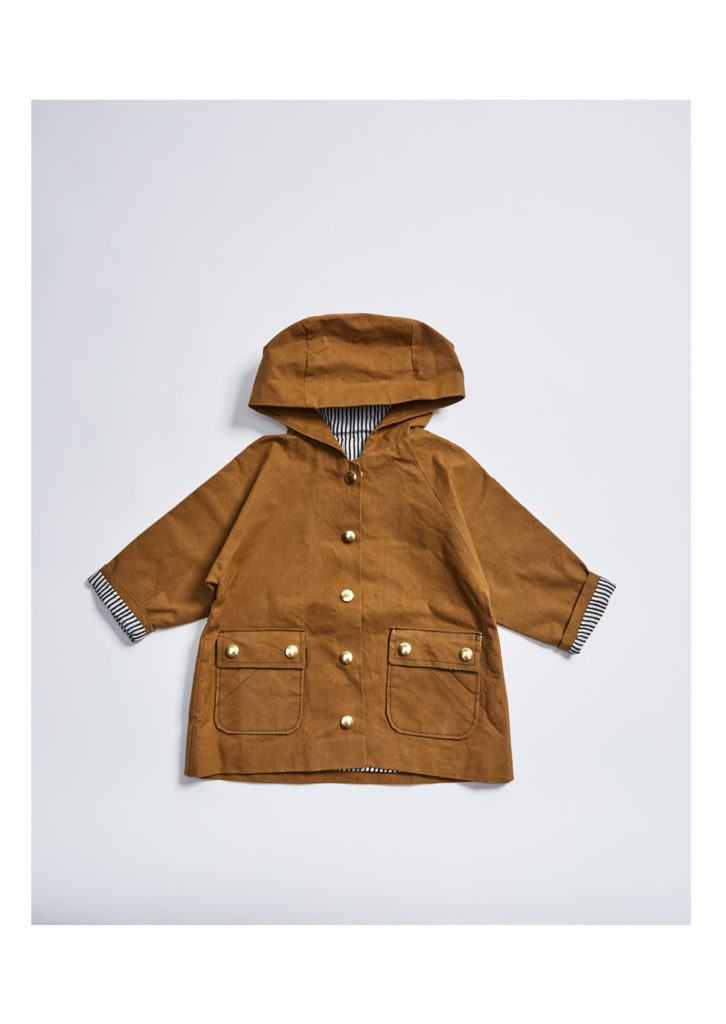
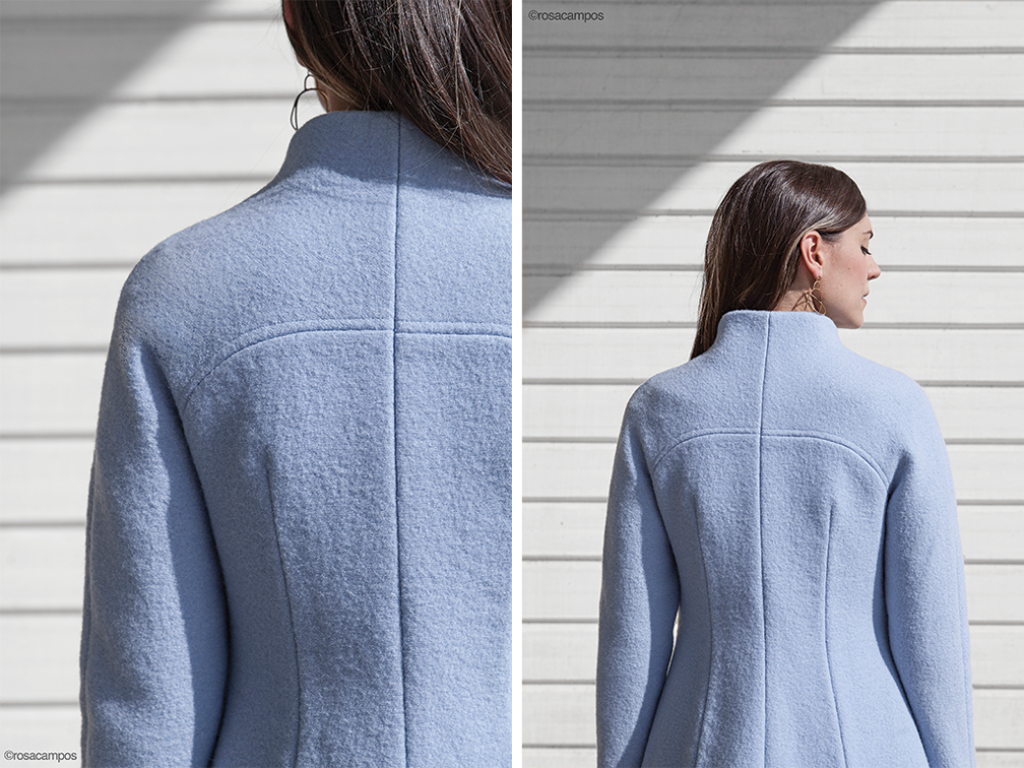
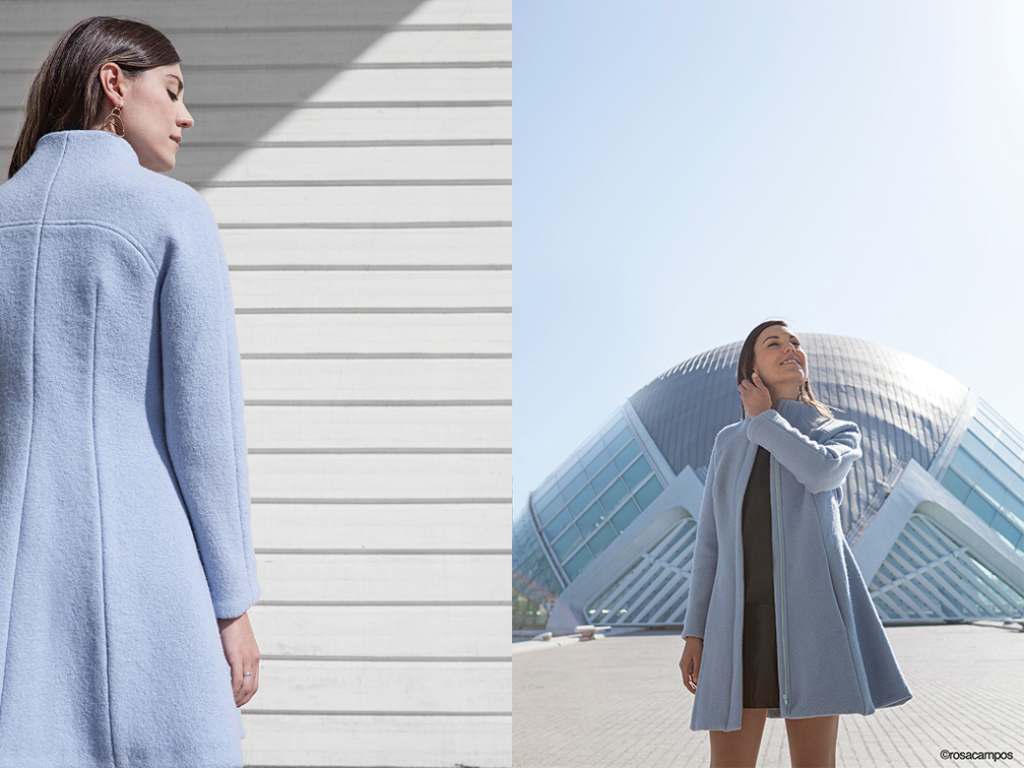
Hemsifèric features a classic shape with strong construction lines: waist darts in the front with shaped side panel, back darts and shaped raglan sleeves… The short funnel collar will keep you warm and stylish. There are inseam pockets and the coat ends at mid-thigh.

As for a modern touch, how about a front zipper, hidden by a central placket? This coat is great to play with topstitching, as I’ve done with the presentation model. That’s the perfect way to highlight the construction details. As the coat is fully lined, it will look as good from inside as it does out.


As for fabric, I recommend using medium to heavy wool fabric to keep the coat structured. You want the raglan sleeves to keep their shape at shoulders and the skirt part to stay flare. Here’s a few examples of wool fabric you should look for: felt, boiled wool, Melton, tweed… The great thing with wool is that it loves being shaped with heat and steam. If you don’t want to use wool, another option is medium to heavy weight wovens such as gabardine, brocade or twill.

Whether you choose a bright or neutral main fabric, a colorful lining is always a great idea: choose silk or Bemberg for a luxurious feel, or flannel for extra warmth. And make sure you don’t skip interfacing! For this coat, I recommend using fusible weft interfacing. It will keep your fabric’s drape while giving it structure.

Even if this pattern requires a great dose of patience, it’s a great project for intermediate seamstresses as the darts and the raglan sleeves make it easy to fit and there are few tailoring techniques. So don’t be afraid, grab your wool fabric, your Hemisfèric coat pattern and make yourself a pretty coat for winter! And as extra help, we’ll share a tutorial next week…

– You can find the Hemisfèric coat pattern in the shop in both printed and PDF version. –

11 comments
13 FacebookTwitterPinterestEmail

I’m so happy to introduce my very first book! Available only in French (for the moment) Ma garde robe chic et intemporelle has been many months in the making. When Mango editions asked me if I would consider working on a patterns book at the end of last year, I didn’t hesitate for very long before accepting! This book will offer “chic and intemporal” patterns for everyday or special occasions. With two complete outfits for each season, with clothing and accessories, and patterns that can be mixed between themselves, you’ll have handmade garments for all year.

I hope you’ll love the book and the patterns and I can’t wait to see the first outfits made from it!

Edit: the sleeves patterns pieces were lacking some marks. Download the corrected version here: ManchesAudreyMarylinKate sleeves and ManchesTippi sleeves.

Stay tuned, a raffle will be organized very soon on the @paulineyalice instagram account to win a book!

10 comments
11 FacebookTwitterPinterestEmail
INSPIRATION

I designed the  faura top & dress pattern as an easy to make sewing project, perfect to get back gently into sewing planning after the holidays. It had to be a pattern with simple lines but with some interesting details as well.

Faura has a princess cut bodice (easy to adjust), small ties to cinch the waist, a flared hem, a keyhole closure at the back and two different versions: short sleeves top or sleeveless dress with pocket. This is such a versatile piece!


Sources


PAULINE ALICE AND YOU

Wow, there’s already some Fauras showing up on Instagram! Thanks so much for the warm welcome to the new  #fauratopdress

If you need some inspiration for your Faura, check out the awesome versions of our testers and reviewers as well as some of the very first makes of our lovely customers! Colorblock, floral, prints, stripes… so many options! As for fabric, you can choose from so many: cotton, rayon, crepe…


@ym.sewssur un fil, @sewmanju@aiguille.coupon.ciseaux,  @angelabisoux, @annouchk,  @coudre_suffit, @plage_sud, @melanieloule@aiguillezmoi, @lespetitescouturesdenathoumei@joliesbobines.

So which one is your favourite? Thanks for sharing your beautiful makes with the hashtags #FauraTopDress and  #paulinealicepatterns, I love seeing what you’ve been up to!
5 comments
7 FacebookTwitterPinterestEmail

It’s September! Back to school and to the office!

I hope you had a great summer and that you’re full of energy to start new sewing projects. We’ve been very studious at Pauline Alice HQ, working all summer on new patterns for Fall/Winter…

After releasing the Mirambell skirt and Lliria dress this summer, I wanted something easy and fast to make to start September nicely.

So let me introduce the Faura top and dress pattern!

The Faura pattern has front and back princess seams for a fitted bust and then flares just below. Cinched at the waist with D-rings details, it closes in the back with an eye and hook. View A is a blouse with hip length and short sleeves, while view B is a short sleeveless dress with a central pocket.

Perfect for a beginner, it’s easy and fast to make: in a few hours you’ll have a pretty blouse or dress.

This basic pattern, with its sixties details, will look ideal with denims or a casual jacket for an easy-going look perfect to ease back into September.

The Faura blouse and dress pattern is available as a PDF pattern here, with print-at-home and copyshop printing options. Once your order is complete, you’ll find it in your personal account for illimited downloads and it will also be sent to your email (remember to check your spams!).

For fabric, you have a very wide choice. We recommend light to medium weight fabrics such as cotton, linen, rayon, chambray, crepe or even a light wool for the start of winter… We’ve used a striped cotton for view A and a soft chambray for view B, both from the Valencia shop Bye Bye Manoni.

I’m looking forward to see what you have in mind for the Faura pattern! Don’t forget to share your projects with the hashtags #paulinealicepatterns and #FauraTopDress.

10 comments
6 FacebookTwitterPinterestEmail