
22.3K
 1. These are your 4 collar pieces: 2 undercollar (which will be attached to the rest of the shirt) and 2 uppercollar (which fold over the tie for example). You need to interface the 4 pieces.

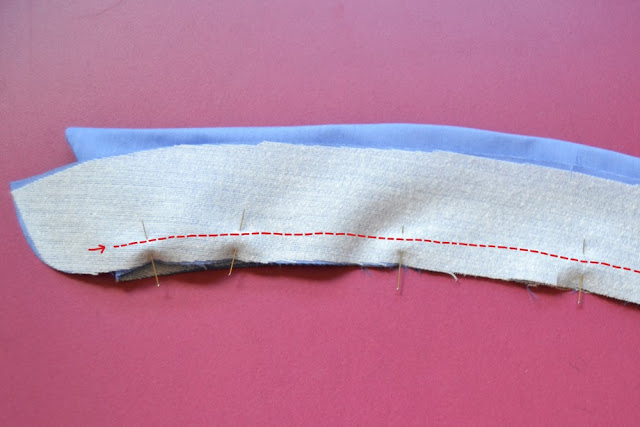
 5. Stitch the undercollar to the layer of uppercollar following the red line from mark to mark (they depend of your pattern, but they should be more or less where the red line start).
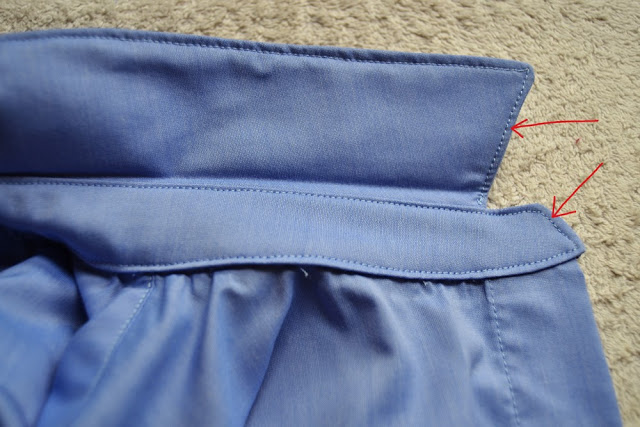
13. Matching the center and the extremities, pin the collar to the shirt. Stitch first the inside layer like you would for bias biding. Press the seam allowance toward the collar. Fold in the seam allowance of the other layer, pin and stitch with a topstitch very close to the edge (see the arrows). Continue the topstitching around the whole collar.

How about a little step by step today?
I thought I would take photos while sewing the classic men shirt I made for my boyfriend in order to explain some tricky steps.
I mean the first shirt I made, I was terrified of sewing a collar, sleeve plackets and cuffs. And at the end they were not so difficult to sew once you knew the important steps.
Here are the important steps to follow when sewing a classic shirt collar:
1. These are your 4 collar pieces: 2 undercollar (which will be attached to the rest of the shirt) and 2 uppercollar (which fold over the tie for example). You need to interface the 4 pieces.
2. Take the 2 uppercollar pieces and with right sides together, pin them together like on the picture. Set the stitch length to 2 or 2,5 for more strength. Stitch following the red line, pivoting at the corner. Cut the seam allowance close to the stitch line and cut the angles in bias.

3. Turn right side out and press flat. Be careful when turning the collar points!

4. Take your first undercollar piece and matching the center and marks, pin it to one layer of the uppercollar like on the picture. The collar stays open.
 5. Stitch the undercollar to the layer of uppercollar following the red line from mark to mark (they depend of your pattern, but they should be more or less where the red line start).
6. It’s not easy to locate the collar to stitch, so just a picture to show you.

7. Repeat the steps 4 and 5 for the other undercollar piece. Pin it to the other uppercollar layer and stitch.

8. This is what you have now: the undercollar and the uppercollar are joined together between the marks. The ends of the undercollar pieces are free.

9. From the mark, stitch the undercollar pieces together following the red line. Cut the seam allowances close to the stitching lines or clip the curve.

10. Turn right side out and press flat. Look how nice it looks already!

11. If we open it, this is how it looks. It is best to cut your seam allowances with different length to avoid markings on the outside of the fabric when pressing.

12. Almost done! Now take your shirt and baste around the neckline (sorry, my thread is very matchy, almost invisible. But there is a red arrow.). Clip around the neckline.
 13. Matching the center and the extremities, pin the collar to the shirt. Stitch first the inside layer like you would for bias biding. Press the seam allowance toward the collar. Fold in the seam allowance of the other layer, pin and stitch with a topstitch very close to the edge (see the arrows). Continue the topstitching around the whole collar.
This is it! I hope it was useful and I will be back very soon with the next step by step on sleeve cuffs with placket.
This week end, I’ll try to take pictures of the photographer with his new shirt 🙂
Have a nice end of the week.

15 comments
Thank you very much! Just today I'll be adding a collar to my shirt dress I've been making, very useful tutorial for me. *^v^*
(Burda's descriptions are not always clear…)
I know what you mean about Burda's directions! Sometimes they could be in japonese it would not be more difficult 🙂
I am happy it was helpful!
Thanks for the tutorial, it's very helpful!
Thanks Elise, I am happy it was useful. Did you use it on something you are sewing?
Te ha quedado perfecto! Nunca he utilizado entretela en la parte interior de la camisa. ¿Qué entretela utilizas? Por cierto, ¿dibujaste tú el cuello de ese patrón de Burda? ¿O utilizaste uno de otro patrón?
No sé si sigues el blog de Pam Enry Tiene unos tutoriales muy interesantes sobre camisas. Es su trabajo. http://off-the-cuff-style.blogspot.it/2012/10/perfect-collar-pointsa-shirtmakers.html
¡Gracias Silvia! Utilizo una entretela finita y muy fluida que me gusta mucho (no me gustan las rigidas): da algo de cuerpo pero deja movimiento a la tela. Me has pillado, he tenido que dibujar un cuello para la camisa, el patrón de Burda tiene sólo la tira del cuello.
No conozco Pam Enry pero me voy enseguida a ver estos tutoriales. Gracias por el consejo. Un besito guapa.
Gracias por el tutorial, me ha ayudado bastante!! un beso!
¡De nada guapa! Puede ser que viene tarde, no? Un besito Isa.
Me encanta. Sobre todo me encanta constatar que lo hago igual que tú. Que patrón has usado para la camisa de hombre? Tuyo propio?
Jaja! A mi tambien me gusta comprobar como lo hacen las otras costureras (y ver si coincidimos). El patrón no es mio, es la camisa 132 del Burda de julio 2012. Espero a las fotos (con modelo) para dar todas las explicaciones 🙂
Ohhh! Muchas gracias por el tutorial, me va a venir genial porque tengo en mente una camisa que precisamente lleva cuello jejeje. Besos!
http://modistilladepacotilla.blogspot.com
¡Me alegro! Tengo ganas de ver tu camisa…
Thank so much for doing this tutorial! I want to make my dad a shirt for christmas but have real trouble interpreting the instructions that come with the pattern so this is really useful.
I'm glad it was helpful. Your dad is very lucky 🙂
French tutorial !!! Just amazing !! Many thanks !!!
Very clear tutorial, I will use it for my next Bleuet ^^
Comments are closed.